
If your Dyson V7 not charging, you’re likely frustrated—especially when it dies mid-clean or won’t power on at all. You’re not alone. Thousands of users face the same issue after just a few years of use. The most common cause? A worn-out lithium-ion battery. But before you shell out hundreds for a new vacuum, it’s crucial to diagnose the real problem. This guide walks you through every possible fix—from simple troubleshooting to replacing the battery in under 10 minutes—for less than $30. You’ll learn how to interpret flashing lights, test your charger, clean critical components, and even install a new battery yourself.
Let’s get your Dyson V7 back up and running—fast and affordably.
Decode the Charging Light Signals
The LED indicator on your Dyson V7 is your first diagnostic tool. Each light pattern tells a story about what’s wrong.
Red Light Flashing 12+ Times = Dead Battery
When your Dyson V7 flashes red 12 or more times—whether plugged in or during use—it’s a clear sign the battery has failed. This isn’t a temporary glitch; it means the lithium-ion cells can no longer hold a charge. Multiple user reports and technical sources confirm this is Dyson’s built-in code for battery end-of-life.
What to do:
– Stop trying to charge it—this won’t revive the battery.
– Proceed directly to battery replacement.
– If the new battery shows the same issue, a deeper fault (like a failed power board) may be to blame.
No Lights When Plugged In? Check These First
If nothing lights up when you plug in your vacuum, don’t assume the battery is dead. This could be a simple power delivery issue.
Possible causes:
– Faulty charger
– Dead wall outlet
– Damaged charging port
– Severely drained battery (try charging for 15+ minutes)
Quick fixes:
– Test the outlet with a phone or lamp.
– Try a different Dyson charger—V6 models are compatible with the V7.
– Use a multimeter: the charger tip should read ~20V DC. Anything below 18V means the charger is failing.
Amber or Yellow Light On? Temperature Issue
An amber or yellow light means your Dyson V7 is outside safe charging temperatures. The vacuum automatically blocks charging to protect the battery.
Solution:
– Move it to a room between 50–86°F (10–30°C).
– Let it acclimate for 30 minutes.
– Avoid storing it in garages, basements, or direct sunlight—extreme heat or cold shortens battery life.
Red Light Flashes 10 or Fewer Times? Not a Battery Problem
Fewer than 12 flashes usually points to a motor fault, blockage, or circuit issue, not the battery.
Next steps:
– Check for obstructions in the hose, filter, or brush bar.
– Perform a reset (see below).
– Contact Dyson support if the problem continues.
Test and Replace the Charger
A failing charger is often overlooked—but it’s one of the easiest fixes.
Use a Multimeter to Test Charger Output
Even if the charger looks fine, internal damage can stop it from delivering power.
Steps:
1. Set your multimeter to DC voltage.
2. Insert the red probe into the charger’s metal tip.
3. Touch the black probe to the outer ring.
4. Read the display.
✅ Good: ~20 volts
❌ Replace if: Below 18 volts or no reading
Pro tip: A Dyson V6 charger works perfectly as a temporary test—many users confirm this swap fixed their “no charge” issue.
Try a Different Wall Outlet
Don’t underestimate this simple fix. Some outlets—especially GFCI types in kitchens or garages—can trip and cut power.
Do this now:
– Test the outlet with another device.
– Press the RESET button on GFCI outlets.
– Avoid extension cords or power strips during testing.
Clear Blockages That Prevent Charging
Your Dyson V7 has a safety shutdown system: if airflow is restricted, it may disable charging to protect the motor.
Common Blockage Points
- Brush head (hair wrapped around roller)
- Hose or wand (dust clumps)
- Front or rear filter (clogged debris)
- Cyclone or bin assembly (stuck dust)
How to Deep Clean Each Part
Brush Head:
1. Remove from vacuum.
2. Cut and pull out hair with scissors.
3. Spin the roller to ensure it moves freely.
Hose and Wand:
1. Detach completely.
2. Use a long brush or pipe cleaner.
3. Flush with warm water if needed—dry fully before reassembling.
Filters:
1. Remove front (pre-motor) and rear (HEPA) filters.
2. Rinse under cold water only—no soap.
3. Air dry for at least 24 hours.
Cyclone Assembly:
1. Take apart the bin and cone.
2. Wipe all surfaces with a dry cloth.
3. Ensure no dust is stuck in the air path.
⚠️ Never charge with a wet filter—moisture can damage internal electronics.
Reset the Power Management System
Sometimes, a simple reset clears temporary faults.
Trigger Hold Reset Trick
This 20-second trick has revived many “dead” Dyson V7s.
Steps:
1. Unplug the charger from the wall.
2. Reconnect it.
3. Attach the vacuum.
4. Press and hold the trigger (on button) for 20 seconds.
Why it works: It forces the internal circuitry to reboot—like restarting a frozen computer.
✅ Success stories: Users Bexy and SFKitKat confirmed this fixed their charging issues.
Pro tip: Try this after cleaning or before buying a new battery—it’s free and takes seconds.
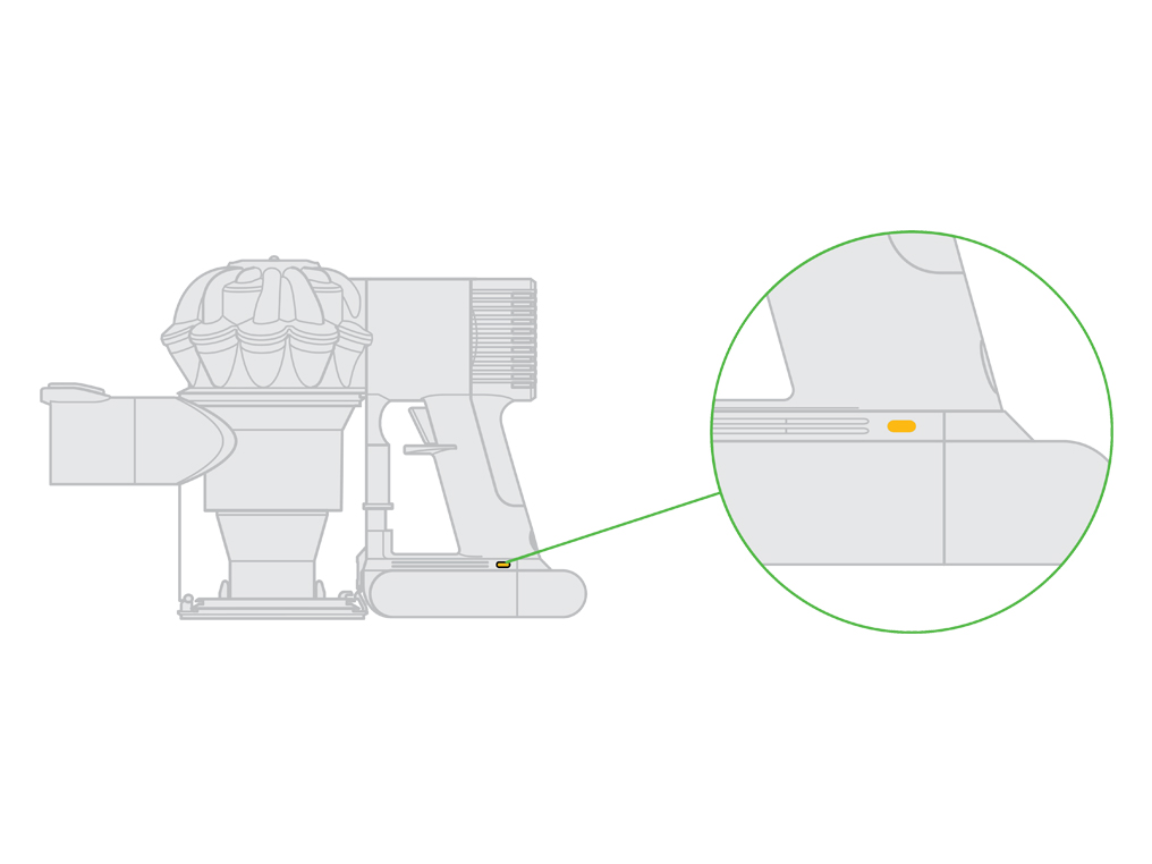
Clean the Battery Contact Points
Dust or corrosion on the battery terminals can block charging—even with a good battery.
How to Clean Contacts
- Remove the battery (see replacement steps below).
- Inspect the metal contacts on both the battery and vacuum.
- Gently wipe with a dry cotton swab or soft cloth.
- Avoid liquids, alcohol, or metal tools.
Reinstall and test:
– Plug in and wait 1–2 minutes.
– Look for a steady red or amber light.
✅ Real fix: User Karen solved her “no charge” issue just by cleaning the contacts—no replacement needed.
Replace the Battery Yourself
If you’ve:
– Confirmed the charger outputs ~20V
– Tried a different outlet
– Cleaned all components
– Counted 12+ red flashes
Then it’s time for a new battery.
OEM vs Third-Party: What to Choose?
| Option | Cost | Lifespan | Risk |
|---|---|---|---|
| Official Dyson Battery | $300–$400 | 2–3 years | High cost, warranty-safe |
| Third-Party Battery | $20–$26 | 1.5–2 years | Lower cost, verify specs |
💡 User tip: Search “Dyson SV11 battery” on Amazon or eBay—many are compatible with the V7 despite the model name.
Before buying, check:
– Voltage: Must be 14.4V
– Capacity: Look for ≥2200 mAh (original is 3000 mAh)
– Physical fit: Should snap in securely
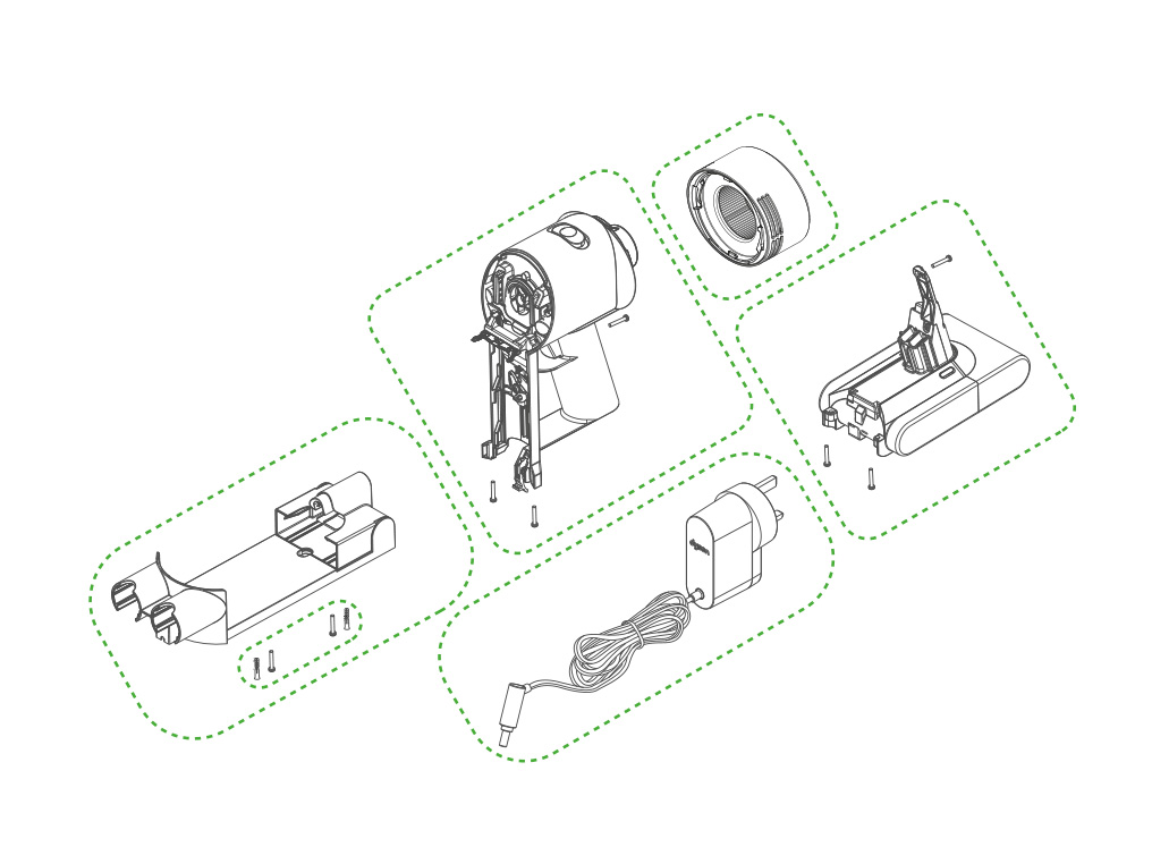
Install New Battery in 7 Steps
Tools You Need
- Precision Phillips screwdriver
- Small bowl for screws
- Replacement battery
Step-by-Step Installation
-
Power off and empty bin
Turn off the vacuum and remove the dust bin. -
Locate the two screws
– One on the bottom of the handle
– One visible through the canister access hole on the back -
Remove screws carefully
Use a precision screwdriver to avoid stripping. -
Gently pry open compartment
Slide a fingernail or plastic tool along the seam to pop it open. -
Slide out old battery
Pull straight out—no wires to disconnect. -
Insert new battery
Align and push until it clicks into place. -
Reattach screws and bin
Secure both screws and reassemble.
⏱️ Time: Most users finish in under 10 minutes.
Charge and Test
- Plug in for 4–6 hours.
- Look for:
- No flashing red light
- Full runtime on Max mode (~6–10 minutes)
- No sudden shutdowns
If problems continue, the power board or motor may be faulty—contact Dyson.
Prevent Future Charging Issues
Optimize Battery Life
Lithium-ion batteries degrade over time. Extend theirs with smart habits:
– Avoid deep discharges: Recharge after each use.
– Limit Max mode: Use Eco or Auto for daily cleaning.
– Store at room temperature: 64–82°F (18–28°C) is ideal.
– Don’t leave it drained: Charge if unused for weeks.
Follow This Cleaning Schedule
| Task | Frequency |
|---|---|
| Empty bin | After every use |
| Wash filters | Every 1–2 months |
| Clean brush bar | Weekly (or after pet use) |
| Deep clean hose/wand | Every 3 months |
| Inspect battery contacts | Annually |
✅ Bonus: A clean vacuum runs cooler, reducing strain on the battery.
When to Contact Dyson Support
Act If You’re Under Warranty
Dyson offers a 2-year warranty covering battery and parts. If your vacuum is within that window, contact support before buying anything.
Support numbers:
– US: 866-693-9766
– UK: 0800-298-0298
– CA: 1-877-397-6622
– AU: 1800 239 766
– Email (US): askdysonUS@dyson.com
Reach Out If:
- Battery replacement doesn’t fix the issue
- You see fewer than 12 red flashes (suggests motor fault)
- The charger is faulty and under warranty
🛑 Never open the battery pack—lithium-ion cells can catch fire if punctured.
Compare Repair vs Replacement Costs
| Option | Cost | Outcome |
|---|---|---|
| Third-party battery | $20–$26 | Full function restored, 90% savings |
| Official Dyson battery | $300–$400 | Genuine part, warranty support |
| New Dyson V7/V8 | $350–$500 | Most expensive, avoid if repairable |
💡 Smart move: Spend $26 to test a third-party battery. If it works, you’ve saved hundreds.
Final Note: Most Dyson V7 not charging issues stem from a dead battery or simple blockages. With a multimeter, a few minutes, and a $26 battery, you can restore full function—no technician needed. Start with cleaning and reset tricks, confirm charger output, then replace the battery if needed. By following this guide, you’ll extend your vacuum’s life and keep it running like new.


