Your kitchen sink suddenly stops draining during dinner prep, leaving you staring at a murky pool of dishwater while dinner burns on the stove. This frustrating scenario strikes 9 out of 10 homeowners at least once a year, but here’s the good news: 85% of kitchen sink drain not working issues can be resolved with basic tools and the right approach. Ignoring that standing water risks sewage backups and costly water damage, but panic won’t help. In this practical guide, you’ll learn exactly how to diagnose whether your clog lives in the P-trap, garbage disposal, or main line—and the precise steps to clear it yourself. No plumbing degree required.
Most homeowners waste time on ineffective chemical cleaners when simple mechanical solutions work faster. By following this sequence—starting with plunging before progressing to snaking—you’ll avoid common mistakes that push clogs deeper. You’ll also discover how to tell within 60 seconds whether your garbage disposal is jammed or dead, and when it’s time to call a professional. Let’s get your sink flowing freely again before that spaghetti turns to mush.
Essential Tools for Unclogging a Kitchen Sink Drain

Gather these specific tools before starting to avoid mid-repair frustration and ensure safety. A standard sink plunger with a flat rim (not the bell-shaped toilet version) creates the necessary seal for sink drains. For deeper clogs, a 25-foot hand-crank drain snake with a corkscrew tip hooks hair and food debris effectively—you’ll know it’s working when you feel resistance followed by a “clunk” as the clog breaks free.
Bring these critical items to your work area:
* Adjustable wrench (size matters—10-inch handles provide best torque for slip nuts)
* 5-gallon bucket (standard kitchen bowls won’t hold P-trap water volume)
* Microfiber towels (absorbs 3x more water than cotton for quick cleanup)
* Rubber gloves rated for grease (food waste contains bacteria like E. coli)
* Flashlight with magnetic base (sticks to pipes for hands-free inspection)
Skip chemical drain cleaners—they corrode metal pipes over time and often fail on grease clogs. The $15 drain snake pays for itself after one use by preventing emergency plumber calls.
Diagnose Your Kitchen Sink Drain Blockage Location
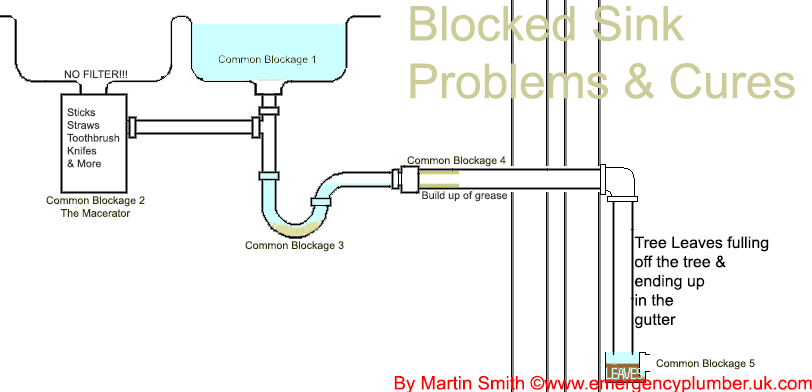
Don’t grab tools blindly—pinpointing the clog location saves 30 minutes of unnecessary disassembly. Start with this critical test: Run water in your other kitchen sink. If both sinks drain slowly, the blockage lives in your main kitchen drain line downstream of the branch pipes. If only one sink backs up, focus your efforts there.
How to Tell If the Garbage Disposal Is Causing the Clog
Listen carefully when flipping the disposal switch. A loud humming or buzzing sound with no grinding means the flywheel is jammed by a fork or avocado pit. If you hear a faint click but no motor sound, the unit likely has a burnt-out motor. Never insert hands—unplug the unit first, then insert the hex key into the bottom-center socket. Rotate back and forth until you feel the impellers free (you’ll hear a distinct “clunk”). Press the red reset button, restore power, and test with cold water running.
Why Multiple Slow Drains Point to a Main Line Problem
When your washing machine drain overflows during a sink backup or toilets gurgle when running the dishwasher, you’ve got a main sewer line clog. This isn’t your typical DIY fix—root intrusions or collapsed pipes require professional hydrojetting. Don’t waste time snaking individual sinks; call a plumber immediately to prevent raw sewage backup in bathtubs or floor drains.
Recognizing Vent Stack Issues from Gurgling Sounds
That unsettling gurgle isn’t just annoying—it’s a warning sign. When air gets sucked through your P-trap during draining, it indicates a blocked vent stack on your roof. Bird nests or ice dams are common culprits. While you can try flushing the vent with a garden hose from the roof, persistent gurgling requires a plumber to install an air admittance valve (AAV) under your sink—a code-compliant fix that takes 20 minutes.
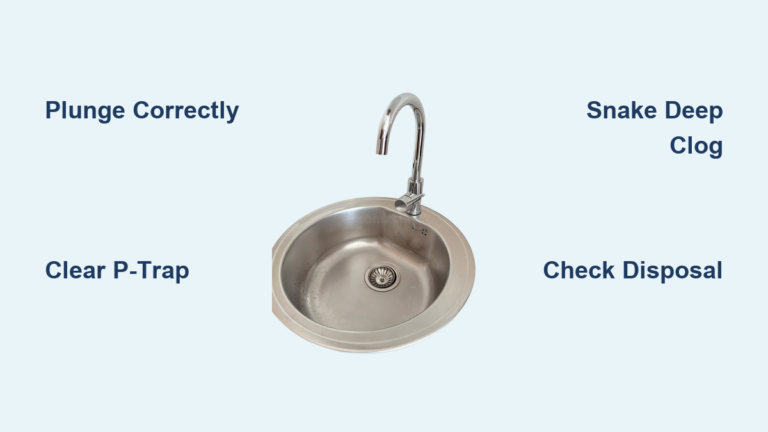
Unclog Your Kitchen Sink in 3 Proven Steps
Follow this sequence exactly—skipping steps often turns simple clogs into emergencies. Always work with power off for disposal-related issues and wear eye protection during mechanical clearing.
Step 1: Plunge Your Sink Correctly for Maximum Suction
Most failed plunging attempts stem from poor technique. For double sinks, stuff a wet rag into the non-clogged drain to force pressure through the blockage. Fill the clogged basin with 2-3 inches of water (enough to cover the plunger cup). Press the plunger straight down to create an airtight seal, then use sharp, forceful strokes—15 rapid pumps over 20 seconds. The key is maintaining seal integrity; if water splashes out, reposition and restart. You’ll know it’s working when water suddenly gurgles down.
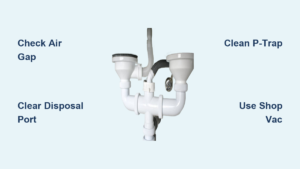
Step 2: Clear the P-Trap Without Messing Up Your Cabinet
Place your bucket directly under the P-trap’s lowest curve. Loosen slip nuts by hand first—only use your wrench for the final quarter-turn to avoid cracking plastic. As you separate the trap, expect 1-2 cups of smelly water to drain immediately. Use needle-nose pliers to pull out hair and food clumps from the curved pipe section. Check the wall outlet pipe for obstructions with your flashlight—many clogs lodge right where the P-trap connects. Reassemble with slip nuts hand-tightened, then give a quarter-turn with the wrench. Test with running water before declaring victory.
Step 3: Snake the Drain to Remove Deep Blockages
Feed the snake’s tip into the drain opening until you feel resistance at the clog location. Crank slowly while applying gentle forward pressure—rushing breaks the cable. When the snake penetrates the clog, you’ll feel sudden give. Rotate clockwise while retracting to hook debris. For disposal clogs, snake through the disposal’s drain outlet (not the top) with power disconnected. Repeat 2-3 times until water flows freely. Flush with hot water for 60 seconds to wash away remnants.
Fixing a Jammed or Clogged Garbage Disposal
Disposal issues cause 40% of kitchen sink drain not working cases. Never assume it’s “just a clog”—misdiagnosis leads to electrocution risks.
How to Manually Unjam a Humming Disposal in 60 Seconds
The critical first step: Turn off power at the circuit breaker (not just the wall switch). Confirm power is off by testing the unit. Insert a 1/4-inch hex key into the bottom-center socket and rotate back and forth vigorously. You’ll feel the flywheel break free when resistance suddenly drops. Remove any visible obstructions with tongs—never fingers. Press the reset button, restore power, and run cold water while restarting. If it hums again, repeat the process; three jams in quick succession indicate motor damage.
When Your Disposal Motor Is Dead: Signs and Solutions
A complete lack of sound or faint clicking when activated signals motor failure. Check for tripped GFCI outlets under the sink first—this solves 25% of “dead” disposals. If power is confirmed, the motor likely burned out from chronic jamming. Replacement is safer than repair: New units cost $80-$200 and install in 30 minutes with basic tools. During installation, seal connections with plumber’s tape to prevent leaks—a common oversight causing water damage.
When to Stop DIY and Call a Professional Plumber
Knowing your limits prevents $500 water damage repairs. Call a licensed plumber immediately if you encounter any of these red flags:
- Sewage smell from multiple drains (indicates main line rupture)
- Water backing up into floor drains or showers (serious sewer line clog)
- Gurgling toilets during sink use (blocked vent stack requiring roof access)
- Snaking 25+ feet without clearing the clog (likely root intrusion in main line)
Professionals use camera inspections to pinpoint issues like collapsed pipes or root masses—problems that worsen if ignored. Their motorized augers clear blockages 50 feet deep, and hydrojetting removes decades of grease buildup in minutes. For main line clogs, the $150-$300 service call beats $1,500 in flood damage.
Prevent Future Kitchen Sink Drain Clogs With These Habits
The average homeowner spends 3 hours yearly dealing with clogs—time you’ll save with these science-backed prevention tactics.
The 2-Step Monthly Drain Maintenance Routine
Once a month, pour ½ cup baking soda followed by ½ cup white vinegar down the drain. The fizzing reaction breaks down grease and organic matter. After 15 minutes, flush with 4 cups of boiling water. This dissolves soap scum and prevents biofilm buildup—the slimy layer that traps debris. For disposals, freeze vinegar in ice cube trays and run 5 cubes weekly to clean blades.
What Never to Put Down Your Sink
Avoid these top clog-causers even with a disposal:
* Grease and oil (solidifies in pipes like concrete)
* Coffee grounds (accumulates like sand in traps)
* Eggshells (membranes wrap around impellers)
* Starchy foods (potato peels expand into paste)
* Fibrous vegetables (celery strings tangle blades)
Always use a fine-mesh strainer—it catches 90% of problem debris. When cooking, pour grease into an old can and dispose of it in the trash once solidified. These small habits save hundreds in emergency plumbing calls annually.
A kitchen sink drain not working situation doesn’t have to ruin your day. By methodically diagnosing the clog location, using the right tools in sequence, and respecting your limitations, you’ll solve most blockages in under 30 minutes. Remember: When water stands still, start with plunging before progressing to snaking, and never ignore systemic signs like gurgling toilets. Implement the monthly maintenance routine to keep your drains flowing freely for years. If you hit a wall with deep clogs or sewage backups, calling a professional isn’t defeat—it’s smart prevention of catastrophic damage. Your sink’s smooth operation starts with these actionable steps.