
Is your Shark Navigator vacuum losing suction power? A dirty or clogged filter could be the culprit. Replacing your vacuum’s filter is an essential part of regular maintenance, ensuring optimal performance and prolonging the life of your machine. This guide provides a comprehensive walkthrough on how to replace the filter in your Shark Navigator, keeping your home clean and your vacuum running smoothly.
Types of Filters in a Shark Navigator
Before you start, it’s important to know the types of filters your Shark Navigator uses. Most models have two main filter types:
- Pre-Motor Filters: These filters, usually a foam and felt set, are located near the dust cup and protect the motor from dust and debris.
- HEPA Filter (Post-Motor Filter): The High-Efficiency Particulate Air (HEPA) filter is typically located near the motor and captures fine particles like allergens and pollutants, ensuring cleaner air emission.
Tools/Materials You’ll Need
- New replacement filters (ensure they are compatible with your specific Shark Navigator model)
Step-by-Step Guide to Replacing Your Shark Navigator Filter
Follow these steps to replace your Shark Navigator filter:
- Power Off and Unplug: Always turn off and unplug your Shark Navigator vacuum before performing any maintenance to prevent electric shock[1, 6, 13].
- Locate the Dust Cup: The dust cup is usually located at the front of the vacuum [1, 5].
- Remove the Dust Cup: Press the release button(s) to detach the dust cup from the vacuum body [1, 2, 5]. The release mechanism may vary slightly depending on your specific model.
- Access the Pre-Motor Filters:
- With the dust cup removed, you’ll see the pre-motor filters (foam and felt) sitting either above or below the dust cup compartment [1, 2, 5].
- Lift out the foam filter, and then remove the felt filter underneath it [1, 2].
- Replace the Pre-Motor Filters:
- Place the new felt filter into the compartment first, ensuring it sits flat and covers the base evenly.
- Next, position the new foam filter directly on top of the felt filter, making sure both are properly aligned.
- Ensure both filters are securely seated and aligned within the filter compartment before closing it..
- Over time, filters lose their effectiveness and need replacement to keep your vacuum performing like new.
Shop Authentic Shark Pre-Motor Filter Replacements for a perfect fit and maximum cleaning power!
- Locate the HEPA Filter:
- The HEPA filter is usually located on the front of the vacuum or behind a grill [1, 2, 11, 21].
- Release the filter door or grill by pressing the release tab or button [1, 2].
- Pull out the old HEPA filter [1, 2].
- Replace the HEPA Filter:
- Place the new HEPA filter into the designated compartment, ensuring it fits snugly and securely.
- Carefully close the filter door or reattach the grill, making sure it clicks firmly into place.
- A fresh HEPA filter helps trap dust, allergens, and fine particles, keeping your home cleaner and your air fresher.
Shop Genuine Shark HEPA Filters for a perfect fit and peak performance!
- Reassemble the Vacuum:
- Reattach the dust cup to the vacuum body, aligning it correctly and pressing until it locks into place [1, 2, 5].
- Check Filter Placement: Ensure all filters and the dust cup are correctly installed before using the vacuum [5, 13].
How Often Should You Replace Your Shark Navigator Filters?
To maintain optimal performance, replace your Shark Navigator filters regularly [5, 7, 13]. Here’s a general guideline:
- Pre-Motor Filters (Foam and Felt): Every 3 months, or more often if you notice reduced suction [1, 2, 8].
- HEPA Filter: Once a year, or as needed based on usage and air quality [1, 2, 8].
Note: Check your Shark Navigator’s user manual for specific replacement recommendations for your model [5, 13].
Practical Elements

Preparation Steps
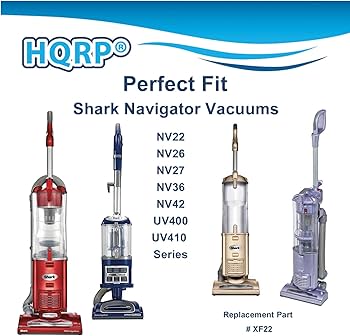
- Identify Your Shark Navigator Model: Locate the model number on your vacuum cleaner. This will help you purchase the correct replacement filters [3].
- Purchase the Correct Filters: Buy replacement filters specifically designed for your Shark Navigator model. Using the wrong filters can damage your vacuum or reduce its effectiveness [10, 12, 17, 19].
- Read the User Manual: Familiarize yourself with the filter replacement instructions in your Shark Navigator’s user manual [5, 13].
Troubleshooting Guide
- Reduced Suction After Filter Replacement:
- Problem: Vacuum suction remains weak even after replacing the filters.
- Solution: Check for clogs in the hose, wand, or floor nozzle [6, 13]. Clear any obstructions that may be restricting airflow [6, 13].
- Filter Compartment is Difficult to Open:
- Problem: The filter door or grill is hard to open.
- Solution: Ensure you’re pressing the correct release button or tab [1, 2]. Refer to your user manual for the exact location and mechanism [5, 13].
- HEPA Filter Doesn’t Fit Properly:
- Problem: The new HEPA filter seems too big or too small for the compartment.
- Solution: Double-check that you purchased the correct HEPA filter for your specific Shark Navigator model [10, 12, 17, 19].
- Vacuum Overheats After Filter Replacement:
- Problem: The vacuum turns off on its own after a few minutes of use.
- Solution: Clean the filters to remove any excess dirt, and check for blockages in the vacuum [6, 13]. Allow the vacuum to cool down for at least 60 minutes before restarting [6, 13].
- Unusual Noises After Filter Replacement:
- Problem: The vacuum makes loud or strange noises after replacing the filters.
- Solution: Ensure all filters and components are securely attached [16]. Check for any damaged parts that may need replacing [16].
Pro Tips
- Wash Filters Regularly: In between replacements, wash the foam and felt filters every 1-3 months to maintain suction power [1, 2, 8]. Rinse them with cold water only and let them air dry completely for at least 24 hours before reinstalling [1, 2, 4, 5].
- Tap Clean the HEPA Filter: Gently tap the HEPA filter over a trash can to remove loose dust and debris between replacements [4]. Do not wash the HEPA filter unless specified in your user manual [4].
- Keep Spare Filters on Hand: Always have a spare set of filters so you can replace them immediately when needed [11].
- Inspect Filters Regularly: Check your filters monthly for signs of excessive dirt or damage [6, 13]. Replace them more frequently if you have pets or allergies [7].
Alternatives/Variations
- Using Aftermarket Filters: While Shark-branded filters are recommended, aftermarket filters designed to fit your specific model can be a cost-effective alternative [17, 19]. Ensure they meet HEPA standards for optimal filtration [10].
- Professional Cleaning Services: If you’re not comfortable replacing the filters yourself, consider having a professional vacuum cleaner service handle it [16].
FAQ Section
How do I know when to replace my Shark Navigator filters?
Reduced suction power, visible dirt buildup on the filters, or a musty odor coming from the vacuum are all signs that it’s time to replace your filters [6, 7, 13].
Can I wash my Shark Navigator HEPA filter?
Check your user manual, but generally, it’s recommended to only gently tap the HEPA filter to clean it [4, 5, 13]. Washing it may damage its filtration capabilities [4]. Foam and felt filters can be washed [1, 2, 4, 5].
Where can I buy replacement filters for my Shark Navigator?
You can purchase replacement filters from the SharkClean website, appliance stores, or online retailers like Amazon [1, 2, 11, 15, 19].
Are generic filters as good as Shark-branded filters?
Generic filters can be a more affordable option, but ensure they are designed to fit your specific Shark Navigator model and meet HEPA standards for adequate filtration [17, 19].
What happens if I don’t replace my vacuum filters regularly?
Failing to replace your filters can lead to reduced suction power, motor overheating, and decreased air quality [6, 7, 13]. It can also shorten the lifespan of your vacuum cleaner [7].
How do I find the correct replacement filters for my Shark Navigator model?
Refer to your vacuum’s user manual or the SharkClean website to identify the correct filter part numbers for your specific model [5, 13, 14].
Tips, Warnings, and Best Practices
- Safety First: Always unplug the vacuum before performing any maintenance [1, 6, 13].
- Use Cold Water Only: When washing the foam and felt filters, use cold water only [1, 2, 4, 5]. Avoid using soap or detergents, as they can damage the filters [4].
- Air Dry Completely: Ensure the filters are completely dry before reinstalling them to prevent motor damage and mold growth [1, 2, 4, 5, 13].
- Don’t Over-Wash: While washing the foam and felt filters is beneficial, excessive washing can degrade the material. Replace them as recommended in your user manual [5, 13].
- Check for Blockages: Regularly check for and clear any blockages in the hose, wand, and floor nozzle to maintain optimal suction [6, 13].
Conclusion
Replacing the filters in your Shark Navigator vacuum is a simple yet crucial task that ensures its longevity and performance. By following this comprehensive guide, you can easily maintain your vacuum and enjoy a cleaner, healthier home. Remember to replace your filters regularly, keep spare filters on hand, and adhere to safety precautions. Take the next step and ensure your Shark Navigator continues to deliver exceptional cleaning power.
yet crucial task that ensures its longevity and performance. By following this comprehensive guide, you can easily maintain your vacuum and enjoy a cleaner, healthier home. Remember to replace your filters regularly, keep spare filters on hand, and adhere to safety precautions. Take the next step and ensure your Shark Navigator continues to deliver exceptional cleaning power.


