

Your kitchen floor bears the brunt of daily life—spilled coffee, heavy appliances, and constant foot traffic inevitably cause damage. When scratches mar your hardwood, tiles crack near the sink, or squeaks echo with every step, knowing how to repair kitchen floor issues saves costly professional fees and extends your floor’s lifespan. This guide delivers actionable solutions for common problems across all flooring types, backed by proven techniques that restore both function and appearance. You’ll gain confidence to tackle repairs from minor scuffs to subfloor issues, avoiding unnecessary replacements while protecting your home’s value.
How to Diagnose Kitchen Floor Damage Before Repairing
Pinpointing the exact problem prevents wasted effort and ensures lasting repairs. Start by identifying your flooring type—vinyl, laminate, tile, or hardwood—since each requires specific fixes. For water-prone areas near sinks or dishwashers, check for soft spots or discoloration indicating moisture damage beneath the surface. Walk slowly across the entire floor barefoot to locate squeaks, then press down firmly to determine if the noise comes from loose subflooring or surface layers. Use a flashlight at a low angle to reveal hidden scratches or gaps between planks. Most critical: trace damage to its source. A cracked tile often stems from shifted subflooring, not just surface impact. Ignoring underlying issues like water leaks guarantees repeat repairs.
Why Your Kitchen Floor Squeaks: Subfloor vs. Surface Fixes
Squeaks typically originate from three sources: loose subfloor-to-joist connections, shifting underlayment, or expanding surface planks. Test by standing over the squeak and wiggling your foot—if the sound persists, the subfloor has separated from joists below. For floating floors like vinyl or laminate, squeaks often mean planks aren’t properly locked. Hardwood squeaks usually indicate nails working loose from seasonal wood movement. Never assume surface-level fixes will solve subfloor problems; forcing down a squeaky plank without addressing joist separation only worsens damage.
Your Essential Kitchen Floor Repair Toolkit

Skip generic “repair kits” and gather these targeted tools for real results. For hardwood or laminate, you need a 4-foot level (to spot uneven subfloors), rubber mallet (for plank realignment without damage), and color-matched putty sticks (for instant scratch concealment). Tile repairs demand a grout saw (to cleanly remove old grout) and notched trowel (for precise mortar application). Vinyl plank fixes require a heat gun (to soften adhesive) and tapping block (to secure new planks without chipping edges). Always include safety glasses and knee pads—floors are unforgiving work surfaces. Pro tip: Match replacement materials before starting; flooring batches vary, making exact color matches impossible later.
Fix Minor Kitchen Floor Scratches and Gouges in 3 Steps
Don’t replace entire sections for surface damage. Hardwood repairs take 20 minutes: First, clean the scratch with mineral spirits. Apply wood filler matching your floor’s undertone (not just surface color), pressing firmly into the groove. Once dry, sand only the filled area with 220-grit paper until flush, then apply a tiny drop of matching stain with a toothpick. Feather edges outward to avoid dark spots. For laminate, use a wax-based repair crayon—press hard to deposit material into the scratch, then buff with a soft cloth. Tile chips need porcelain touch-up paint applied with a pinhead-sized brush; let dry 24 hours before sealing with grout sealer. Avoid “quick-fix” markers—they fade within weeks.
Why Laminate Scratches Won’t Heal Like Hardwood
Laminate’s photo-printed layer means deep scratches expose the core board, making true repair impossible. Focus on camouflage: For narrow scratches, melt a matching putty stick with a hairdryer, then wipe excess before it hardens. Wider gouges require epoxy fillers tinted to your floor’s color—mix in small batches to prevent premature curing. Never sand laminate; you’ll destroy the wear layer. Prevention tip: Apply felt pads under chair legs before scratches occur—they cost pennies but prevent hundreds in repairs.
Replace Damaged Vinyl Planks Without Removing Adjacent Tiles
Vinyl’s click-lock system allows single-plank replacement when done correctly. Start by removing baseboard molding with a pry bar and scrap wood (to avoid wall damage). Locate the damaged plank’s “unlocking” edge—usually the short end opposite the tongue. Insert a putty knife at a 45-degree angle where planks connect, then gently twist to disengage the locking mechanism. Work slowly toward the center; forcing it cracks neighboring planks. Lift the damaged section straight up—no sideways wiggling. For the replacement, angle the new plank’s tongue into the groove of the adjacent row, then lower and click the short end. Tap only with a rubber mallet on a scrap plank to distribute force. Reinstall baseboards with 18-gauge brad nails for invisible fixes.
How to Replace a Cracked Kitchen Tile Without Ruining Neighbors
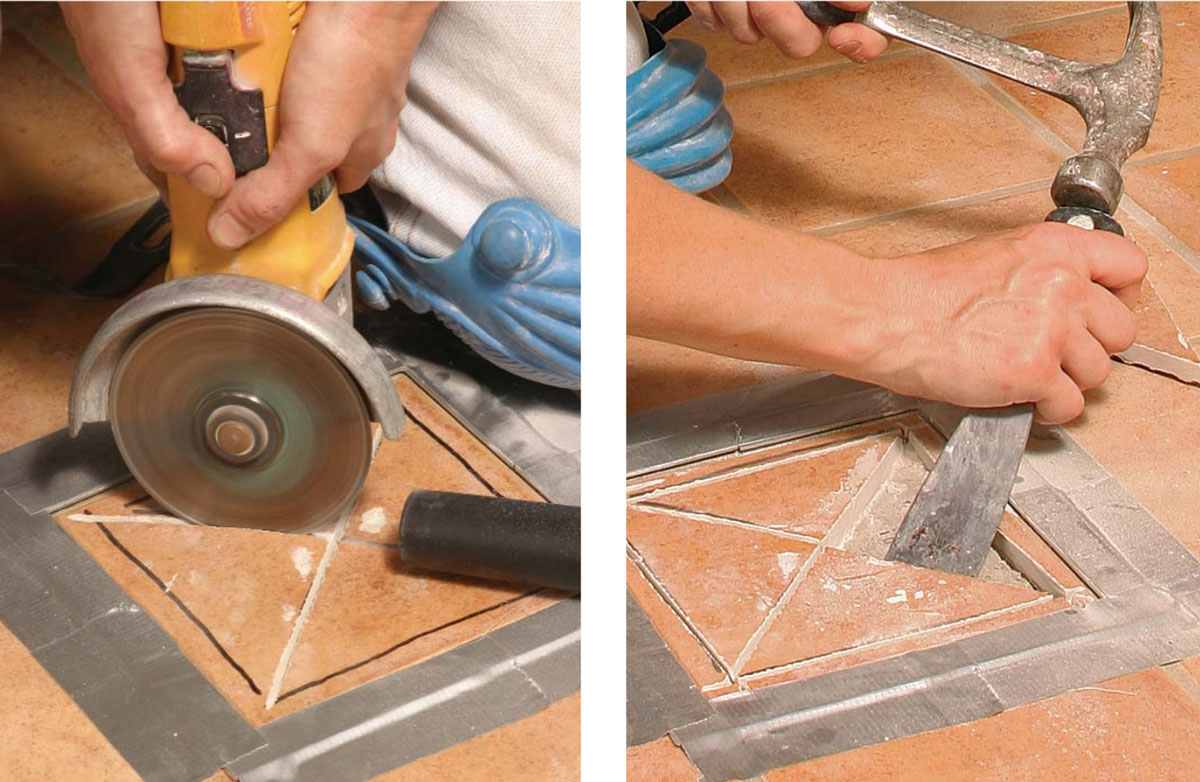
Removing tiles risks damaging adjacent ones. First, cut all grout lines around the damaged tile with a oscillating tool (set to 1/8″ depth). Place masking tape in a cross pattern over the tile to contain shards. Using a cold chisel and hammer, tap the tile’s center until it fractures into small pieces—never strike edges. Remove debris with needle-nose pliers, then scrape old mortar with a grout scraper. Apply fresh thin-set mortar with a notched trowel, creating “combs” for adhesion. Press the new tile into place, twisting slightly to ensure full contact. Insert spacers, then let cure 24 hours before grouting. Critical: Buy extra tiles—kitchens often have unique patterns.
Stop Squeaky Kitchen Floors: 2 Proven Fixes for Subfloor and Underlayment
Squeaks under appliances or high-traffic zones demand structural solutions. For accessible subfloors (from a basement), locate the joist under the squeak by tapping from below while someone walks above. Clamp a 2×4 cleat between the joist and subfloor, then secure with construction adhesive and 3-inch deck screws. The cleat must span the entire gap—partial fixes fail within months. For floors without basement access, drill a pilot hole through the flooring into the joist, then drive a 2.5-inch screw with the head countersunk 1/16″ below the surface. Fill the hole with matching wood putty. Never use nails—they loosen again.
Why Screws Beat Nails for Permanent Squeak Fixes
Nails slide in wood’s grain as humidity changes, causing recurring squeaks. Deck screws’ coarse threads grip wood fibers tightly, resisting seasonal movement. Use collated screws for speed—they feed directly from a drill. Countersink screws slightly below the surface to avoid tripping hazards, then fill holes with color-matched putty. For tile or vinyl floors, drill pilot holes through grout lines to hide repairs.
Level an Uneven Kitchen Subfloor in 4 Steps for Flawless New Flooring
Dips near doorways or humps from shifted plywood ruin new installations. First, clean all debris with a shop vacuum—dust prevents adhesion. Mix self-leveling compound to a pancake-batter consistency (follow bag instructions; too thick won’t flow). Pour from the lowest point, using a trowel to guide the compound toward high spots—it naturally flows to fill voids. Work quickly; most compounds set in 20 minutes. Check levelness with a 4-foot straightedge as it dries. Never walk on it for 4 hours. For severe slopes (>1/2″), apply in 1/4″ layers with 24-hour drying between coats.
Seal and Protect Your Repaired Kitchen Floor: Critical Final Steps
Skipping sealing guarantees future damage. For tile repairs, wait 72 hours after grouting before applying penetrating sealer—this prevents moisture absorption that causes mold and discoloration. Apply with a microfiber cloth, wiping excess immediately to avoid hazy residue. Hardwood repairs need 2 light coats of water-based polyurethane brushed with the grain, sanding lightly between coats. Laminate and vinyl require seam sealing: Apply clear vinyl adhesive to replacement plank edges with a toothpick, then wipe excess before it dries to prevent sticky buildup. Always do a final “water test”—sprinkle drops on the repair; if they bead up, sealing succeeded. If absorbed, reapply.
Why Grout Sealing Fails Without Proper Curing
Applying sealer too soon traps moisture in grout, causing cloudiness and premature cracking. Cure times vary: Cement-based grout needs 72 hours, epoxy grout 24. Test by pressing your thumb on the grout—if no indentation remains, it’s ready. Use silicone-based sealers in wet zones (near sinks); they resist mold better than acrylic. Reapply every 2 years for lasting protection.
Final Note: Mastering kitchen floor repairs starts with precise diagnosis and ends with proper sealing. Focus on fixing root causes—not just symptoms—to avoid repeat work. For water damage near appliances, always check for leaks first; ignoring this invites mold growth under your floor. When in doubt about structural issues like sagging subfloors, consult a professional—safety trumps DIY savings. Maintain your investment with monthly checks: Look for new scratches, test for squeaks, and reseal grout lines annually. With these techniques, your kitchen floor will withstand daily chaos while keeping your home’s value intact.


