

Your kitchen counter has seen better days—stains won’t come out, edges are chipped, and that awkward gap between the sink and countertop is collecting crumbs. If you’re wondering how to make a kitchen counter that transforms your cooking space without breaking the bank, you’re in the right place. This guide cuts through the confusion to give you actionable steps for creating a countertop that looks professionally installed but costs far less. Whether you’re a weekend warrior with basic tools or an intermediate woodworker ready for a challenge, you’ll discover exactly which materials work for your skill level and budget, avoiding costly mistakes that could ruin your project before it even begins.
Most homeowners mistakenly think building a kitchen counter requires professional fabrication equipment, but the reality is quite different. With proper planning and the right techniques, you can create a stunning countertop that becomes the centerpiece of your kitchen. This guide focuses on practical, achievable methods rather than theoretical possibilities, so you’ll know exactly what to expect at each stage—from precise measurements that prevent expensive errors to finishing techniques that make your DIY project look custom-installed. Let’s transform that worn-out workspace into a kitchen counter you’ll be proud to show off.
Precision Measurement Techniques That Prevent Costly Mistakes
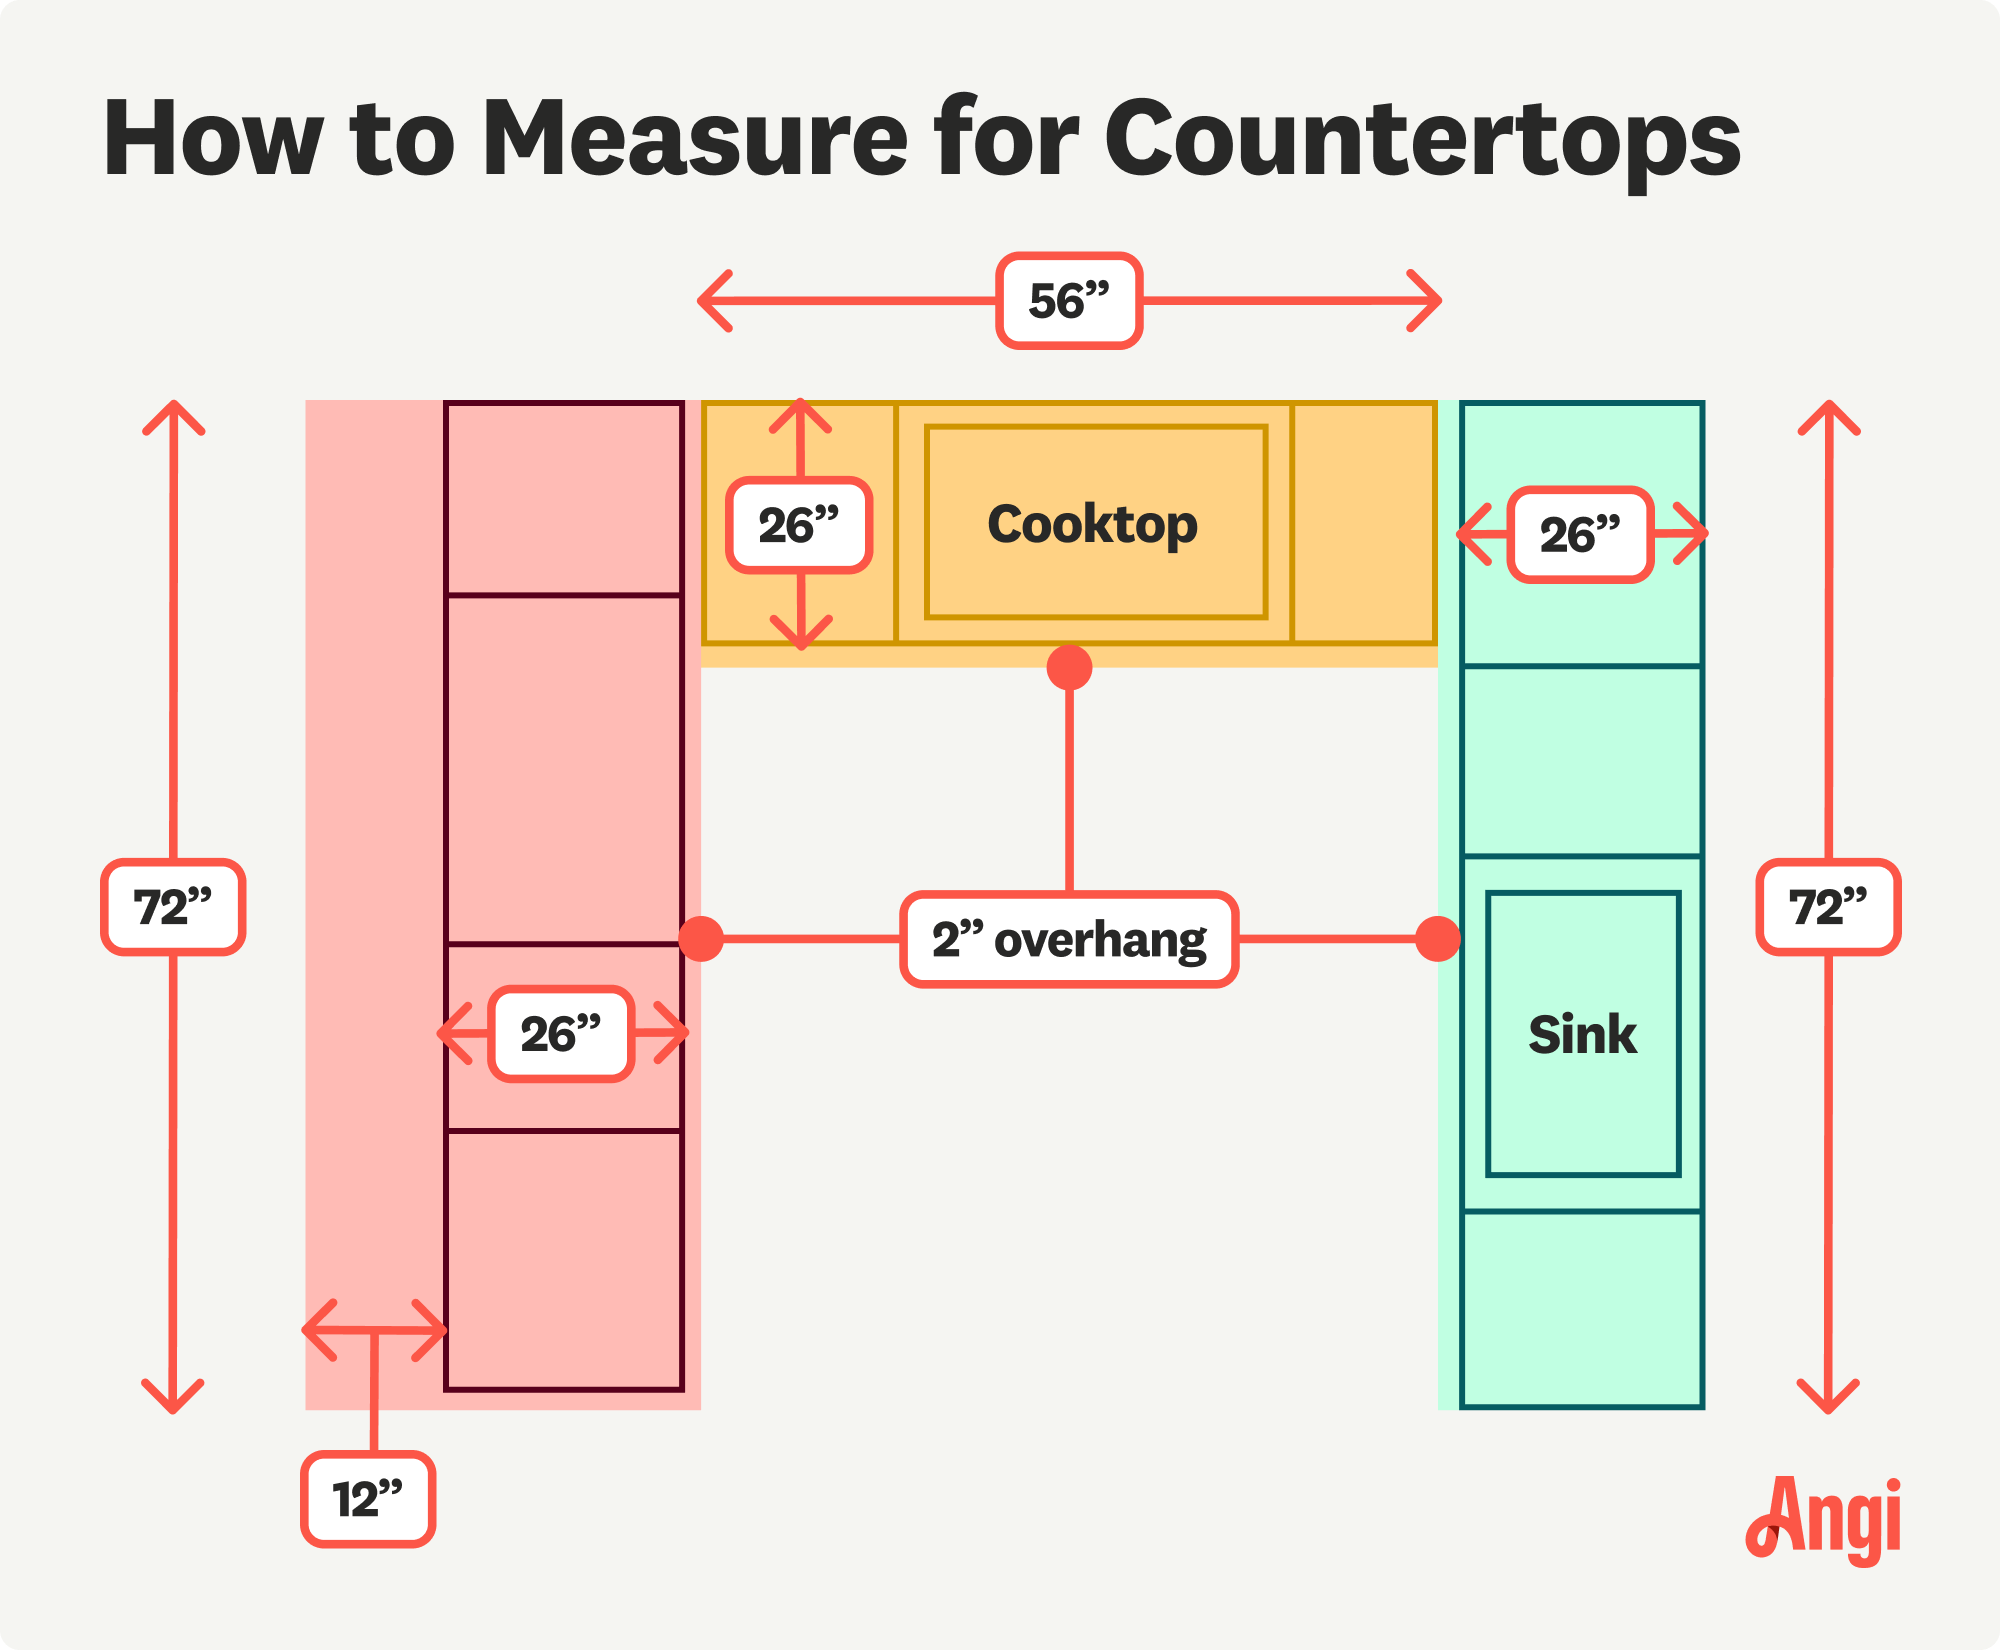
Accurate measurements make or break your kitchen counter project—you’ll waste hundreds on materials if you skip this critical step. Start by creating a detailed sketch of your kitchen layout with all cabinet runs, noting where walls aren’t perfectly square. Measure each section twice: first the length along the cabinet fronts, then the depth from wall to front edge, accounting for any obstructions like windows or appliances. Remember to add the standard 1-1.5 inch overhang beyond the cabinet fronts for comfortable seating and protection.
Creating a Foolproof Countertop Template
Professional installers never skip the template stage, and neither should you. For DIY projects, use 1/4-inch plywood or heavy cardboard to create a full-size pattern of your counter shape. Cut strips to match your counter width, then assemble them on the cabinet boxes with masking tape. Trace the exact wall contours onto your template material, marking all sink and cooktop locations with precise dimensions from manufacturer specifications. This template becomes your master guide for cutting—test it multiple times before transferring measurements to your actual countertop material.
Sink Cutout Measurement Secrets
Most DIYers ruin countertops at the sink cutout stage by measuring from the top surface. Instead, measure from the bottom of your countertop material for accuracy. For under-mount sinks, the cutout must be 1/8 inch smaller than the sink rim to create a tight seal. Transfer the sink template to your countertop’s underside using a pencil, then drill 3/8-inch starter holes at each corner before cutting with a jigsaw. A down-cutting blade prevents splintering on the visible surface. Always double-check measurements against your physical sink before cutting—this single step saves more failed projects than any other.
Laminate vs. Butcher Block vs. Concrete: Choosing Your DIY Countertop Material

Installing Laminate Countertops Without Bubbles or Gaps
Laminate offers the easiest DIY countertop solution with professional results when you follow these steps. Start with a stable 3/4-inch plywood substrate—never particleboard for kitchen counters due to moisture concerns. Apply high-quality contact cement to both surfaces using a 3/8-inch nap roller, let it dry until tacky (about 15 minutes), then carefully position the laminate sheet. Work from the center outward with a J-roller, applying firm pressure to eliminate air pockets. Trim excess with a router and flush-trim bit, then apply matching edge banding with contact cement before sanding smooth.
Common mistake to avoid: Rushing the contact cement drying time causes weak bonds that bubble later. Wait until the cement is no longer wet but still sticky to the touch—test by lightly touching your fingertip to the surface; it should lift cleanly without residue.
Butcher Block Countertop Installation: Avoiding Warping and Cracks
Prefabricated butcher block countertops deliver warmth and durability with manageable DIY installation. Before cutting, seal all six sides with food-safe mineral oil or Rubio Monocoat to prevent moisture absorption. When making sink cutouts, drill starter holes inside the marked area and use a fine-tooth jigsaw blade moving slowly to avoid splintering. After cutting, immediately reseal all exposed edges with multiple oil coats. For seams between sections, use waterproof Titebond III glue with pipe clamps and cauls to maintain flatness—wipe excess glue immediately with a damp cloth before it dries.
Pro tip: Place butcher block on cabinets for 48 hours before final installation to acclimate to kitchen humidity levels, reducing future movement. Check for gaps along walls with a flashlight—small inconsistencies can be filled with colored silicone caulk that matches your wood tone.
6-Step Countertop Installation Process: From Old Removal to Final Securing
Removing Your Existing Countertop Without Damaging Cabinets
Turn off water and electricity to the kitchen area before starting. Disconnect plumbing lines and remove the sink and faucet. Locate mounting screws—typically inside cabinets or underneath the counter—and remove them with a drill/driver. For stubborn laminate counters, score along wall edges with a utility knife to break caulk seals. Have a helper support the counter as you lift it off; single-handed removal often leads to dropped countertops and damaged cabinets.
Securing Your New Countertop: Leveling Secrets Professionals Use
Before final installation, check cabinet tops with a 4-foot level in multiple directions. Shim low spots with tapered wood shims until perfectly level—never shim the countertop itself. Position your new counter, then drill pilot holes through cabinet rails into the countertop bottom using 1-1/4 inch screws. For stone or heavy materials, use L-brackets underneath for additional support. Tighten screws gradually in a star pattern to avoid twisting the countertop. Test with a level after each screw to maintain perfect flatness across the entire surface.
Backsplash and Edge Sealing: Preventing Water Damage
Install a matching backsplash immediately after countertop securing to protect walls from splashes. For wood counters, cut a 4-inch high piece from your countertop material and attach it to the wall with construction adhesive and finish nails. Seal the joint between countertop and backsplash with 100% silicone caulk—never regular caulk which mildews. For laminate edges, apply matching edge banding with contact cement, then sand smooth before applying a bead of clear silicone along the seam where the countertop meets the wall.
Essential Countertop Tools You Already Own (Plus 3 Critical Additions)
Most DIYers overestimate the tools needed for kitchen counter projects. You likely already own a tape measure, level, circular saw, and drill/driver. The three critical additions are: a router with flush-trim bit for laminate edges ($50), a quality jigsaw with fine-tooth blades for sink cutouts ($40), and a set of pipe clamps for butcher block seams ($30). Skip expensive specialty tools—professional results come from technique, not equipment. For concrete countertops, add a trowel and orbital sander to your list.
Cost Breakdown: Where DIY Actually Saves You Money

Laminate countertops cost $20-$40 per square foot installed professionally, but DIY brings this down to $10-$25 with basic tools. Butcher block runs $30-$50 per square foot DIY versus $80-$120 professionally. The real savings come with concrete overlays—you can achieve a $3,000 stone look for under $500 in materials. Avoid quartz or granite DIY attempts; fabrication requires $10,000+ equipment that negates any cost savings. For beginners, laminate or pre-fabricated butcher block delivers the best value with minimal risk.
Final Installation Checklist Before Calling It Done
Before declaring your kitchen counter project finished, complete these critical checks: Run your hand along all seams to feel for ridges requiring sanding. Inspect under the counter with a flashlight for missed screws or uneven mounting. Test the sink area by pouring water to check for leaks around the cutout. Wipe the entire surface with mineral spirits to remove any installation residue before final finishing. Most importantly, step back and view your counter at eye level—this reveals subtle imperfections invisible from normal standing position.
Building your own kitchen counter delivers immense satisfaction and significant savings when approached with proper planning. The key to success lies in meticulous measurements, choosing materials matching your skill level, and following professional techniques that prevent common DIY disasters. Start with a small bathroom vanity project to build confidence before tackling your main kitchen—this single strategy prevents more failed countertop projects than any other advice. With the right approach, your DIY kitchen counter won’t just function beautifully; it will become a conversation piece that showcases your craftsmanship for years to come.


