
That first sip of clean, crisp water from your kitchen faucet is priceless—until you realize your plumbing setup makes installing a filter seem impossible. When the cold water line disappears straight into the wall with no accessible connection point, many homeowners give up on under-sink filtration entirely. But here’s the truth: how to install water filter in kitchen sink doesn’t have to be a dead end just because your pipes are concealed. This frustrating obstacle stops countless people from enjoying filtered water straight from their tap, yet the solutions are more straightforward than you’d think.
The good news is that installing an under-sink water filter with hidden plumbing is completely achievable with the right approach. Whether you’re concerned about contaminants, bad taste, or simply want healthier drinking water, you don’t need to settle for pitcher filters or bottled water. This guide cuts through the confusion and gives you actionable methods to successfully install your filter—even when your kitchen sink’s cold water line vanishes into the wall. You’ll learn exactly what tools to gather, which installation method matches your skill level, and how to avoid costly mistakes that could lead to leaks.
Essential Safety and Preparation Before You Start
Before touching a single tool, prioritize safety with these non-negotiable steps. Find your main water shut-off valve immediately—don’t wait until you’re mid-project with water spraying everywhere. Test it now to confirm it works; many homeowners discover too late that their shut-off valve is seized. Once verified, gather these specific tools: a reliable stud finder, drywall saw or keyhole saw, tubing cutter (not scissors!), adjustable wrenches, and Teflon tape. Skip the cheap hardware store tubing cutter—it will crush your lines and cause leaks.
Double-check local plumbing codes before making your first cut. Many municipalities require permits for tapping into water supply lines, especially if you’re modifying copper pipes. Skipping this step could void your homeowner’s insurance if a leak occurs later. Keep towels, a bucket, and a flashlight within arm’s reach—water always finds the lowest point in your cabinet, so prepare for unexpected drips even after shutting off the main supply.
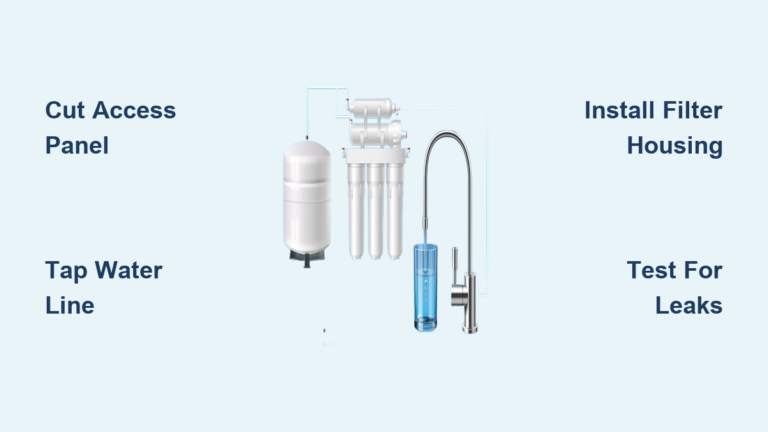
Choosing Your Installation Method Based on Skill Level
Your specific kitchen layout and comfort with plumbing determines the best approach. These methods are ranked from most permanent (and professional) to simplest.
The In-Wall Access Method: Professional-Grade Installation
This is the gold standard solution when your cold water line runs straight into the wall. Cut a clean, rectangular access panel in the drywall using a stud finder to locate the space between studs—never cut through a stud. A 12″x12″ opening provides ample room to work and patches easily later. Inside the wall, locate the ½-inch copper or PEX cold water line (typically above the visible angle stop valve).
Install a compression tee fitting directly into the main line by cutting out a small section with a tubing cutter and deburring the ends. Connect ¼-inch plastic tubing from the tee to your filter’s “IN” port. This method ensures all water to your kitchen sink passes through the filter, including any dishwasher or ice maker lines. Pro tip: Use a 90-degree drill attachment to tighten fittings in tight spaces—your knuckles will thank you. After testing for leaks, install a louvered access panel for future maintenance rather than patching permanently.
The Post-Valve Tap Method: No Wall Cutting Required
If cutting drywall makes you nervous, this under-sink solution works when you have sufficient cabinet space. Shut off the main water supply first, then disconnect the flexible supply line from your existing cold water angle stop valve. Install a T-fitting here—one branch connects to your filter’s inlet, the other to the faucet supply line.
Be aware of this critical limitation: Only water flowing to your kitchen faucet gets filtered. Your dishwasher, refrigerator ice maker, and any other branches remain unfiltered. This method also requires careful routing of tubing in a cramped space—measure your cabinet depth before buying a filter canister to avoid clearance issues. If your under-sink area is packed with garbage disposal plumbing or storage, skip this method entirely.
Faucet-Mounted and Countertop Alternatives
When permanent installation isn’t feasible, these zero-plumbing options deliver filtered water with minimal effort. Faucet-mounted filters like PUR or Brita screw directly onto your spout with a diverter valve that switches between filtered and unfiltered water. They’re ideal for renters but reduce flow rate and can feel wobbly during use.
Countertop systems like Waterdrop 10UA connect via a hose to your faucet and feature digital filter life indicators. They require counter space but offer better filtration than faucet mounts and don’t alter your plumbing. For absolute simplicity, filtered pitchers need zero installation—just fill and pour—but they won’t give you instant filtered water at the tap.
Step-by-Step Wall Access Installation Process
Follow these precise steps for a leak-free, professional installation when accessing pipes behind the wall.
Phase 1: Workspace Preparation and Wall Access
Turn off the main water supply and drain lines by opening a downstairs faucet. Mark a level, rectangular outline on the wall using a stud finder to avoid cutting through studs. Cut your access panel with a drywall saw—start with a small pilot hole to verify pipe location before making the full cut. Keep the removed drywall piece intact for potential reuse as an access panel.
Phase 2: Tapping Into the Cold Water Line
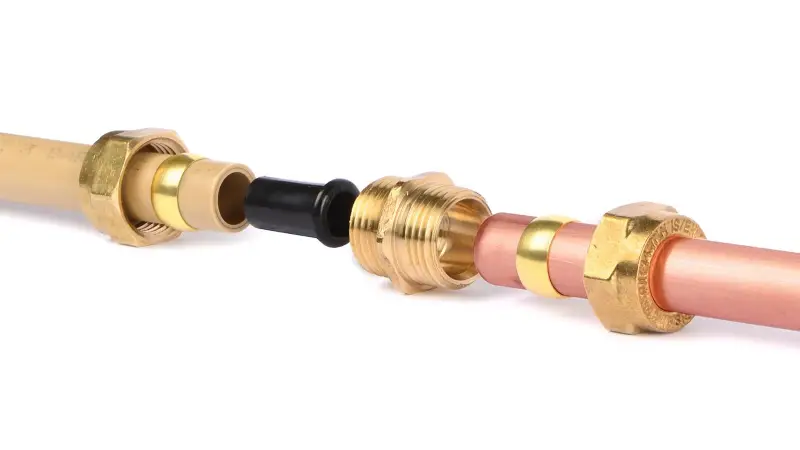
Locate the cold water supply line inside the wall cavity—it’s usually a ½-inch copper or PEX pipe running vertically. Use a tubing cutter to make a clean cut in an accessible section, then deburr the ends. Install a ½-inch compression tee fitting by hand-tightening first, then give a quarter-turn with a wrench (overtightening cracks fittings). Attach ¼-inch tubing from the tee’s side port to your filter’s inlet, securing with a compression nut.
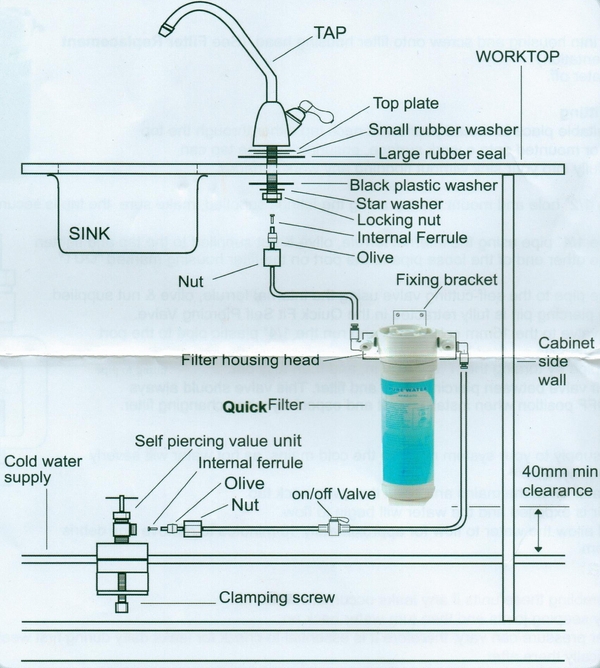
Phase 3: Filter Mounting and Faucet Connection
Mount the filter housing vertically on cabinet wall using the included bracket—never mount horizontally as this prevents proper sediment settling. Connect tubing from the filter’s outlet to a dedicated filtered water faucet (drill a 1¼-inch hole in your sink deck first). Before installing the filter cartridge, flush the system for 5-10 minutes to remove carbon fines and air bubbles—collect this water for plants.
Phase 4: Critical Leak Testing and Final Checks
Turn water on SLOWLY while monitoring all connections—rushing this step causes water hammer and leaks. Check the tee fitting inside the wall first, then the filter housing and faucet connections. A single drop per minute becomes a gallon per day. Test water pressure at the filtered faucet—a significant drop indicates improper installation or clogged lines. If leaks appear, shut off water immediately and re-tighten connections incrementally.
Must-Know Maintenance and Troubleshooting Tips

Mark filter replacement dates on your calendar—most under-sink filters last 6 months or 500 gallons. Ignoring this turns your filter into a bacteria factory. Install a shut-off valve on the filter inlet line to simplify future changes without draining the whole system. If water tastes strange after installation, flush for another 10 minutes—residual carbon needs thorough purging.
Never skip the pressure test—a 20-minute observation period catches slow leaks that would cause major damage over time. Keep your access panel visible or patch neatly with drywall compound; future plumbing issues will be exponentially easier to fix. For persistent low pressure, check if your filter’s flow rate (measured in GPM) matches your faucet’s output—undersized filters choke water flow.
Installing a water filter in your kitchen sink with hidden plumbing transforms your tap water quality without requiring professional help. By choosing the right method for your situation and following these precise steps, you’ll enjoy cleaner, better-tasting water straight from your faucet. Remember that the wall access method delivers the most reliable, whole-faucet filtration, while post-valve and countertop options offer simpler alternatives with trade-offs. Whichever path you choose, proper preparation and meticulous leak testing ensure your how to install water filter in kitchen sink project ends with refreshing success rather than a flooded cabinet.


