

That sinking feeling when your dream granite countertop develops hairline fractures just weeks after installation? It usually traces back to one critical mistake during setup. Installing granite on a kitchen island demands surgical precision in support structure preparation—not just brute strength during lifting. This guide cuts through DIY myths to deliver the exact professional method for securing granite to island bases, preventing costly cracks while achieving that seamless, high-end finish. You’ll learn why skipping the plywood subtop causes 90% of installation failures and how to properly anchor overhangs that won’t buckle under daily use. Whether you’re renovating a 10×4-foot island or a compact breakfast bar, these steps ensure your granite becomes a lifetime centerpiece—not a liability.
Essential Pre-Installation Checks Your Fabricator Won’t Tell You
Before that gleaming slab arrives, verify your island’s skeleton can handle granite’s punishing weight—approximately 18 pounds per square foot. An unlevel or flexing cabinet base guarantees cracks within months, regardless of installation skill. Start by placing a 4-foot spirit level diagonally across your cabinet top; if the bubble drifts more than 1/8 inch off center, your foundation is compromised. Shimming cabinet legs alone won’t fix this—reinforce the entire frame with corner braces screwed directly into wall studs behind the island. Next, confirm your granite slab exceeds cabinet dimensions by at least 1.5 inches on all sides for proper overhang. Measure your slab against the cabinet footprint: a typical 50×38-inch slab must cover a 48×36-inch base. Finally, inspect edge profiles—any ogee, bullnose, or bevel detailing must be factory-finished. Field modifications risk chipping and void warranties.
Why Your Plywood Subtop Determines Granite’s Lifespan
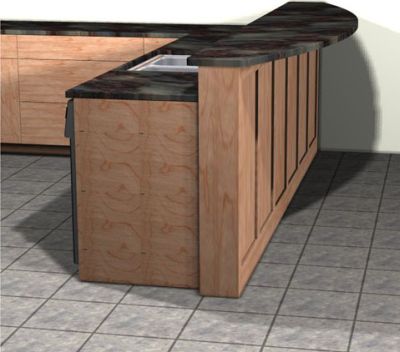
Skipping this step causes catastrophic slab fractures—yet most DIYers install granite directly onto cabinets. Granite requires a full-support surface matching its exact perimeter, not just the cabinet footprint. Cut 3/4-inch AC-grade plywood to your slab’s dimensions (e.g., 50×38 inches), not the cabinet size. This subtop absorbs structural shifts that would otherwise transfer stress to the stone. Secure it using construction adhesive smeared across cabinet framing, then drive 2.5-inch cabinet screws upward every 6 inches from beneath. Critical detail: the plywood surface must be perfectly flat—sand any ridges from screw heads before proceeding. Never use particleboard or OSB; their inconsistent density creates weak spots under granite’s weight. For islands with sink cutouts, notch the plywood to match but reinforce edges with 2×2 lumber screwed vertically to cabinet sides.
How to Level the Subtop in 30 Minutes (Moderate Difficulty)
- Position shims strategically: Place tapered shims between cabinet legs and floor at low spots identified during pre-checks.
- Check cross-leveling: Lay your 4-foot level front-to-back, then side-to-side across the plywood. Adjust shims until the bubble centers in all directions.
- Lock in position: Drill pilot holes through cabinet base into shims, then secure with 1.5-inch finish nails. Test stability by jumping near corners—zero flex is mandatory.
Pro Tip: Place a laser level against the wall behind the island. Project a horizontal line across the plywood surface to spot minute deviations invisible to traditional levels.
Step-by-Step Granite Installation: From Lift to Lockdown
Preparing the Adhesive Bed (15-Minute Prep)
Clean the plywood subtop with a TSP solution to remove dust and oils—any residue compromises adhesion. Squeeze 100% silicone construction adhesive (like GE Supreme 800) in a continuous serpentine bead pattern, covering 70% of the surface. Keep beads 3 inches apart with no gaps near edges. Never substitute Liquid Nails—its rigidity prevents natural stone movement, creating stress points that crack granite. For a 50×38-inch slab, use two 10.5-oz tubes. Avoid over-application; excess silicone squeezes out during setting, creating messy clean-up and weak spots.
Lifting and Positioning the Slab Safely (High Difficulty)
You absolutely need three strong helpers—granite’s inertia makes two-person lifts dangerously unstable. Equip each person with professional suction handles (not DIY fabric pads). Approach the slab from all sides, engage handles firmly, and lift using legs—not backs. Walk the slab directly over the island; never slide it across cabinets. Lower one edge first while others guide alignment, ensuring even 1.5-2 inch overhangs on all sides. Pause 2 inches above the adhesive bed: have one person verify overhang measurements with a tape measure before final placement. Apply firm, even pressure across the surface to embed the slab into the silicone without shifting.
Installing Corbel Supports for Overhangs (Critical for >12″ Overhangs)

Any overhang exceeding 12 inches without wall support requires structural reinforcement. For a standard 13-inch island overhang:
- Position 9×6-inch hardwood corbels 12 inches inward from each end.
- Drill pilot holes through corbel tops into granite using a masonry bit—this anchors the stone itself, not just plywood.
- Secure corbel bases to cabinet sides with 3-inch structural screws, then drive 4-inch lag bolts into wall studs behind the island.
Warning: Drywall anchors will fail under granite’s weight. Verify stud placement with a stud finder before corbel installation. For waterfall edges, use hidden steel L-brackets screwed through cabinet sides into the slab’s underside.
Sealing and Finishing: The 24-Hour Cure Protocol
Immediately after slab placement, run a 1/4-inch bead of 100% silicone caulk where granite meets the backsplash. Smooth with a damp fingertip dipped in dish soap—this prevents sticking. Do not seal the granite yet; wait 72 hours for the slab to fully cure on its base. Then apply a penetrating stone sealer (like Miracle Sealants 511) using a microfiber cloth. Work in 3×3-foot sections, allowing 5 minutes dwell time before buffing excess. Reapply annually for porous granites like Santa Cecilia. For seams between slabs, use color-matched epoxy resin—not silicone—to prevent staining.
Non-Negotiable Safety and Support Rules
Weight distribution is your silent killer. A 50×38-inch slab weighs 425 pounds—more than many cabinets were designed to carry. Reinforce your island frame with 2×4 lumber screwed diagonally across corners before installing plywood. During lifting, maintain clear pathways; granite shards from a dropped slab can cause severe injury. Never attempt sink cutouts yourself—diamond-tipped wet saws cost $2,000+ and require water containment systems. Hire a fabricator; their $150 fee prevents $2,000 in replacement costs. Finally, resist the urge to use the countertop prematurely—wait 72 hours before placing appliances or standing on overhangs.
When to Call a Professional (Avoid $3,000 Mistakes)
While DIY installation works for simple rectangular islands, certain scenarios demand expert intervention. If your island has curved edges, integrated cooktop cutouts, or overhangs exceeding 15 inches, hire a fabricator for the final placement. Their crane systems and laser-leveling tools achieve sub-millimeter precision impossible with hand tools. Also consult a pro if your cabinet base shows any flex when pressed—this indicates structural weakness no amount of shimming can fix. Remember: professional installation typically costs $40-$60 per square foot, but a single cracked slab sets you back $800+ in materials and labor.
Final Note: A properly installed granite island becomes the unshakeable heart of your kitchen for decades. By prioritizing that full plywood subtop and structural corbel anchoring, you transform vulnerable stone into an indestructible work surface. Seal annually, avoid sitting on overhangs, and never place hot pans directly on unsealed granite. For ongoing care, explore our guide on removing etch marks from granite—a crucial skill for maintaining that showroom finish. Your island isn’t just a countertop; it’s the stage for family memories, and with this method, it’ll perform flawlessly through every celebration.