

You’ve just finished vacuuming, but the dirt remains stubbornly in place. Your vacuum hums to life, yet fails to pick up even the lightest debris—a frustrating reality for millions of homeowners each year. This common problem affects upright, canister, and stick vacuums regardless of brand or price point, but here’s the good news: 90% of suction issues can be resolved with simple troubleshooting you can complete in under an hour.
How to fix a vacuum cleaner with no suction starts with understanding that most problems stem from restricted airflow rather than motor failure. Whether you own a bagged model or the latest cordless stick vacuum, this guide delivers the exact sequence professional technicians follow to restore powerful suction. You’ll learn specific checks for filters, blockages, and settings that solve the problem without costly repairs or replacement.
Table of Contents
- Empty Dustbin or Replace Bag First
- Clean All Filters Systematically
- Hunt Down Hidden Blockages
- Restore Brush Roll Function
- Verify Height and Power Settings
- Seal Air Leaks and Connection Issues
- Test Power Supply Thoroughly
- Recognize When Professional Help Needed
- Prevent Future Suction Problems
- Cost-Effective Repair Decisions
Empty Dustbin or Replace Bag First
A full dustbin or bag creates immediate airflow restriction, causing the most common suction failure. This single step resolves over half of all no-suction complaints, yet many users skip it while searching for complex solutions.
Bagless Vacuums: Proper Emptying Technique
- Remove the canister immediately after use rather than waiting until later
- Empty before reaching the max fill line—suction begins declining at just two-thirds capacity
- Tap your dustbin firmly against the trash can to dislodge compacted debris
- Wash plastic canisters monthly with cold water to remove fine dust buildup
- Dry completely for 24 hours before reassembly to prevent motor damage
Bagged Models: When to Replace
Replace bags when they’re approximately two-thirds full, not when the indicator shows full. Generic bags often restrict airflow compared to manufacturer-recommended versions. Check for a visible dust layer clogging the bag pores, which chokes suction. Install new bags with the airflow arrow pointing in the correct direction—reversing this simple step cuts suction dramatically.
Clean All Filters Systematically
Clogged filters kill suction even with an empty dustbin. Modern vacuums contain two to four filters that trap everything from pet dander to microscopic particles, and neglecting them creates serious airflow restrictions.
Filter Location Guide by Brand
- Dyson: Pre-motor filter near dustbin, HEPA filter behind ball mechanism
- Shark: Foam and felt filters under dust cup, HEPA filter in front housing
- Bissell: Washable pre-motor filter, pleated post-motor filter
Washable Filter Cleaning Steps
- Remove filters and tap against trash can to dislodge loose debris
- Rinse under cold water until water runs completely clear
- Never use soap unless manufacturer explicitly permits
- Air-dry for minimum 24 hours before reinstalling
- Never reinstall damp filters—this causes mold and motor failure

Blockages create dramatic suction loss and often hide in unexpected places. You’ll hear a high-pitched whistle or notice pulsing suction when air struggles past obstructions in your vacuum’s airflow pathway.
Common Blockage Locations
- Curved hose neck where it connects to vacuum body
- Wand connections between metal or plastic tubes
- Inlet behind brush roll on upright models
- Attachment points for crevice tools and upholstery nozzles
Professional Blockage Removal
Hold your hose up to bright light—if you cannot see light through it, a blockage exists. Disconnect all components and use a flashlight to identify obstructions. Push through with a broom handle wrapped in cloth, avoiding sharp tools that damage hose interiors. Check the brush head inlet for hair, string, and carpet fibers that restrict airflow.
Restore Brush Roll Function
A tangled brush roll mimics suction loss by preventing debris pickup, especially on carpets. Severe tangles trigger automatic shut-off to prevent motor damage, creating confusion about the actual problem.
Brush Roll Deep Clean Process
- Unplug vacuum completely and flip onto its back
- Remove brush roll using clips or screws (varies by model)
- Cut away debris with scissors—work parallel to brush to avoid damage
- Clean brush housing removing all hair, dust, and debris
- Test rotation—brush should spin freely with gentle finger push
Pet owners should clean brush rolls every 3-5 uses to prevent severe tangles. Use scissors rather than blades to avoid damaging bristles, and consider self-cleaning models for high-hair households while still inspecting monthly.
Verify Height and Power Settings
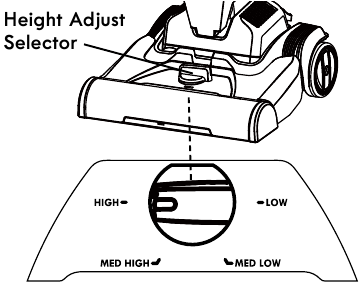
Incorrect settings create the illusion of suction loss. Your vacuum might work perfectly—just on the wrong setting for your flooring type.
Set the height adjustment to the lowest position for bare floors, medium for low-pile carpet, and highest for plush carpeting. Test by pushing the vacuum—it should glide smoothly with slight resistance. Close all air vents completely, as open vents reduce suction dramatically. Check power modes—eco settings provide only 50% suction on most cordless models, and accidental slider movement often creates false suction problems.
Seal Air Leaks and Connection Issues
Air leaks reduce suction by allowing air entry through gaps instead of the cleaning nozzle. These leaks often develop gradually, making them hard to detect without proper inspection.
Listen for hissing during operation and feel for unexpected airflow from the vacuum body. Inspect the hose visually for splits, cracks, or pinholes, especially at connection points. Ensure all components click securely into place—loose connections create significant airflow leaks. For small hose cracks, wrap with electrical tape as a temporary fix, but schedule professional hose replacement for permanent solution.
Test Power Supply Thoroughly
Suction loss often masks power supply problems. Your vacuum runs, but not at full capacity due to electrical issues.
For cordless models, verify full battery charge—low battery reduces suction 40-60%. Clean battery contacts with a dry cloth for secure connection and test on highest power mode. For corded vacuums, unwind the cord completely—partial winding causes overheating and power reduction. Check outlet connections for looseness and inspect cords for damage. Reset the thermal switch if your vacuum shut off mid-use due to overheating.
Recognize When Professional Help Needed
After completing all previous steps, certain symptoms indicate internal component failure requiring professional service.
Look for motor failure warning signs including no suction despite complete troubleshooting, grinding or clicking noises from the motor, burning smells, or visible smoke. Never disassemble your vacuum if under warranty, as this voids coverage. Document all steps you’ve completed for technicians to avoid redundant diagnostics. Consider replacement for budget models under $200 with motor failure, as repair costs often exceed value.
Prevent Future Suction Problems
Simple maintenance prevents 90% of suction issues. Create these habits to maintain peak performance long-term.
Empty your dustbin after each use—never wait for full capacity. Clean the brush roll weekly of hair and debris, and check the hose for developing blockages. Wash all washable filters monthly following proper drying procedures. Replace HEPA filters annually or per manufacturer guidelines, install new belts when brush roll performance declines, and update hoses showing age cracks or flexibility loss.
Cost-Effective Repair Decisions

Knowing when to repair versus replace saves money and frustration. Filter replacement typically costs under $30 and restores performance for most models. Brush roll cleaning requires no tools and solves common pet hair issues. Hose replacement runs $25-75 for most brands, while belt changes cost $5-15 with a 10-minute fix.
Consider replacement when motor failure occurs on budget models under $200, multiple component failures affect units over 5 years, repair costs exceed 50% of new price with expired warranty, or extensive physical damage affects housing or major parts.
Your vacuum cleaner’s suction loss rarely signals permanent failure. By following this systematic approach—starting with emptying the dustbin and working through filters, blockages, and settings—you’ll restore full power in under an hour for most issues. Remember that consistent maintenance prevents the frustration of sudden suction loss, keeping your floors spotless and your vacuum running strong for years. Start with the dustbin emptying process, then work through each section systematically. If suction isn’t restored after completing all steps, professional service may be necessary for internal component issues.


