
That persistent drip… drip… drip from your kitchen sink isn’t just annoying—it’s flushing money down the drain. A single-handle kitchen faucet leaking at the spout or base typically wastes over 3,000 gallons of water annually, spiking your utility bills while signaling failing internal components. The good news? Fixing a dripping single-handle kitchen faucet is one of the most accessible DIY repairs for homeowners. Unlike complex plumbing emergencies, this issue usually stems from a worn cartridge or O-ring that you can replace in under an hour with basic tools. This guide gives you the exact steps to diagnose the leak source, select the correct replacement parts, and complete the repair without calling a plumber—saving you $150-$300 in service fees.
Ignoring a dripping faucet accelerates wear on other components and invites mineral buildup that complicates future repairs. Whether your Delta, Moen, or Kohler faucet drips constantly or only when hot water runs, you’ll learn to pinpoint the failure point and execute a lasting fix. By the end of this process, you’ll stop the water waste, prevent countertop corrosion, and gain confidence for future plumbing projects. Let’s turn off that drip for good.
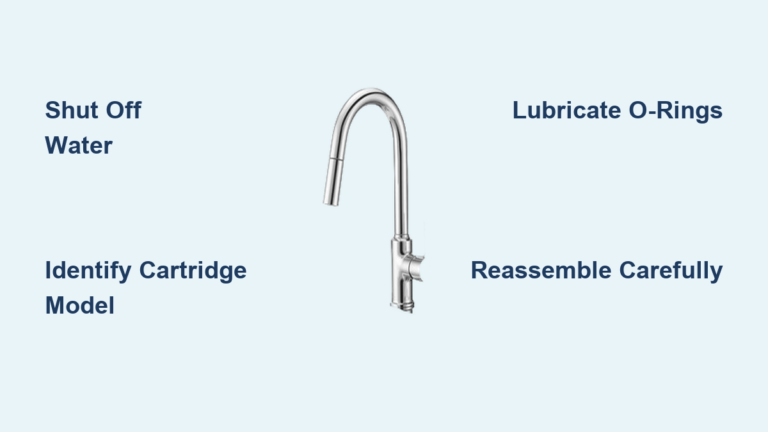
Essential Tools and Safety Precautions Before Repairing Your Faucet
Skipping proper preparation risks flooding your cabinets or damaging faucet components. Always shut off water supply valves first—locate the hot and cold shutoffs under your sink and turn them clockwise until fully closed. Test by briefly opening the faucet; no water should flow. Place towels in the sink basin to protect surfaces and position a small bucket beneath the P-trap to catch residual water. Essential tools include a Phillips screwdriver, flat-head screwdriver, adjustable wrench, Allen wrench set (typically 1/8″ or 5/32″), and needle-nose pliers. For stubborn cartridges, a dedicated cartridge puller tool prevents damage but isn’t always necessary.
Critical safety note: Never attempt repairs with water still flowing. Double-check shutoff valves by feeling pipes for vibration. Wear safety glasses to protect against debris when removing caps. Organize screws and small parts in a labeled container—losing a tiny set screw means restarting the entire process. If valves under the sink are corroded or won’t close, shut off your home’s main water supply before proceeding.
Why Shutting Off Water Correctly Prevents Costly Mistakes
Many DIYers assume partial valve closure is sufficient, but even a slight drip during disassembly causes flooding when removing internal components. Fully closed valves create a dry workspace, letting you safely remove the cartridge without water pressure forcing parts apart. If shutoff valves leak when closed, replace them first—they’re inexpensive and prevent future repair headaches.
Step 1: Identify Your Faucet Model and Source Exact Replacement Parts
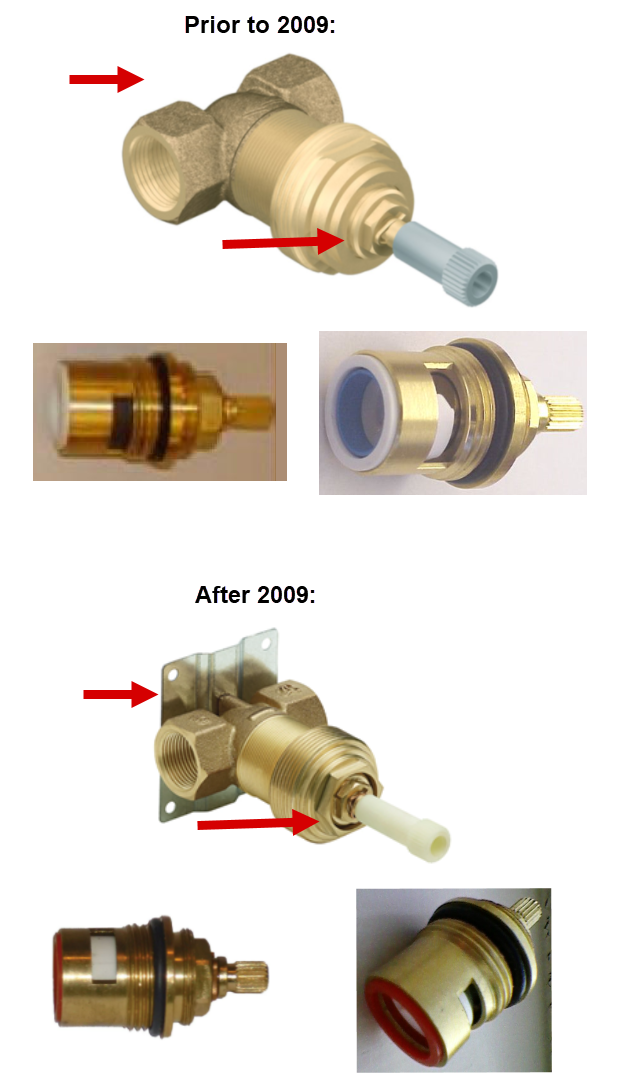
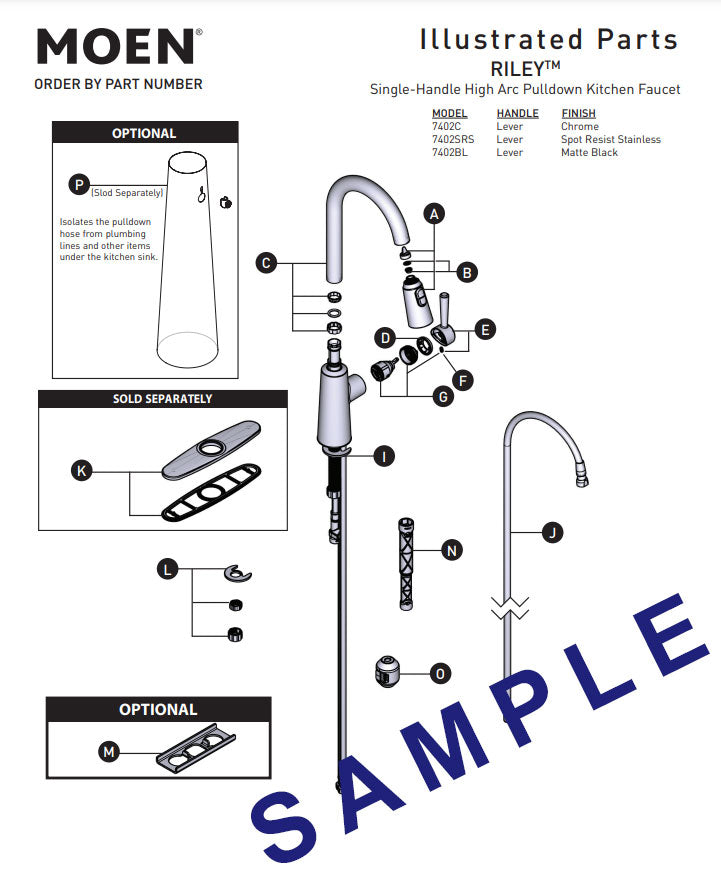
Generic cartridges cause 70% of failed faucet repairs. Your faucet brand and model dictate the cartridge type, so identification is non-negotiable. Look for logos stamped on the base of the spout, handle base, or decorative cap. Common brands include Moen (1225 or 1222 cartridge), Delta (RP46074 or RP44920), and Kohler (K-557 or K-5402). If no markings exist, remove the existing cartridge (detailed in Step 3) and take it to a hardware store for matching. Bring the old part—it’s the only foolproof identification method.
Purchase OEM (Original Equipment Manufacturer) parts when possible. Universal cartridges often fit initially but fail prematurely due to material differences. Budget retailers like Home Depot or specialized plumbing suppliers (e.g., Supply.com) stock brand-specific kits including O-rings and lubricant. Expect to pay $8-$25 for a cartridge kit—far cheaper than emergency plumber visits.
How to Avoid the #1 Repair Failure: Wrong Cartridge Selection
Mistaking a ceramic disk cartridge for a ball-type cartridge (or vice versa) guarantees continued dripping. Moen’s 1225 cartridge has four rubber seals, while Delta’s RP46074 uses a single ceramic cylinder. Take clear photos of your faucet before disassembly and cross-reference online diagrams using your brand name. When in doubt, call the manufacturer’s support line with photos—they’ll identify the model for free.
Step 2: Remove the Handle and Decorative Cap Without Damage
Start by prying off the decorative button on top or rear of the handle using a flat-head screwdriver’s edge. Most buttons have a discreet notch—slide the screwdriver into this gap to avoid cracking plastic. Underneath, you’ll find a set screw requiring an Allen wrench (typically 3/32″ or 1/8″). Loosen the screw counterclockwise, but don’t remove it completely yet. Gently wiggle the handle while pulling upward; if stuck, tap the handle base with a rubber mallet. Once loose, unscrew the set screw fully and lift the handle straight off.
Never force the handle—excessive pressure cracks the plastic stem. If corrosion binds the handle, apply penetrating oil around the base and wait 10 minutes before retrying. For metal handles, wrap pliers with a cloth to prevent scratches during removal.
Step 3: Extract the Worn Cartridge Safely
Beneath the handle, you’ll see a plastic or metal retaining nut (the “bonnet nut”). Use an adjustable wrench to loosen it counterclockwise, taking care not to scratch surrounding surfaces. Once removed, inspect for a metal C-clip securing the cartridge—slide needle-nose pliers under its edge to pop it off. Now grip the cartridge stem with pliers wrapped in a microfiber cloth and apply steady upward pressure. Rock the cartridge gently side-to-side if stuck; never yank vertically.
Critical Orientation Tip Before Removing the Old Cartridge
Note the alignment of tabs or notches on the cartridge stem before extraction. Most have a flat side or numbered indicators matching internal faucet grooves. Take a smartphone photo—this prevents 30-minute reassembly struggles from incorrect positioning. If the cartridge resists, a cartridge puller tool applies even pressure without damaging ceramic components.
Step 4: Install the New Cartridge for a Permanent Seal
Lubricate all O-rings with plumber’s grease—never use petroleum jelly, which degrades rubber. Apply a thin coat inside the faucet body’s cartridge sleeve too. Align the new cartridge using your reference photo, ensuring tabs match the faucet’s internal guides. Press it straight down until fully seated; you should feel it click into place. Reinstall the C-clip (if applicable) by snapping it over the cartridge groove with pliers.
Why Lubrication Prevents Future Drips
Dry O-rings tear during installation or create friction that accelerates wear. Plumber’s grease (silicone-based) maintains seal flexibility through temperature changes, extending cartridge life by 2-3 years. Skipping this step causes immediate leaks or premature failure.
Step 5: Reassemble Components in Correct Sequence
Reassembly follows reverse disassembly but requires precision. Hand-tighten the bonnet nut first, then give it a quarter-turn with your wrench—overtightening cracks porcelain housings. Slide the handle onto the cartridge stem in the “off” position, insert the set screw, and tighten until snug (not forceful). Press the decorative cap back into place until it clicks. Finally, slowly open the shutoff valves under the sink while watching for leaks at connections.
Step 6: Test for Leaks and Diagnose Persistent Dripping
Run both hot and cold water for 60 seconds to flush debris. Check three critical areas:
– Spout drip: Indicates misaligned cartridge or damaged seat
– Handle base leak: Signals loose bonnet nut or worn handle O-ring
– Base of faucet: Suggests corroded mounting hardware
If dripping continues, disassemble only the cartridge section to verify orientation. For handle leaks, replace the small O-ring beneath the handle. Spout leaks after cartridge replacement often mean mineral deposits on the valve seat—clean with vinegar-soaked cloth before reinstalling.
Common DIY Repair Mistakes That Worsen Leaks
- Forgetting O-ring lubrication: Causes immediate tearing and leaks (always grease new O-rings)
- Over-tightening bonnet nuts: Creates hairline cracks in faucet bodies (hand-tight + 1/4 turn max)
- Ignoring valve seat corrosion: Leaves pitting that prevents cartridge seals (clean with white vinegar)
- Mixing cartridge brands: Moen parts won’t fit Delta housings (match OEM exactly)
Pro Tip: Place a magnetized tray under your workspace—lost set screws become impossible to retrieve from sink drains.
When Professional Help Saves You Money
Call a plumber if:
– Water still drips after two cartridge replacements
– The faucet body shows visible cracks or corrosion
– Shutoff valves leak when opened/closed
– You detect water pooling under cabinets (indicates hidden pipe damage)
These issues often require faucet replacement ($200-$500) or pipe repairs beyond DIY scope. A $75 diagnostic fee beats $500 in water damage from misdiagnosed leaks.
Prevent Future Drips With Simple Maintenance
Your repaired faucet will last years longer with these habits:
1. Clean aerator monthly to prevent mineral buildup affecting cartridge movement
2. Wipe handles dry after use to minimize O-ring exposure to hard water
3. Open/close valves slowly to reduce pressure surges on seals
4. Replace cartridges proactively every 4-5 years (before leaks start)
That final drip you silenced today saves 20 gallons weekly—adding up to a full bathtub of water monthly. By mastering this repair, you’ve not only fixed an immediate annoyance but gained foundational plumbing skills applicable to showers, tubs, and outdoor faucets. Keep your cartridge puller and plumber’s grease in the toolbox; next time that drip starts, you’ll stop it before it wastes a single drop.


