
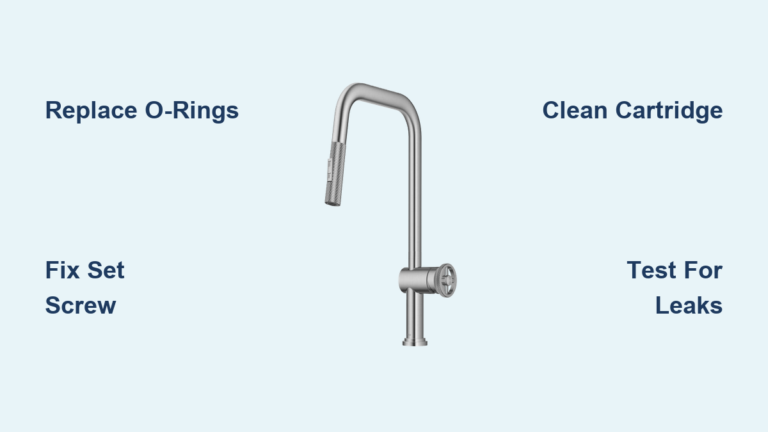
That annoying drip under your kitchen sink or a handle that wobbles like a loose tooth isn’t just irritating—it wastes gallons of water daily and can cause serious damage if ignored. When your kitchen faucet handle breaks, leaks, or sticks, you don’t need to panic or call a plumber immediately. Most handle failures stem from simple, fixable issues like worn seals or mineral buildup, and with basic tools, you can complete this repair yourself in under 30 minutes. This guide delivers a precise, step-by-step fix for wobbly, leaking, or frozen handles using proven methods that address the exact failure points hiding inside your faucet.
Ignoring a faulty handle accelerates wear on internal components, turning a $5 O-ring repair into a $200 faucet replacement. I’ve seen homeowners strip set screws or crack handles by forcing stubborn parts, but the right approach prevents costly mistakes. You’ll learn to diagnose whether you’re dealing with stripped splines, corroded cartridges, or failed seals—and how to replace them correctly. By the end, you’ll have a handle that operates smoothly with zero leaks, saving you money and giving you the confidence to tackle future plumbing issues.
Diagnose Your Exact Faucet Handle Failure Before Starting
Identifying your specific handle problem prevents wasted effort and ensures you buy the right parts. Don’t assume a leak means a new cartridge—you could be replacing good components while missing the real culprit.
Why Your Handle Wobbles or Feels Loose
A handle that shifts side-to-side or spins freely almost always points to a loose or stripped set screw beneath the decorative cap. Remove the cap with a flathead screwdriver and check the screw with an Allen wrench—if it turns without tightening or feels gritty, the screw threads are damaged. In severe cases, the metal splines connecting the handle to the valve stem wear down, requiring a handle replacement.
Handle Leaks at the Base: The O-Ring Culprit
Water pooling where the handle meets the faucet body signals failed O-rings. These rubber seals degrade from heat and mineral exposure, losing elasticity until they can’t maintain a watertight barrier. Test this by drying the area completely, then running hot water for 60 seconds—new leaks appearing here confirm worn O-rings, not a spout issue.
Stiff or Grinding Handle Movement Causes
If turning the handle feels like twisting a rusted bolt, mineral deposits have caked onto internal parts. Hard water leaves limescale on cartridge stems or ball assemblies, creating friction. Alternatively, dried-out grease on moving parts causes direct metal-on-metal contact. Never force a stiff handle—it strips splines instantly.
Gather These Exact Tools and Parts for a Flawless Repair

Using incorrect tools scratches chrome finishes or breaks plastic parts. Match these items to your faucet type before disassembly to avoid mid-repair store runs.
Essential Tools for Handle Removal Without Damage
- Hex key set (1.5mm–5mm): Most handles use hidden Allen screws—bring the full set since sizes vary by brand.
- Grooved-jaw pliers wrapped in microfiber cloth: Protects finish while gripping stubborn retaining nuts.
- Cartridge puller tool ($8 at hardware stores): Safely extracts stuck cartridges without cracking the valve body—pliers often fail here.
- Needle-nose pliers with rubber grips: For removing tiny retaining clips without sending them flying into your cabinet.
Critical Replacement Parts You Must Match
- O-ring kit specific to your faucet brand: Generic kits sell universal sizes, but Moen, Delta, and Kohler require exact diameters. Bring your old O-rings to the store—they’re under 50 cents each.
- Silicone plumber’s grease (NOT petroleum-based): Petroleum dissolves rubber O-rings; silicone maintains flexibility in hot/cold cycles.
- Exact cartridge/stem model number: Found stamped on the old part—take it to the store. A mismatched cartridge causes leaks or improper temperature control.
Shut Off Water and Prep Your Workspace Properly
Skipping prep risks flooding your kitchen cabinet. This 2-minute step prevents 90% of DIY plumbing disasters.
Locate and Test Shutoff Valves First
Under-sink valves often seize from disuse. Turn both clockwise until firm—don’t force them. Then open the faucet to drain lines; if water doesn’t stop flowing, your valves are faulty. In that case, shut off the main house supply before proceeding. Never skip this test—residual pressure can blast parts during disassembly.
Protect Your Sink and Countertop
Place towels in the sink basin to catch dropped screws, and set a small bucket under supply lines. Lay masking tape on the countertop where you’ll place parts—this prevents scratches and keeps components organized. Have vinegar-soaked rags ready for mineral deposits you’ll encounter later.
Remove the Faucet Handle Without Breaking It
Forcing a stuck handle is the #1 DIY mistake. Use these techniques to avoid snapping plastic stems or scratching finishes.
Accessing the Hidden Set Screw Safely
Pry off decorative caps with a flathead screwdriver wrapped in electrical tape—bare metal chips chrome. If the cap won’t budge, apply penetrating oil and wait 10 minutes. For press-fit handles (common on older faucets), grip the base with cloth-wrapped pliers and twist counter-clockwise; don’t pull upward yet.
Handle Removal When Parts Are Stuck
If the handle won’t lift after removing the screw, never hammer it. Instead, reinsert the screw halfway, then tighten it until it gently pushes against the stem—this creates leverage to wiggle the handle free. For severely corroded handles, use a handle puller tool: screw it into the set screw hole, then turn clockwise to apply even pressure.
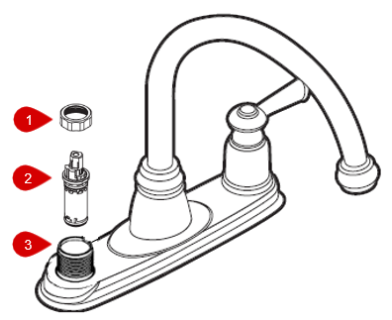
Replace Worn O-Rings Causing Base Leaks
This 5-minute fix solves 70% of handle leaks. Skipping O-ring replacement during cartridge swaps guarantees recurring leaks.
Locating and Removing Old O-Rings
After handle removal, inspect the valve stem—O-rings sit in small grooves near the top. Use a dental pick (not metal tools) to lift them out; metal can nick the stem, causing future leaks. Note their positions: some faucets have dual O-rings stacked vertically for redundancy.
Installing New O-Rings Correctly
Coat replacement O-rings in silicone grease—this isn’t optional—and stretch them gently into place. Never force them; if resistance occurs, you have the wrong size. Grease fills microscopic gaps in rubber, creating an instant seal. Test fit the handle before reassembly; if it slides on smoothly, the O-rings aren’t pinched.
Swap Out a Faulty Cartridge for Smooth Handle Operation
A failing cartridge causes temperature inversion, leaks when “off,” or stiff turning. Replacement takes 10 minutes but requires precision.
Removing Stubborn Cartridges Without Damage
After removing the retaining clip/nut, spray penetrating oil around the cartridge base. Wait 15 minutes, then attach a cartridge puller—tighten the central screw gradually until you feel resistance, then give one firm twist. If it won’t budge, heat the faucet body with a hairdryer for 60 seconds; thermal expansion loosens corrosion.
Installing the New Cartridge Perfectly
Align the new cartridge’s tabs with slots in the valve body—forcing it causes instant leaks. Moen cartridges have color-coded tabs (blue for cold); Delta uses keyed slots. Insert it straight down until it seats fully. Apply silicone grease to all O-rings, then reinstall the retaining clip with needle-nose pliers.
Reassemble and Test for Zero Leaks
Rushing reassembly causes leaks. Follow this sequence to avoid common oversights.
Critical Reassembly Order You Must Follow
- Hand-tighten the retaining nut/clip first
- Slide the handle straight down (no wiggling)
- Insert the set screw but leave it loose
- Operate the handle 10 times to seat parts
- Only then tighten the set screw
This order ensures internal components align before final tightening—skip it, and you’ll strip the screw hole.
Leak Testing That Actually Works
Turn water on slowly at shutoff valves. Place a paper towel under the handle base—if it stays dry after 5 minutes, you’ve succeeded. If damp, retighten the retaining nut 1/8 turn (over-tightening cracks plastic). Never test with the sink full of water—that hides slow base leaks.
Fix Stuck, Loose, or Inverted Handle Issues Fast
These specialized fixes solve problems standard repair guides miss.
Reviving a Handle That Spins Freely
Stripped splines mean the handle can’t grip the stem. Wrap the stem’s top with 2 layers of Teflon tape before reattaching the handle—this fills gaps temporarily. For a permanent fix, replace the plastic handle (under $10) since metal stems rarely wear.
Stop Handle Leaks from Mineral Buildup
Soak the cartridge in white vinegar for 20 minutes to dissolve limescale, then scrub ports with an old toothbrush. Re-lubricate all moving parts with silicone grease—this prevents recurrence for 6+ months in hard water areas.
Troubleshoot Post-Repair Leaks or Low Pressure

If issues persist after repair, these targeted checks pinpoint the cause.
Handle Still Leaking? Check These 3 Spots
- O-ring not seated: Remove handle and verify no gaps between rubber and stem
- Cartridge misaligned: Moen cartridges click into place—reseat until you hear it
- Retaining nut loose: Snug it 1/16 turn with cloth-wrapped pliers
Low Water Flow After Repair Fix
Remove the aerator (tip of spout) and soak in vinegar. Debris dislodged during repair often clogs it. If flow remains weak, open shutoff valves fully—partial opening restricts pressure.
When to Call a Professional Plumber Immediately
Stop repairs if you encounter these red flags to avoid catastrophic flooding.
Cracked Faucet Bodies or Failed Shutoff Valves
If the valve body (under-handle housing) has hairline cracks, water will leak from multiple points. Similarly, if shutoff valves leak when operated, you need a main-water-line repair—DIY attempts here risk major water damage.
Corroded Cartridges Stuck in Valve Body
When a cartridge breaks off inside the faucet, extraction requires specialized drill bits and risks damaging the valve seat. This demands professional reaming tools and seat resurfacing.
Prevent Future Faucet Handle Failures with 2-Minute Maintenance
Extend your repair’s lifespan with these simple habits.
Monthly Handle Care That Stops Problems
Twist handles through full hot/cold range weekly to prevent mineral buildup. Every 3 months, apply a drop of silicone grease inside the handle cap—this lubricates the set screw and prevents corrosion.
Hard Water Defense Tactics
Install an inline water softener ($40) on your kitchen supply line. For immediate relief, soak cartridges in vinegar for 10 minutes during each annual maintenance—this dissolves scale before it hardens.
A properly repaired faucet handle should operate smoothly for 5+ years with basic care. If you followed these steps and still have issues, the problem likely lies in your faucet’s internal valve seat—a more advanced repair we’ll cover in our guide to fixing kitchen faucet spout leaks. Most importantly, you’ve saved $150+ in plumber fees and gained the confidence to handle future fixes. That drip under your sink? It’s already a memory.


