
Is your Shark Rotator vacuum in need of some serious cleaning, repair, or part replacement? Disassembling it might seem daunting, but with the right guidance, it’s a manageable task. This guide will walk you through the process of safely taking apart your Shark Rotator vacuum, allowing you to maintain its performance and extend its lifespan. By understanding the disassembly process, you can troubleshoot issues, clean hard-to-reach areas, and replace worn-out components, ultimately saving you money on repairs or replacements.
This article provides a detailed, step-by-step guide on how to disassemble a Shark Rotator vacuum. We’ll cover everything from preparing your workspace and gathering the necessary tools to carefully separating each component. We’ll also provide helpful tips and warnings to ensure a safe and successful disassembly. By following these instructions, you’ll be able to take apart your Shark Rotator vacuum with confidence, whether you’re cleaning it, replacing a part, or troubleshooting a problem.
Tools and Materials You’ll Need
Before you begin, gather the following tools and materials:
- Screwdrivers: A Phillips head screwdriver and a flathead screwdriver of various sizes.
- Pliers: Needle-nose pliers can be helpful for gripping small parts.
- Soft Cloth or Towel: To protect surfaces and prevent scratches.
- Small Containers or Bags: For organizing screws and small parts.
- Camera or Smartphone: To take pictures of the disassembly process for reference.
Preparation Before Disassembly
- Unplug the Vacuum: Ensure the vacuum is unplugged from the power outlet to prevent electrical shock.
- Empty the Dust Cup: Remove and empty the dust cup to avoid any mess during disassembly.
- Clear Your Workspace: Find a clean, well-lit area with enough space to work comfortably. Cover the area with a soft cloth or towel to protect surfaces.
- Gather Your Tools: Have all the necessary tools within easy reach.
- Take Pictures: Use your camera or smartphone to take pictures of each step of the disassembly process. This will be extremely helpful when reassembling the vacuum.
Disassembling the Dust Cup and Canister

- Remove the Dust Cup: Press the release button or latch to detach the dust cup from the main body of the vacuum.
- Separate the Dust Cup Components: Depending on your model, the dust cup may have multiple parts that can be separated, such as the cyclone filter and the bottom lid. Gently twist or unclip these components to disassemble them.
- Detach the Canister: The canister typically houses the motor and other internal components. Look for screws or clips holding it in place and carefully remove them to detach the canister from the wand or handle.
Disassembling the Wand and Handle
- Detach the Wand: Press the wand release button to separate the wand from the main body of the vacuum.
- Remove the Handle: The handle is usually attached to the wand with screws. Locate and remove these screws to detach the handle.
- Disassemble the Handle Components: Some handles may have additional components, such as switches or buttons. Carefully disassemble these components, taking note of their original positions.
Disassembling the Motor Housing
- Access the Motor Housing: Once the canister is detached, you should be able to access the motor housing. This may involve removing additional covers or panels.
- Remove Screws: Locate and remove all screws holding the motor housing together.
- Separate the Housing: Carefully separate the two halves of the motor housing, taking care not to damage any internal components.
- Remove the Motor: Once the housing is open, you can access and remove the motor. Take note of any wires or connectors attached to the motor before disconnecting them.
Disassembling the Brushroll and Nozzle
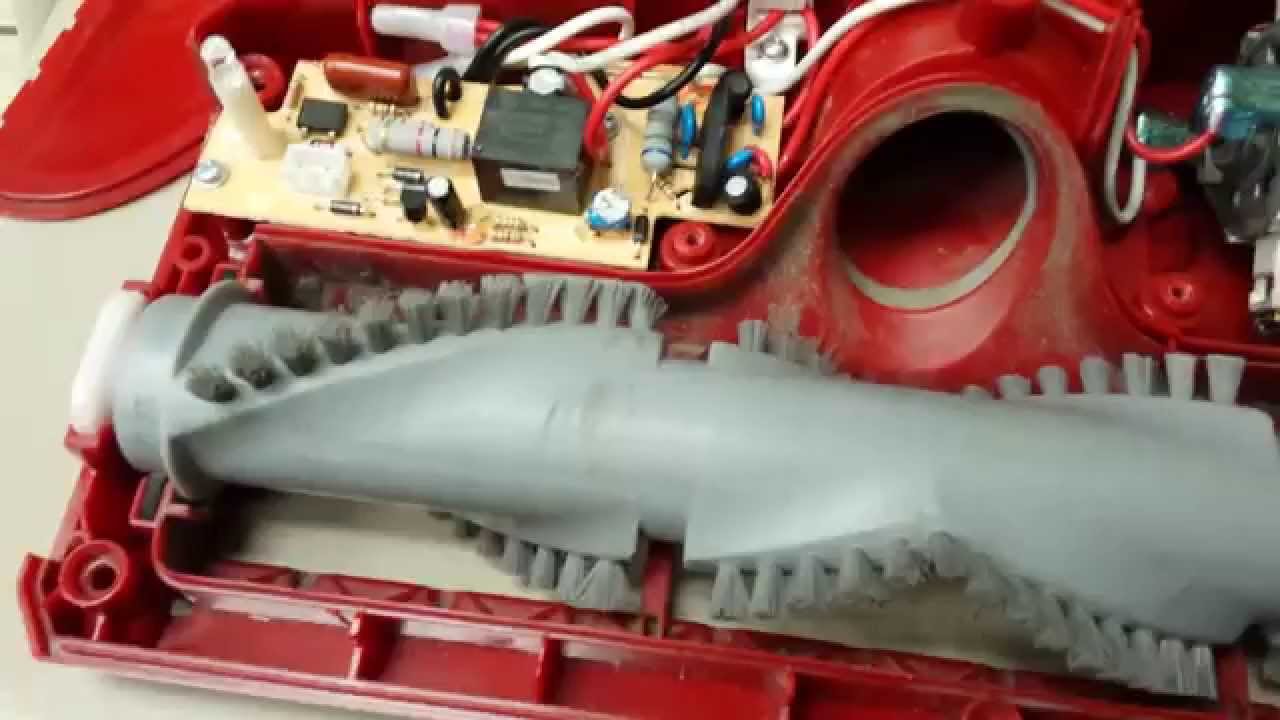
- Access the Brushroll: Locate the brushroll cover on the bottom of the vacuum nozzle. Remove any screws or clips holding it in place.
- Remove the Brushroll Cover: Carefully remove the brushroll cover to expose the brushroll.
- Remove the Brushroll: Lift the brushroll out of the nozzle. If it’s stuck, gently wiggle it back and forth while pulling upwards.
- Disassemble the Nozzle: The nozzle may have additional components, such as wheels or lights. Disassemble these components as needed, taking note of their original positions.
Cleaning and Inspection
- Clean All Parts: Use a soft brush or cloth to remove any dust, dirt, or debris from all disassembled parts.
- Inspect for Damage: Carefully inspect each part for signs of wear, damage, or breakage. Replace any damaged parts before reassembling the vacuum.
- Check for Blockages: Check all hoses, tubes, and openings for any blockages. Use a long, flexible tool to clear any obstructions.
Common Issues and Troubleshooting
- Vacuum Not Turning On: Check the power cord, switch, and motor for any damage or loose connections.
- Poor Suction: Check for blockages in the hoses, tubes, or dust cup. Also, check the filters and brushroll for excessive dirt or debris.
- Brushroll Not Spinning: Check the brushroll motor and belt for any damage or wear. Also, check for hair or debris wrapped around the brushroll.
- Unusual Noises: Check for loose parts, damaged components, or obstructions in the airflow path.
- Overheating: Check for blockages in the airflow path or a malfunctioning motor.
Tips, Warnings, and Best Practices
- Safety First: Always unplug the vacuum before disassembling it to prevent electrical shock.
- Take Your Time: Disassemble the vacuum carefully and methodically to avoid damaging any parts.
- Organize Your Parts: Keep screws and small parts organized in labeled containers or bags to avoid confusion during reassembly.
- Refer to Your Pictures: Use the pictures you took during disassembly as a guide when reassembling the vacuum.
- Consult the Manual: Refer to your vacuum’s user manual for specific instructions and diagrams.
FAQ Section
How often should I disassemble my Shark Rotator vacuum for cleaning?
Ideally, you should disassemble and deep clean your Shark Rotator vacuum every 3-6 months, depending on usage. Regular cleaning prevents buildup that reduces suction and performance.
What if I can’t remove a particular part during disassembly?
Double-check for any hidden screws or clips that may be holding the part in place. Refer to your vacuum’s user manual for specific instructions. If you’re still having trouble, consider seeking assistance from a qualified technician.
Can I use any type of lubricant on the motor or brushroll?
No, you should only use lubricants specifically designed for vacuum cleaner motors and brushrolls. Using the wrong type of lubricant can damage the components and void your warranty.
What should I do if I find a damaged part during disassembly?
If you find a damaged part, replace it with a genuine Shark replacement part. Using non-genuine parts can compromise the performance and safety of your vacuum.
How do I reassemble the vacuum after disassembly?
Use the pictures you took during disassembly as a guide. Reassemble the parts in the reverse order of disassembly. Ensure all screws and clips are securely fastened.
Is it safe to disassemble the vacuum if it’s still under warranty?
Disassembling the vacuum while it’s still under warranty may void the warranty. Check your warranty terms and conditions before disassembling the vacuum.
Conclusion
Disassembling your Shark Rotator vacuum might seem like a complex task, but with this step-by-step guide, you can confidently tackle it. Remember to prioritize safety, take your time, and refer to your pictures and user manual for guidance. Regular disassembly and cleaning can significantly improve your vacuum’s performance and extend its lifespan. If you encounter any issues or are unsure about any step, don’t hesitate to seek assistance from a qualified technician. Now that you know how to disassemble your Shark Rotator vacuum, you’re well-equipped to keep it running smoothly for years to come. Take the first step towards a cleaner, more efficient home by disassembling, cleaning, and reassembling your Shark Rotator vacuum today!


