
That sinking feeling when you notice your kitchen chair seats are frayed, stained, or just plain worn out? You’re not alone. Thousands of homeowners face this dilemma every year, wondering whether to replace expensive dining sets or find a smarter solution. How to cover kitchen chair seats is one of the most accessible and transformative DIY projects you can tackle, giving dated furniture new life without breaking the bank. This simple upgrade can completely redefine your kitchen’s aesthetic while protecting your investment from daily spills, crumbs, and wear.
Imagine walking into your kitchen each morning to find crisp, clean chair seats that complement your new countertops or match your freshly painted walls. The best part? You don’t need professional upholstery skills to achieve this look—just basic tools and a willingness to follow a clear process. Whether you’re refreshing a hand-me-down set or updating your current dining area to match a new décor scheme, mastering how to cover kitchen chair seats puts you in control of your home’s style. In the next few minutes, you’ll learn exactly what tools to gather, which materials will stand up to kitchen traffic, and the precise steps to create seats that look professionally finished.
Essential Tools and Materials Checklist for Chair Seat Projects

Gathering the right supplies before starting your project prevents frustrating mid-process trips to the hardware store and ensures smooth execution. For successful how to cover kitchen chair seats projects, you’ll need a staple gun (electric or manual with 1/4″ staples), a Phillips-head screwdriver for removing seat attachments, and a flat-head screwdriver for prying out old staples. Sharp fabric scissors make clean cuts without fraying edges, while a measuring tape ensures precise fabric and foam sizing.
Your material list should include durable upholstery fabric (2-3 yards depending on seat size), 2-3 inch high-density foam for comfortable cushioning, 1/4-inch plywood cut to your seat dimensions (if replacing the entire base), and a high-temperature hot glue gun for securing tricky corners. Don’t forget work gloves to protect your hands from sharp staples and splinters—this simple addition makes the process safer and more comfortable, especially when working with older wooden seats that may have rough edges.
Choosing Materials That Withstand Kitchen Wear and Tear
Selecting Stain-Resistant Fabrics That Last
Kitchen chair seats endure constant abuse—spills, crumbs, pet claws, and daily friction—so choosing the right fabric is non-negotiable. When learning how to cover kitchen chair seats, prioritize mid- to heavy-weight fabrics like cotton duck canvas, outdoor performance fabrics, or vinyl laminates that resist stains and wipe clean easily. These materials maintain their appearance through countless family meals and unexpected accidents.
Avoid delicate textiles like silk, thin linen, or loosely woven cottons that show every spill and wear thin quickly. If you’re using 100% cotton fabric, always pre-wash and dry it before starting your project to prevent uneven shrinking later. For patterned fabrics, lay your seat template on the material before cutting to ensure symmetrical placement—nothing looks more amateurish than a crooked stripe or off-center floral motif on your finished seat.
Foam Thickness and Density for All-Day Comfort
The right cushioning transforms uncomfortable chairs into seating you’ll actually want to use during long meals. When covering kitchen chair seats, 2-3 inches of high-density foam provides optimal support without excessive sinking. Test your existing foam by pressing your thumb into it—if it doesn’t quickly rebound to its original shape, replace it entirely.
Measure your current seat thickness before purchasing new foam, as kitchen chairs typically range from 1.5 to 3 inches in cushion depth. High-density foam (2.5-3.5 pounds per cubic foot) maintains its shape longer than cheaper alternatives. Cut your new foam slightly smaller than the seat base (about 1/4 inch all around) to prevent bulging at the edges when you pull the fabric taut during installation.
Detailed Process for Flawless Seat Reupholstering
Removing Seat Cushions Without Damage
Begin your how to cover kitchen chair seats project by turning the chair completely upside down on a soft surface like carpet or cardboard to prevent scratches. Locate the 4-8 screws securing the seat to the chair frame—usually 1/2 to 3/4 inch long. Using your Phillips-head screwdriver, remove all screws while keeping them organized in a small container. Gently lift the seat off the frame, taking note of any washers or spacers that might fall out.
Place the seat bottom-side up on your work surface. If the seat feels loose or wobbly, this is your opportunity to reinforce the attachment points with wood glue before reassembly. Never force a stuck seat—tap gently around the edges with a rubber mallet if needed, but avoid prying which could crack the wood.
Stripping Old Fabric and Assessing Components
Carefully examine the existing staple pattern on the seat underside before removing anything—this shows where tension points should be when you reinstall new fabric. Using your flat-head screwdriver as a pry bar, work from the center outward to lift staples, inserting the screwdriver tip under each staple crown and twisting gently to pull it free.
As you remove the old fabric, inspect the wooden seat base for cracks or splinters that need sanding. Check if the original foam has separated from the base—if so, scrape off any remaining adhesive with your flat-head screwdriver. This is also when you’ll decide whether to reuse the existing foam (only if it’s still resilient) or replace it entirely. Discard any frayed fabric or deteriorated foam immediately to avoid accidentally using compromised materials.
Precision Fabric Installation Technique
Lay your new fabric face-down on a clean, flat workspace, smoothing out all wrinkles. Center the seat base (bottom-side down) on the fabric, ensuring at least 3-4 inches of excess fabric extends beyond all edges. For patterned fabrics, position the seat so the design centers perfectly on what will become the top surface.
Start by pulling the fabric taut across one side of the seat and securing it with a single staple at the exact center point. Move to the opposite side, pulling with equal tension (not so tight it distorts the wood), and staple its center point. Repeat this center-out approach for the remaining two sides, creating a drum-tight surface without wrinkles. This cross-pattern tensioning prevents the common mistake of lopsided fabric that plagues beginner projects.
Professional Corner Folding Method
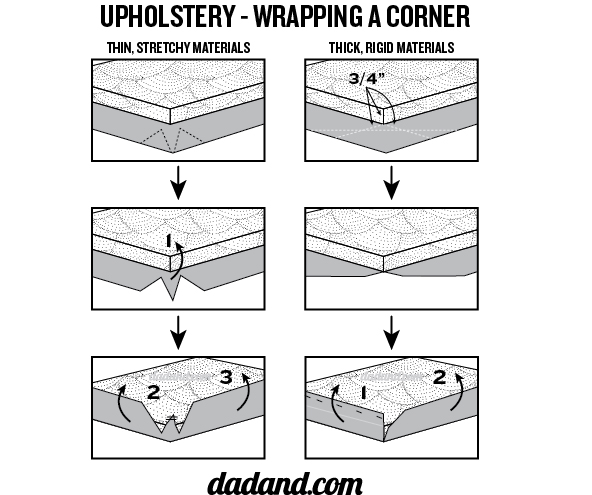
Most DIYers struggle with corners, but this simple technique creates crisp, professional results. On one side near a corner, pull the fabric straight down and staple about 2 inches from the corner point. Then fold the adjacent side’s fabric toward the corner like an envelope flap, creating a neat pleat. Staple through this folded section close to the corner.
Trim excess fabric within 1 inch of the staple line to reduce bulk, but leave enough to prevent unraveling. Repeat for all four corners, maintaining consistent tension. If your fabric is particularly thick or bulky, consider using your hot glue gun to secure the final corner folds before stapling—this prevents shifting during the critical last steps.
Critical Mistakes That Ruin Chair Seat Projects

Skipping the fabric pre-wash step for natural fibers causes uneven shrinking after completion, leading to puckered, distorted seats. Always test your staple gun on scrap wood first—too weak and staples won’t hold; too strong and they’ll blow through thin seat bases. Never staple too close to edges (minimum 3/8 inch) as this causes fabric tearing with regular use.
One often-overlooked mistake is improper tension distribution. Pulling too tightly on one side creates visible wrinkles on the seat surface, while loose fabric leads to premature sagging. Check tension by pressing your palm firmly on the seat top—if you see fabric shifting or hear creaking, you’ll need to remove and restaple that section.
Reassembly and Final Quality Check
Align your newly upholstered seat perfectly with the chair frame before inserting screws. Hand-start each screw to prevent cross-threading, then tighten firmly (but not excessively) with your screwdriver. Over-tightening can strip wood threads, especially in older chairs.
Once secured, flip the chair upright and sit on it gently to test stability. Run your hands over the seat surface to check for hidden wrinkles or loose spots. If any areas feel soft or uneven, you may need to add an extra staple or two underneath. For immediate protection, consider applying a fabric protector spray designed for upholstery—this creates an invisible barrier against future spills.
Mastering how to cover kitchen chair seats transforms tired furniture into custom-designed pieces that reflect your personal style. This weekend project costs a fraction of replacement chairs while yielding professional-looking results that impress guests and renew your enjoyment of mealtime. The satisfaction of sitting on seats you’ve personally refreshed creates a special connection to your home that store-bought furniture can’t match. Start with one chair as a practice piece, then tackle the entire set—you’ll be amazed at how such a simple update can completely revitalize your kitchen’s atmosphere. With these techniques in your DIY toolkit, future seat refreshes will take half the time and deliver even better results.


