
Your glass kitchen cabinet doors might be showcasing your beautiful dishware, but what happens when you want privacy, need to hide clutter, or simply crave a style refresh? Learning how to cover glass kitchen cabinet doors transforms your kitchen’s appearance without expensive renovations. This frustrating dilemma affects countless homeowners who love the elegance of glass doors but need practical solutions for everyday living. Whether you’re a renter seeking temporary fixes or a homeowner planning a kitchen makeover, this guide delivers proven techniques to obscure cabinet contents while maintaining your kitchen’s aesthetic appeal.
Glass cabinet doors present a unique design challenge—they offer visual interest but expose everything inside. Many homeowners struggle with mismatched dishware, everyday items that don’t match their aesthetic, or simply want more privacy in high-traffic kitchen areas. The good news is that covering glass cabinet doors has become remarkably accessible with modern materials and techniques. You’ll discover options ranging from $10 DIY films to professional treatments, all designed to give you control over your kitchen’s appearance without replacing entire cabinet systems.
Why Glass Cabinet Doors Need Coverage Solutions
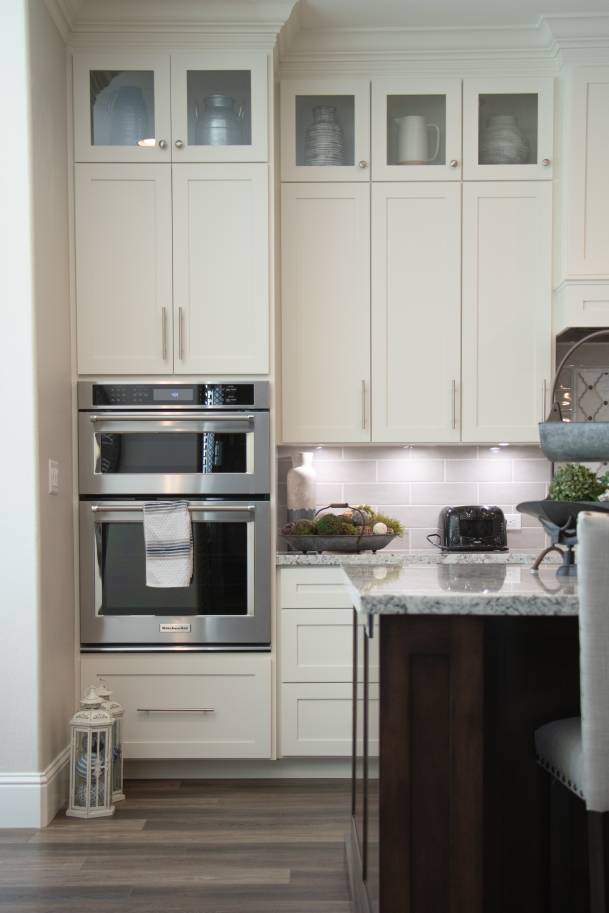
Glass kitchen cabinets create beautiful displays but often reveal too much of your daily reality. Many homeowners install glass doors expecting to showcase fine china, only to find themselves hiding mismatched mugs and everyday dishes behind strategically placed cookbooks. The constant pressure to keep contents perfectly styled turns what should be a design feature into a source of daily stress. This visual inconsistency between your kitchen’s aesthetic and practical storage needs creates one of the most common kitchen design frustrations homeowners face.
Privacy Concerns with Clear Glass Doors
Clear glass cabinet doors broadcast every item inside to anyone entering your kitchen space. This becomes problematic when you want to maintain a cohesive kitchen design but own practical dishware that doesn’t match your aesthetic vision. Family kitchens particularly suffer from this issue—children’s colorful plates and everyday bowls rarely align with sophisticated kitchen decor. The solution isn’t to stop using functional dishware but to intelligently cover glass cabinet doors so your storage solutions support rather than undermine your design goals.
When to Choose Temporary vs. Permanent Coverage
Your decision between temporary and permanent coverage depends on your circumstances. Renters typically need non-damaging solutions that won’t trigger security deposit deductions, while homeowners planning long-term stays might prefer more permanent transformations. Consider how long you’ll remain in your current home, your budget constraints, and whether you want flexibility to change your kitchen’s appearance seasonally. Temporary solutions like static-cling films work well for short-term needs, while painted or professionally etched glass offers lasting results for homeowners committed to their space.
Applying Frosted Glass Film Like a Pro
Frosted glass film delivers professional-looking results with minimal DIY experience. This cost-effective solution transforms clear glass to obscured in under an hour per door, making it the most popular method for how to cover glass kitchen cabinet doors. Whether you’re preparing for a home showing or simply tired of rearranging dishes before guests arrive, this technique provides instant visual relief without permanent changes.
Step-by-Step Film Application Process
Start by thoroughly cleaning your glass with a 50/50 mixture of isopropyl alcohol and water—this removes oils that prevent proper adhesion. Mix a few drops of dish soap with water in a spray bottle for your application solution. Cut your film slightly larger than the glass panel, then carefully peel the backing while spraying both the adhesive side and glass surface. Position the film with generous overlap, then use a plastic squeegee to work from the center outward, eliminating bubbles as you go. Finally, trim excess film with a sharp utility knife for a clean, professional edge.
Choosing the Right Film Opacity for Your Needs
Not all frosted films offer the same level of coverage—selecting the appropriate opacity makes all the difference. Light diffusion films maintain some visibility while softening contents, ideal for displaying attractive dishware without perfect organization. Medium frost provides better concealment while still allowing light transmission, perfect for everyday kitchen use. Heavy frost or patterned films completely obscure contents while adding decorative interest. Test small samples on your actual cabinet glass before committing to large purchases, as lighting conditions dramatically affect final appearance.
Painted Glass Cabinet Door Transformations

Frosted glass spray paint creates a permanent, professional finish that outlasts most films. This method works particularly well for homeowners seeking a cohesive kitchen aesthetic without worrying about film peeling or bubbling over time. Unlike temporary solutions, painted glass maintains its appearance through years of kitchen use, resisting the wear that often plagues adhesive films in high-moisture environments.
Proper Surface Preparation for Paint Adhesion

The secret to successful glass painting lies in surface preparation. Remove cabinet doors if possible and clean with isopropyl alcohol to eliminate all oils and residues. Lightly scuff the glass surface with 220-grit sandpaper to create “tooth” for better paint adhesion—this critical step prevents premature peeling. Apply painter’s tape to all edges and surrounding frames to protect adjacent surfaces. Work in a well-ventilated area with proper drop cloths, as overspray can create a significant cleanup challenge.
Achieving Professional Results with Spray Technique
Hold your frosted glass spray can 8-10 inches from the surface and apply thin, even coats using sweeping motions. Allow each coat to dry completely (typically 15-30 minutes) before applying the next—rushing this process causes runs and uneven texture. Most projects require 2-3 light coats for optimal coverage. For decorative effects, use painter’s tape to create geometric patterns or apply masking film for custom designs. Allow 24-48 hours for complete curing before reinstalling cabinet doors to prevent surface damage.
Interior Coverage Methods That Preserve Glass Integrity
These clever techniques cover glass cabinet doors from the inside, leaving the glass itself untouched. Perfect for renters or those who might want to revert to clear glass later, interior solutions maintain your cabinet structure while transforming appearance. You’ll achieve privacy without altering the glass surface, preserving your options for future design changes.
Installing Removable Back Panels Inside Cabinets
Measure the interior dimensions of your glass panel opening, then cut frosted acrylic sheets or decorative panels to fit precisely. Secure these panels with removable adhesive putty dots in the corners—this creates a clean, three-dimensional effect while allowing easy removal. For a more dramatic look, use colored acrylic sheets that cast soft light through the glass. This method works especially well with LED cabinet lighting, which illuminates your new backdrop beautifully.
Fabric and Wallpaper Liners for Instant Style
Choose washable fabrics or moisture-resistant wallpaper to line the interior of your glass doors. Cut your material precisely to size, then attach with double-sided mounting tape along the edges. This technique transforms cabinet contents into abstract shapes behind the fabric while adding texture and color. For best results, select materials with some translucency that allow light to pass through while obscuring specific items. Solid colors work well for minimalist designs, while patterns add visual interest to otherwise plain cabinets.
Troubleshooting Common Coverage Problems
Even the best how to cover glass kitchen cabinet doors projects encounter occasional issues. Knowing how to address common problems saves time, money, and frustration when your coverage solution doesn’t perform as expected. These practical fixes rescue projects that might otherwise require complete redoing.
Eliminating Bubbles in Applied Films
Bubbles happen to everyone during film application—don’t panic. For small bubbles, gently press them toward the edge with a credit card. For larger bubbles, carefully lift the film edge with an X-Acto knife, respray the area with your application solution, then smooth the film back down. If bubbles persist after drying, use a fine needle to puncture them, then press out the trapped air with your finger. Prevention works best: work slowly during application and maintain adequate overlap to allow repositioning.
Preventing Paint Peeling on Glass Surfaces
Paint peeling usually indicates inadequate surface preparation. If you notice edges lifting, carefully remove the affected area with a razor blade, then clean and lightly sand the spot before reapplying paint. For future projects, ensure thorough cleaning with alcohol, proper surface scuffing, and adequate drying time between coats. Consider using a glass-specific primer before applying your topcoat—this creates a critical bonding layer that significantly extends paint life on smooth glass surfaces.
Cost-Effective Solutions for Every Budget
You don’t need a professional budget to master how to cover glass kitchen cabinet doors. Smart material choices and strategic application save money while delivering impressive results. Focus your spending where it matters most—on high-visibility cabinets—while using simpler solutions for less prominent areas.
Budget-Friendly Film Options Under $50
Standard frosted window film costs $20-$50 per roll and covers multiple cabinet doors. Purchase a single roll to test different opacity levels before committing to larger quantities. Look for sales at home improvement stores or online retailers—many offer sample packs allowing you to test multiple options for minimal cost. Basic application tools (squeegee, utility knife, spray bottle) cost under $15 and work for multiple projects. This approach delivers professional results for less than $50 total, making it the most cost-effective solution for most homeowners.
When to Invest in Professional Services
Consider professional help for large cabinet installations, intricate patterns, or when working with expensive custom cabinetry. Professionals achieve flawless results on complex projects that might frustrate DIYers, particularly with large glass panels or textured designs. For high-end kitchens where precision matters, professional installation costs $200-$500 but ensures perfect results that enhance your home’s value. This investment pays off when dealing with valuable cabinetry where mistakes could be costly to correct.
Covering your glass kitchen cabinet doors successfully transforms your kitchen’s functionality without compromising style. By selecting the right method for your specific needs and following proper application techniques, you’ll enjoy beautiful cabinets that work with your lifestyle rather than against it. Remember that the best solution balances aesthetics, budget, and practicality—whether that’s a $20 film application or a professional glass treatment. Implement one of these proven methods today and finally enjoy cabinets that showcase your style, not your storage challenges.


