
Is your Shark vacuum not performing like it used to? A worn or broken belt could be the culprit. The belt is a crucial component that powers the brush roll, which is essential for picking up dirt, debris, and pet hair from your floors. Replacing the belt is a relatively simple maintenance task that can significantly improve your vacuum’s performance and extend its lifespan.
This guide will walk you through the process of changing the belt in your Shark vacuum, ensuring you can get back to enjoying clean floors in no time. We’ll cover the tools you’ll need, the steps involved, and some troubleshooting tips to help you along the way. With a little patience and these instructions, you can easily tackle this repair yourself and save money on professional services.
Whether you have an upright, a rotator, or a lift-away Shark vacuum, the basic principles of belt replacement remain the same. Let’s dive in and get your vacuum running like new again!
Identifying the Need for a Belt Replacement

Before you start taking your vacuum apart, how do you know if it’s actually the belt that’s the problem? Here are a few common signs that indicate your Shark vacuum belt may need replacing:
- The brush roll isn’t spinning: This is often the most obvious sign. If the brush roll isn’t turning, even when the vacuum is on, the belt is likely broken or stretched out.
- Burning rubber smell: A worn belt can slip and create friction, leading to a burning rubber smell.
- Reduced suction: A slipping belt can cause the brush roll to spin inefficiently, reducing the vacuum’s overall suction power.
- Unusual noises: A stretched or damaged belt might create squealing or thumping noises during operation.
Tools and Materials You’ll Need
Before you begin, gather the following tools and materials:
- New replacement belt: Make sure you purchase the correct belt for your specific Shark vacuum model. Check your vacuum’s manual or the Shark website to identify the right part number.
- Screwdriver: You’ll likely need a Phillips head screwdriver to remove the brush roll cover and other components.
- Scissors or seam ripper: These tools can be helpful for cutting away any tangled hair or debris around the brush roll.
- Gloves (optional): If you prefer to keep your hands clean, wear a pair of gloves.
- Small brush or vacuum attachment: To clean out any accumulated dust and debris.
Step-by-Step Guide to Changing the Belt
Now, let’s get to the actual belt replacement. Follow these steps carefully:
- Unplug the Vacuum: For safety, always unplug your Shark vacuum cleaner from the power outlet before starting any repairs.
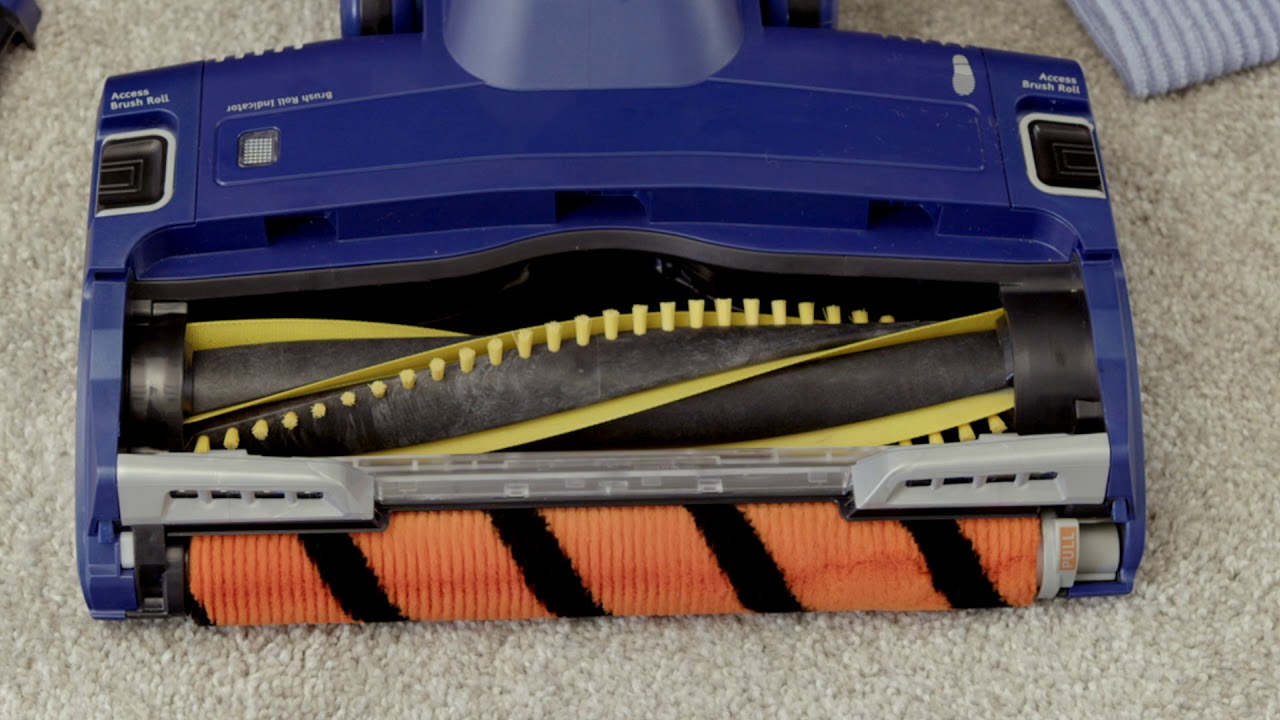
- Access the Brush Roll: Locate the brush roll cover on the bottom of the vacuum head. Depending on your model, it may be held in place by screws or clips. Use a screwdriver to remove the screws or gently release the clips.
- Remove the Brush Roll: Carefully lift out the brush roll. If it’s tangled with hair or debris, use scissors or a seam ripper to remove it.
- Remove the Old Belt: With the brush roll removed, you should be able to see the old belt. Take note of how the belt is positioned around the motor shaft and the brush roll. Gently stretch or cut the old belt to remove it.
- Install the New Belt: Place the new belt around the brush roll in the same position as the old one. Then, stretch the other end of the belt and secure it around the motor shaft. Make sure the belt is properly seated and not twisted.
- Reinstall the Brush Roll: Place the brush roll back into the vacuum head, ensuring it’s properly aligned.
- Test the Brush Roll: Before reassembling the vacuum, manually spin the brush roll to make sure it turns freely. If it feels tight or restricted, double-check the belt alignment.
- Reattach the Brush Roll Cover: Replace the brush roll cover and secure it with the screws or clips you removed earlier.
- Plug In and Test: Plug the vacuum back into the power outlet and turn it on. Observe the brush roll to make sure it’s spinning correctly.
Troubleshooting Common Issues

Sometimes, things don’t go exactly as planned. Here are a few common issues you might encounter and how to troubleshoot them:
- Belt is too tight: If the new belt is too tight, it may be difficult to install or cause the brush roll to spin slowly. Make sure you’ve purchased the correct belt for your model. If it’s the right size, try stretching it slightly before installation.
- Belt is too loose: If the belt is too loose, it may slip off the motor shaft or the brush roll. Again, ensure you have the correct belt size. If the belt continues to slip, the motor shaft or brush roll may be worn and need replacement.
- Brush roll won’t spin after replacement: Double-check the belt alignment and make sure it’s properly seated around the motor shaft and brush roll. Also, check for any obstructions that may be preventing the brush roll from turning.
- Burning smell persists: If you still notice a burning smell after replacing the belt, there may be another issue with your vacuum, such as a clogged hose or a faulty motor. Consult a professional for further diagnosis.
Pro Tips for Maintaining Your Shark Vacuum Belt
To extend the life of your Shark vacuum belt and keep your vacuum running smoothly, follow these pro tips:
- Regularly clean the brush roll: Remove any hair, string, or debris that may be wrapped around the brush roll. This can prevent the belt from overworking and wearing out prematurely.
- Avoid vacuuming over hard or sharp objects: These objects can damage the brush roll and the belt.
- Check the belt regularly: Inspect the belt for signs of wear or damage, such as cracks, fraying, or stretching. Replace the belt as soon as you notice any of these issues.
- Use the correct floor setting: Using the wrong floor setting can put unnecessary strain on the belt. Select the appropriate setting for the type of flooring you’re vacuuming.
FAQ About Shark Vacuum Belt Replacement
What happens if I don’t change my vacuum belt?
If you don’t change your vacuum belt when it’s worn or broken, your vacuum cleaner’s performance will decline. The brush roll may stop spinning entirely, leading to poor dirt and debris pickup. Continuing to use the vacuum with a bad belt can also damage the motor and other components, ultimately shortening the lifespan of your machine.
How often should I change my Shark vacuum belt?
The lifespan of a vacuum belt depends on usage and maintenance. As a general guideline, replace the belt every 6 to 12 months. If you notice any signs of wear or reduced performance, replace it sooner.
Can I use a generic belt instead of a Shark-branded belt?
While generic belts may be cheaper, it’s generally recommended to use a Shark-branded belt specifically designed for your vacuum model. Generic belts may not fit properly or provide the same level of performance and durability.
Where can I buy a replacement belt for my Shark vacuum?
You can purchase replacement belts from the Shark website, appliance stores, and online retailers. Be sure to check your vacuum’s model number to ensure you’re buying the correct belt.
Is it difficult to change a vacuum belt?
No, changing a vacuum belt is a relatively simple task that most people can do themselves with basic tools and a little patience. Just follow the step-by-step instructions provided in this guide.
What other maintenance tasks should I perform on my Shark vacuum?
In addition to changing the belt, regularly clean the filters, empty the dust cup, and check for any clogs in the hose or attachments. Proper maintenance will keep your Shark vacuum running smoothly and extend its lifespan.
Tips, Warnings and Best Practices
- Safety First: Always unplug your vacuum before performing any maintenance or repairs.
- Refer to Your Manual: Consult your Shark vacuum’s manual for specific instructions and diagrams related to belt replacement.
- Cleanliness is Key: Keep your work area clean and organized to avoid losing any small parts.
- Proper Belt Tension: Make sure the new belt has the correct tension. It should be tight enough to turn the brush roll but not so tight that it puts excessive strain on the motor.
- Don’t Force It: If you’re having trouble removing or installing the belt, don’t force it. Double-check your steps and make sure you’re using the correct tools.
Conclusion
Changing the belt in your Shark vacuum is a straightforward task that can significantly improve its performance. By following these step-by-step instructions and taking the time to maintain your vacuum properly, you can keep your floors clean and extend the life of your appliance. Don’t wait until your vacuum stops working altogether – proactively replace the belt when needed to ensure optimal performance. Now that you know how to change the belt, grab a new one and get ready to experience the renewed power of your Shark vacuum!


