

Picture this: You’re parked at a mountain vista at sunset, ready to cook dinner, but your “kitchen” is a camping stove on a milk crate. Without a properly built van kitchen, meal prep becomes a frustrating chore that steals joy from your adventures. A well-designed galley transforms your vehicle into a true home on wheels, letting you whip up meals anywhere while keeping your space organized and safe. This guide cuts through the guesswork of how to build a kitchen in a van by focusing on actionable steps that prevent common pitfalls. You’ll learn exactly how to integrate water systems, power sources, and appliances into a compact layout that survives cross-country bumps—all while avoiding costly mistakes that ruin months of conversion work.
Measure Your Van Interior Dimensions Before Cutting Wood
Precision measurements prevent wasted materials and layout disasters. Your van’s unique contours—especially wheel wells and roof curves—dictate what’s possible. Start by removing all insulation and wall panels to access the bare metal floor. Measure from the floor’s finished height (including insulation) to the ceiling at three points: directly above wheel wells, midway between wheels, and at the rear doors. Record width measurements at floor level, counter height (typically 32-36 inches), and ceiling height to account for tapering walls.
Account for Structural Obstacles in Your Layout
Wheel wells shrink usable space by up to 18 inches on each side. Sketch these intrusions on graph paper using a 1:10 scale—each square equals 10cm. Mark permanent fixtures like door hinges and electrical conduits that limit cabinet placement. For Sprinter vans, note the raised rear floor section; for Transit vans, account for the front cab bulkhead angle. This prevents discovering mid-build that your dream fridge won’t fit beside the driver’s seat.
Calculate Clearance for Appliance Operation
Leave 4 inches behind refrigerators for compressor airflow and 6 inches above stoves for ventilation. Test mock-ups with cardboard boxes sized to your planned appliances. Slide them through your van’s narrowest point (usually the door opening) to verify installation feasibility. Skipping this step causes 30% of DIY van builders to abandon their kitchen layout after cutting wood.
Match Your Kitchen Layout to Your Cooking Habits and Needs
Your cooking style—not Pinterest trends—should drive every design choice. A solo traveler boiling instant coffee needs radically different gear than a family cooking pasta daily. List every appliance you’ll use weekly: “I need a sink for dishwashing” beats “I want a sink.” Prioritize items by frequency: the coffee maker used daily deserves prime counter space, while the waffle iron can live in storage.
Design Workflow Around Your Most Common Meal Prep
Map your movement for making scrambled eggs: fridge (open door) → counter (chop veggies) → stove (cook) → sink (clean). Position these stations within 18 inches of each other. For right-handed cooks, place the sink left of the stove; lefties reverse this. Install the trash bin under the sink—not in a hard-to-reach cabinet—so you’re not climbing over seats mid-cook.
Optimize Workflow with L-Shape or Galley Van Kitchen Designs
L-shaped layouts dominate Sprinter conversions, wrapping around rear corners to maximize counter space. Galley kitchens (parallel counters) work best in Transits, using the narrow width for efficient movement. Avoid placing the stove under windows—it blocks ventilation—and never position the sink directly in front of doors where spills create slip hazards.
Position Appliances Using the “Work Triangle” Principle
Keep sink-fridge-stove distances between 12-24 inches total. In vans under 19 feet, combine sink and stove functions: mount a portable induction cooktop inside the sink basin when not in use. This saves 8+ inches of precious counter space. Always leave 10 inches of landing space beside the stove—no one wants to balance a hot pan on a cabinet door.
Build Lightweight Cabinetry and Countertops for Van Durability
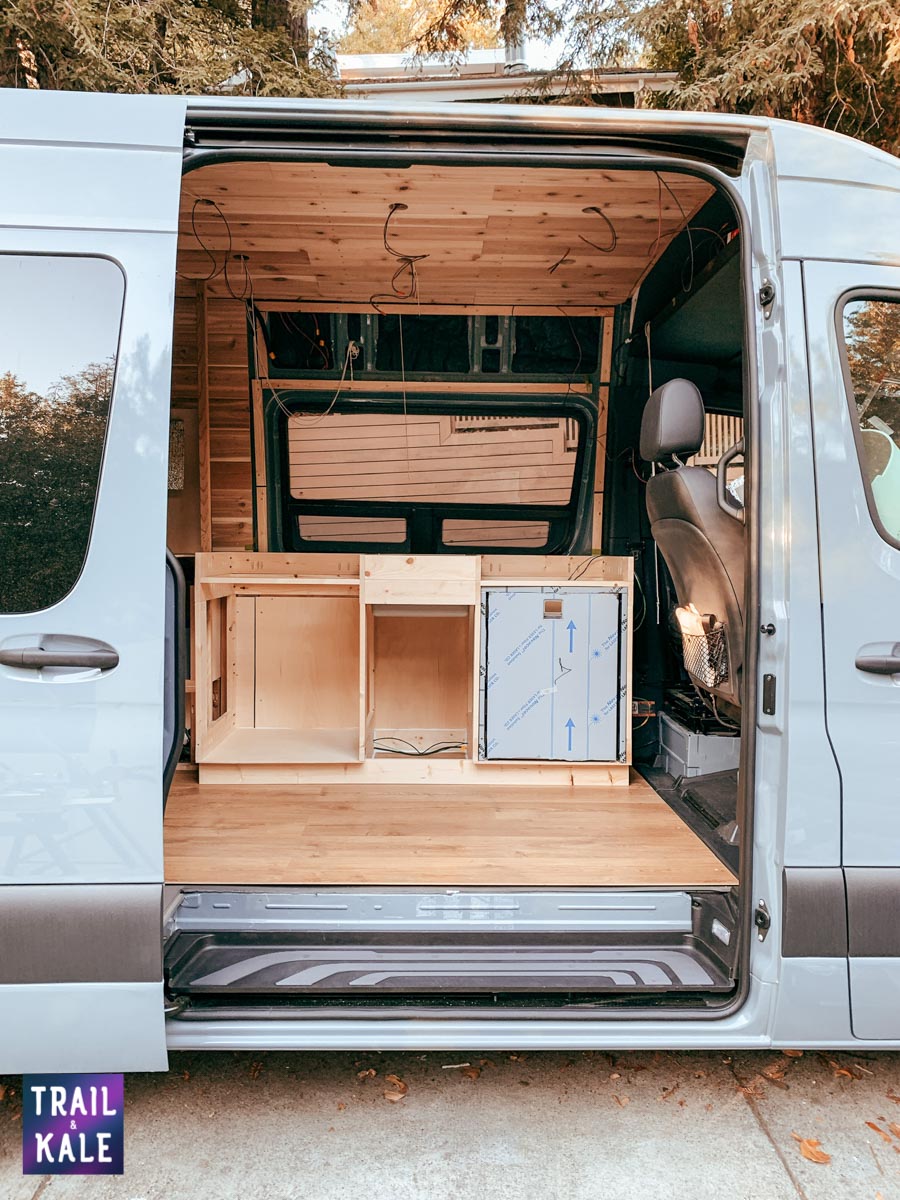
Standard plywood cabinets crack under road vibrations. Use 1/2-inch Baltic birch plywood with marine-grade Titebond III glue—its waterproof formula handles humidity swings. Cut all pieces oversized by 1/8 inch, then sand to exact dimensions for tight joints. Pre-drill every screw hole to prevent splitting, and use #8 stainless steel screws (never nails) with rubber washers to absorb shocks.
Choose Countertops That Resist Cracks and Stains
Butcher block requires weekly oiling to prevent warping; solid surface (Corian) costs 40% more but withstands boiling water spills. For budget builds, laminate over plywood works if you seal all edges with aluminum edging tape. Test materials by pouring boiling water on scraps—real-world spills reveal weaknesses before installation.
Install a 3-Stage Water Filtration System for Safe Drinking Water
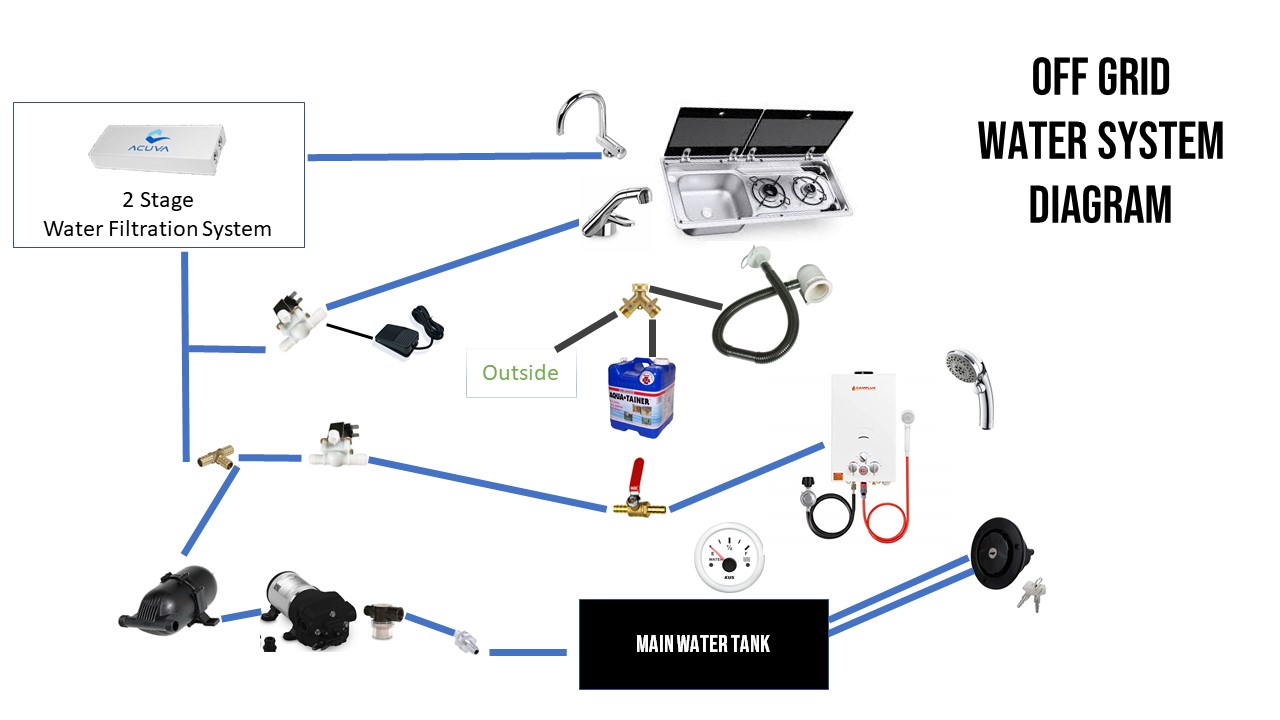
Municipal water tanks breed bacteria in stagnant lines. Install this sequence before your pump: 5-micron sediment filter → 0.5-micron carbon block filter → optional UV sterilizer. Mount filters vertically in an accessible cabinet—never behind permanent panels. Use push-to-connect fittings (not hose clamps) for leak-proof joints that survive vibration.
Prevent Pump Cavitation with Proper Tank Placement
Position your 12V water pump within 12 inches of the freshwater tank outlet. Longer runs cause air pockets that burn out motors. Add a 1/4-inch check valve immediately after the pump to stop backflow when shutting off the faucet. Test the system by running water for 10 minutes—any sputtering means you missed an air pocket.
Set Up a Gravity-Fed Greywater Drain with Easy Access Valve
Greywater tanks under the van avoid interior odors but require careful slope planning. Your sink must sit 6+ inches above the tank inlet. Use rigid 1-inch PVC pipe (not flexible hose) with a 1/4-inch-per-foot downward slope toward the tank. Install a T-junction with a cleanout port before the tank for unclogging spaghetti disasters.
Choose Draining Solutions for Remote Locations
A gate valve (not ball valve) prevents accidental spills during bumpy drives. For stealth camping, connect a 10-foot hose to the tank outlet—run it discreetly behind your tire to drain into vegetation without leaving the vehicle. Empty tanks every 2 days to avoid sour smells permeating your cabin.
Power Your Van Kitchen with a 12V DC and Inverter System
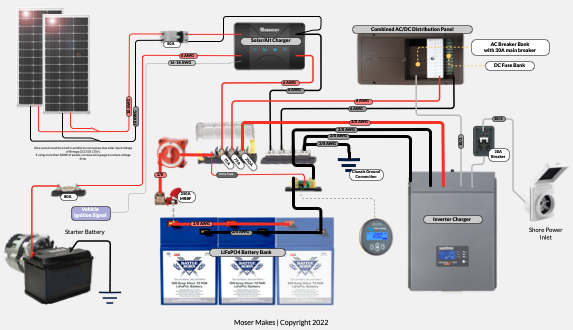
A 1000W pure sine wave inverter runs blenders and microwaves without frying electronics. But it drains batteries fast: a 10-minute microwave session consumes 200Ah. Install a dedicated 30A circuit breaker between the inverter and battery bank, and use 4-gauge copper wire to prevent voltage drop. Never run high-wattage appliances while driving—the alternator can’t keep up.
Size Batteries Based on Actual Appliance Draw
Calculate daily watt-hours: Fridge (40W x 24h = 960Wh) + Water pump (50W x 0.5h = 25Wh) = 985Wh total. With a 50% depth-of-discharge limit, you need 1970Wh of battery capacity (about 164Ah at 12V). Under-sizing causes 70% of van lifers to abandon off-grid cooking within 6 months.
Install a Roof Vent Fan to Eliminate Kitchen Moisture and Odors
Condensation from cooking warps cabinets and grows mold within weeks. A MaxxFan Deluxe (1,300 CFM) clears steam in 90 seconds. Cut the roof hole using a jigsaw with metal-cutting blades—start with a 1/2-inch pilot hole. Apply butyl tape around the flange before lowering it through the roof; this creates a waterproof seal as you tighten the screws.
Wire the Fan for Automatic Moisture Control
Connect the fan to a humidistat ($25 part) set to 60% humidity. It triggers automatically when you boil water, eliminating manual switches. Run wires through a conduit looped downward—the “drip loop” prevents rain from tracking into your electrical system. Test before sealing: spray water near the fan while it runs to check for leaks.
Choose the Right 12V Fridge Size for Your Van’s Energy Budget
A 40-quart fridge (like the Dometic CFX3) fits under most counters but drains 35Ah daily. For solo travelers, a 25-quart model cuts energy use by 30%. Never install fridges flush against walls—leave 3 inches on all sides for airflow. In hot climates, add a 12V fan blowing across the condenser coils to boost efficiency by 25%.
Decide Between Propane and Induction Cooktops for Safety
Propane tanks must live in a sealed, externally vented compartment—never inside the cabin. A single leak in a parked van can create an explosive atmosphere. Induction cooktops avoid this risk but require 1,200W of continuous power (a 100Ah battery runs one for just 1 hour). For safety, hardwire propane systems with an automatic shutoff valve that triggers on CO detection.
Mount a Deep Bar Sink with High-Arc Faucet for Filling Pots
Standard RV sinks are too shallow for pots. Install a 10-inch-deep bar sink (like the Sea Gull MAR-222) with a gooseneck faucet. Angle the drainpipe downward immediately after the sink trap—van movement causes water to pool in flat pipes, creating stinky traps. Use silicone sealant around the sink rim, not plumber’s putty, which dries out and cracks on rough roads.
Secure All Appliances to Survive Road Vibrations and Stops
Unsecured fridges become projectiles in crashes. Bolt appliances to the van’s metal frame—not just cabinetry—using L-brackets with vibration-dampening rubber pads. Test security by shaking the unit vigorously; if you hear rattling, add closed-cell foam padding. After installation, take a bumpy test drive with a full water tank to check for leaks before final sealing.
Final Note: Building your van kitchen demands precision, but the payoff is freedom. Start with laser-focused measurements, match every component to your actual cooking habits, and never skip safety redundancies like automatic propane shutoffs. Seal all wood edges against humidity, secure appliances to the vehicle frame, and test systems before final assembly. A well-built kitchen turns roadside stops into culinary adventures—where the only limit is your next horizon. For ongoing success, drain greywater after each use, inspect water lines monthly for cracks, and keep a fire extinguisher mounted within arm’s reach of your stove. Your perfect van kitchen isn’t about square footage; it’s about creating a space where every meal fuels the journey.


