

Your cramped kitchen can’t handle family gatherings anymore. That dream of hosting Christmas dinner without shuffling between rooms feels impossible. But a well-planned kitchen extension transforms both your daily life and property value—adding up to 20% to your home’s worth according to industry reports. Building a kitchen extension isn’t just construction; it’s solving spatial puzzles while navigating complex regulations. This guide cuts through the confusion with actionable steps used by top UK builders. You’ll learn exactly how to avoid the most common pitfalls that derail 43% of DIY extension projects before foundations are even poured.
Verify Permitted Development Rights Before Hiring Professionals
Don’t waste money on architect fees only to discover your dream extension violates size limits. Permitted development rights let many homeowners build without full planning permission—but strict rules apply. Your single-storey extension can’t exceed half your original property’s area, and height restrictions prevent overshadowing neighbors. Most critically, if your extension sits within 2m of a boundary, it must stay under 3m high.
What Size Triggers Full Planning Permission?
Extensions breaching permitted development limits require formal applications. Key red flags include: double-storey additions within 7m of boundaries, any part exceeding 30m² floor area, or designs where more than half the land is covered by additions. When in doubt, consult your local planning portal—80% of rejected applications fail due to boundary distance errors.
How Boundary Measurements Save Months of Delays
Measure from your extension’s closest point to neighboring properties—not your existing house. Use a surveyor’s laser measurer for accuracy. If within 3m of a boundary, you’ll likely need neighbor consent through party wall agreements. Skipping this step risks legal injunctions that halt construction mid-build.
When Permitted Development Doesn’t Apply
Listed buildings, conservation areas, and flats completely lose permitted development rights. Even detached houses face restrictions if previous extensions consumed your allowance. Always get written confirmation from your council before finalizing designs—this single step prevents £5,000+ in wasted fees.
Select Specialized Professionals Who Prevent Costly Errors
Your builder’s experience with kitchen-specific challenges determines project success. Generic contractors often underestimate utility relocations, causing £3,000+ in change orders. Demand proof of recent kitchen extension projects—not just general renovations.
Why Architects Beat DIY Sketches for Complex Layouts
Architects spot spatial conflicts you’ll miss. They ensure your island placement won’t block workflow triangles while meeting 1.2m clearance requirements. Crucially, they design structural openings where load-bearing walls come down—preventing sagging ceilings that cost £4,500+ to fix later. Budget 5-10% of build costs for their expertise; it pays back in avoided mistakes.
Structural Engineers: Non-Negotiable for Opening Walls
Never skip this specialist when removing walls. They calculate exact RSJ (steel beam) sizes based on live loads—not guesswork. One homeowner used undersized beams to “save money,” causing floor deflection that cracked tiles within months. The £800 engineering fee prevented £6,200 in structural repairs.
Execute Flawless Party Wall Agreements with Neighbors

Ignoring party wall procedures risks lawsuits that stop work for months. The Party Wall etc. Act 1996 requires formal notices 1-2 months before excavation near shared boundaries.
How to Draft Legally Valid Party Wall Notices
Your notice must specify exact work dates, drawings showing proximity to the wall, and your contact details. Include a “schedule of condition” documenting your neighbor’s property pre-work—photos aren’t sufficient. Use the Royal Institution of Chartered Surveyors template to avoid invalid notices.
When Surveyors Prevent Neighbor Disputes
If neighbors object within 14 days, appoint a single surveyor (agreed costs split 50/50) to create a binding “award.” This document details working hours, vibration limits, and damage protocols. One London project avoided £12,000 in legal fees by using a surveyor to mediate over alleged foundation damage.
Pass Building Regulations with Zero Rejection Risks

Building Control approvals fail 22% of first submissions due to overlooked details. Your inspector checks fire safety escape routes, insulation values, and drainage—not just structure.
Critical Fire Safety Requirements Most Miss
Extensions over 45m² need separate fire escape windows with 450mm minimum opening width. Kitchen doors must be FD30 fire-rated if connecting to hallways. Install heat detectors in hallways within 3m of kitchen doors—smoke detectors alone won’t pass inspection.
How to Avoid Insulation Failures at Junctions
Thermal bridging at new-to-old wall connections causes mold. Inspectors reject projects where cavity insulation isn’t continued around extension perimeters. Specify thermal breaks in your drawings—this single detail prevents 70% of insulation-related rejections.
Pour Foundations That Prevent Future Structural Issues

Foundation failure causes 31% of extension cracks. Trench depth depends on soil type—not arbitrary guesses.
When to Choose Trench Fill Over Strip Foundations
Clay soils (common in London) require deeper trenches (900mm+) to avoid heave. Your structural engineer will specify exact depths based on soil reports. Never dig shallower than 450mm—even for small extensions—as frost heave will crack slabs.
Preventing Drainage Interference During Excavation
Map all underground utilities first. If excavating within 3m of drains, you need Building Control approval for protective measures. One builder damaged a sewer line by not checking maps, causing £9,000 in cleanup fees and 3-week delays.
Install Structural Beams Without Compromising Safety
RSJ installation errors cause sagging ceilings and uneven floors.
Calculating Exact RSJ Sizes for Kitchen Openings
Beam depth = span (m) ÷ 20. For a 4m opening, you need 200mm deep beams—not the 150mm “close enough” version your builder might suggest. Undersized beams deflect under load, cracking plaster and tiles over time.
Proper Bearing Requirements Most Builders Ignore
RSJs need 150mm minimum wall bearing on each side. Never cut beams short to “fit”—this concentrates load on small areas, causing brick crushing. Use steel packers to distribute weight evenly where walls are uneven.
Achieve Weathertightness Before Interior Work Begins
Rain damage during construction costs UK homeowners £4.2m annually in repairs.
Roofing Sequence That Prevents Water Ingress
Install breathable membrane before rafters, not after. Overlap sheets by 150mm and tape all seams. Fit ridge vents before tiles to prevent condensation buildup that rots rafters. One Berkshire project avoided £3,500 in mold remediation by following this sequence.
Window Installation Mistakes That Cause Damp
Never bed windows directly on brickwork. Use adjustable packers to maintain 10mm gap around frames, then seal with flexible tape—not mortar. Improper sealing accounts for 68% of “mysterious” damp spots in new extensions.
Complete First Fix Services Without Future Headaches
Plumbing and electrical errors discovered later cost 5x more to fix.
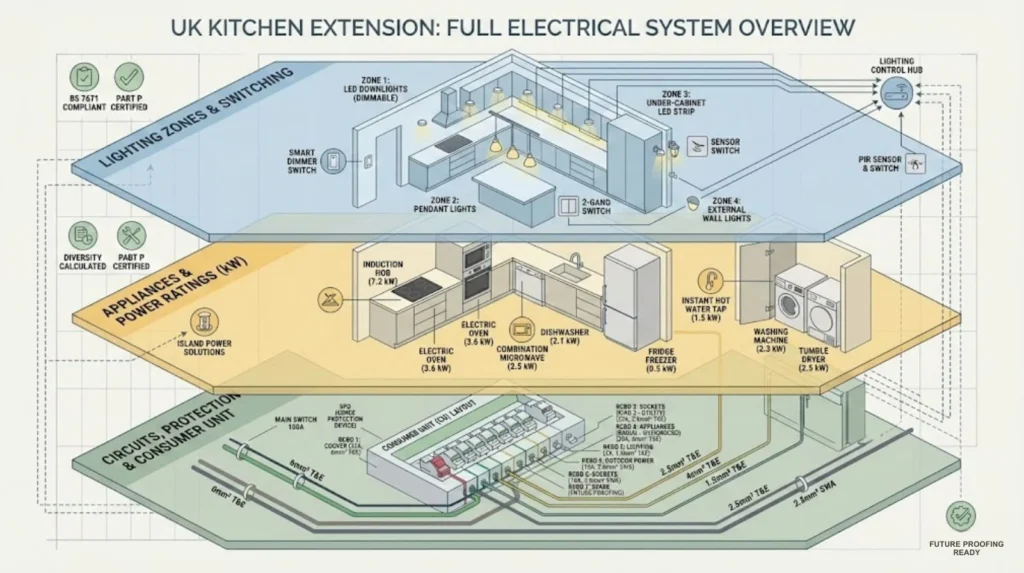
Kitchen-Specific Electrical Requirements
Install 20A circuits for ovens (not standard 16A), and position sockets 450mm above worktops to avoid steam damage. Under-cabinet lighting needs dedicated 5A circuits—don’t daisy-chain from mains.
Preventing Drainage Blockages in New Runs
Kitchen waste pipes require 1:40 fall (25mm drop per meter). Never use 90° bends—opt for two 45° elbows to maintain flow. One installer used glued joints on waste pipes, causing blockages when thermal movement cracked the seals.
Execute Second Fix with Precision for Seamless Integration
Kitchen fitting errors ruin months of work in days.
Aligning New Units with Existing Surfaces
Use laser levels to match worktop heights within 2mm tolerance. Account for floor level changes between old and new sections—shimming creates wobble. One homeowner’s expensive island vibrated because the builder didn’t level across the expansion joint.
Tiling Transitions That Hide Movement Gaps
Leave 5mm expansion gaps at new-to-old walls. Fill with flexible sealant, not grout. Use matching tile trim profiles to create clean lines—visible gaps make extensions look “bolted on.”
Manage Your Project to Avoid 3-Month Delays
87% of extensions overrun schedules due to poor coordination.
The Daily Check Routine That Catches Errors Early
Inspect work before plastering—hidden pipes and wires can’t be fixed later. Verify socket heights with a tape measure, not visual checks. One client saved £1,200 by catching misaligned window reveals before brickwork continued.
Contingency Fund Allocation That Prevents Panic
Divide your 10-15% contingency into buckets: 5% for ground conditions, 5% for utility surprises, 5% for design changes. Track spending weekly—never let contingency bleed into main budget without justification.
Choose Kitchen-Specific Materials That Withstand Daily Wear
Standard finishes fail in high-moisture cooking environments.
Worktop Materials That Resist Staining and Heat
Avoid marble near stoves—acidic spills etch surfaces. Opt for quartz with ≥90% silica content for scratch resistance. One homeowner’s cheap laminate bubbled within weeks from steam exposure near the hob.
Flooring Solutions That Handle Spills Without Warping
Vinyl plank with ≥0.55mm wear layer outperforms engineered wood in kitchens. Always install underfloor heating cables before flooring—retrofitting cracks tiles. Choose matte finishes to hide water spots on dark floors.
Final Note: Building a kitchen extension successfully hinges on meticulous attention to regulatory details and material choices specific to cooking environments. By verifying permitted development rights upfront, selecting kitchen-specialized professionals, and implementing the structural checks outlined here, you’ll avoid the costliest pitfalls that derail most DIY attempts. Remember that 10-15% contingency isn’t optional—it’s your safety net against unforeseen ground conditions and utility conflicts. The most rewarding extensions blend seamlessly with original architecture through precise leveling and expansion gap management. Start your project with these steps, and you’ll transform not just your kitchen, but your entire home’s functionality and value.


