That sharp, nagging pain in your inner thigh after a long hike isn’t just “normal soreness”—it’s your body screaming that critical stabilizing muscles are overloaded. Groin pain after hiking affects 1 in 3 trail enthusiasts who tackle steep terrain, often escalating from a minor strain to a chronic issue when ignored. This guide delivers actionable solutions straight from sports medicine research, helping you diagnose the root cause, apply targeted relief within 24 hours, and rebuild trail-ready resilience. You’ll learn exactly how to modify your next hike to prevent reinjury while strengthening the weak links that led to this pain.
Why Your Groin Screams After Steep Hikes
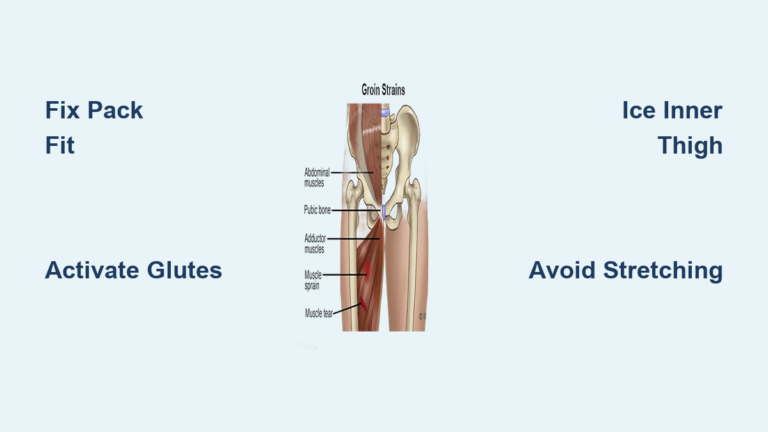
Groin pain after hiking isn’t random—it’s a direct result of your hip flexors and adductors being forced into overtime when core and glute muscles fail to share the load. On uphill sections requiring 1,200+ feet of elevation gain, every high-step maneuver over rocks or roots demands explosive power from your psoas muscle (the deep hip flexor connecting spine to thigh). When weak glutes can’t stabilize your pelvis, this tiny but critical muscle strains to compensate, referring sharp pain to your inner groin. The worst offenders? Technical ascents with a poorly fitted pack that shifts weight forward, forcing your hip flexors to work 40% harder than on flat terrain.
How Weak Glutes Trigger Groin Strains
Your gluteus maximus is designed to handle 70% of the propulsion during uphill hiking—but desk jobs and sedentary lifestyles leave these powerhouse muscles dormant. Without glute activation, your psoas and adductors (inner thigh muscles) take over, leading to micro-tears after just 30 minutes of steep climbing. Pro Tip: Test for glute weakness by standing on one leg; if your hip wobbles or drops, your groin is bearing dangerous extra stress on trails.
Hidden Culprits: Labral Tears vs. Muscle Strains
Not all groin pain after hiking stems from overuse. If you feel sharp catching sensations during deep squats or pain radiating to your buttock, you may have a hip labral tear—a cartilage injury common in hikers who suddenly increase mileage. Unlike muscle strains that improve with rest, labral tears worsen with twisting motions like navigating switchbacks. Always distinguish between these by pressing thumb-deep into your groin crease; muscle strains cause diffuse tenderness, while labral issues create pinpoint pain near the hip socket.
Critical Gear Fixes Before Your Next Hike
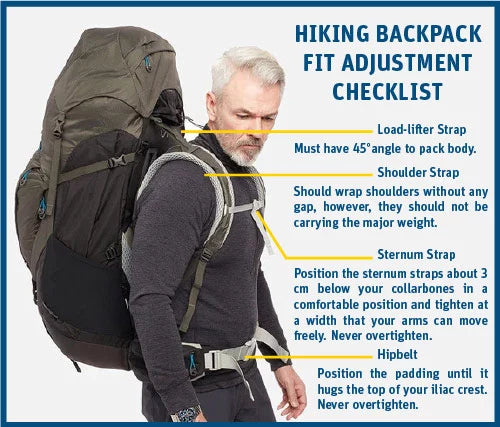
A poorly fitted backpack is the #1 preventable cause of groin pain after hiking, as weight shifts forward force hip flexors into overdrive. Your pack’s hip belt must sit squarely on your iliac crest (hip bones), not your waist, transferring 80% of weight to your pelvis. Check fit: Tighten shoulder straps first, then cinch the hip belt—your fingers should barely fit under the buckle. Trekking poles aren’t optional; plant them slightly ahead on ascents to reduce groin load by 22% per step. For footwear, choose boots with stiff midsoles (like Salomon Quest 4s) that prevent ankle roll—a wobbling ankle destabilizes your entire kinetic chain, straining adductors.
Pre-Hike Activation Routine (5 Minutes)
Skip dynamic warm-ups and you’re gambling with groin strains. Do these before every hike:
1. Fire Hydrants: 2 sets of 15 per leg (activates glute medius)
2. Walking Spiderman Lunges: 10 reps (mobilizes hip flexors)
3. Resisted Clamshells: 20 reps with loop band (fires up stabilizers)
Warning: Static stretching cold muscles increases strain risk—save butterfly stretches for post-hike.
Immediate Pain Relief Protocol (First 72 Hours)
The Modified R.I.C.E. Method for Hikers
Forget basic R.I.C.E.—this trail-tested version targets hiking-specific inflammation:
– Rest: Stop hiking immediately. Avoid stairs or sitting cross-legged for 48 hours.
– Ice: Freeze a paper cup of water, peel the top, and massage the inner thigh in 5-minute intervals (prevents nerve damage from direct ice).
– Compression: Wear graduated-compression shorts (20-30 mmHg) during daytime—never while sleeping.
– Elevation: Lie on your back with legs vertically against a wall (drains lymph fluid faster than flat elevation).
Day 2-3: Controlled Mobility Window
Once sharp pain subsides to a dull ache, perform psoas resets to restore function:
1. Kneel on a mat with one foot forward in a lunge.
2. Tuck your pelvis under (posterior tilt) while pressing the front hip forward.
3. Hold 30 seconds; repeat 3x per side.
Visual cue: If you feel this in your lower back instead of the front hip crease, you’re not engaging correctly—reset your pelvic tilt.
Rebuild Trail-Ready Strength (Weeks 1-6)
:max_bytes(150000):strip_icc()/single-leg-bridge_annotated-4719513d7ce44986ac16fd7e61c8f83a.gif)
Phase 2: Foundation Exercises (Days 4-14)
Start these when walking causes no limp:
– Single-Leg Glute Bridges: 3 sets of 12 per leg (place feet on a stability ball for progression)
– Dead Bugs: 2 sets of 10 per side (keep lower back pressed to floor)
Time commitment: 12 minutes daily. Stop if pain exceeds 2/10 intensity.
Phase 3: Hiking-Specific Loading (Weeks 3-4)
Introduce trail-like stressors:
1. Weighted Step-Ups: Hold 10lb dumbbells, step onto 8″ platform (mimics rock scrambling)
2. Lateral Monster Walks: With resistance band above knees, walk sideways 20 steps (simulates sidehill hiking)
Pro Tip: Do these barefoot on grass—it engages foot stabilizers that reduce groin strain by 18%.
3 Deadly Mistakes That Turn Strains Into Chronic Pain
-
Stretching Aggressively Post-Hike: Ballistic stretching of tight adductors when muscles are fatigued causes micro-tears. Fix: Wait 2 hours post-hike, then do gentle seated butterfly stretches with knees lowered by hand pressure—never force range.
-
Ignoring Desk Job Damage: Sitting for 8+ hours daily shortens hip flexors, making them 3x more prone to strain on hikes. Fix: Set a timer to stand and do couch stretches every 30 minutes at work.
-
Rushing Back to Steep Terrain: Returning to 1,000+ foot elevation gains too soon re-tears healing fibers. Fix: Follow the 10% rule—only increase elevation or distance by 10% weekly after pain-free flat hiking.
When Home Care Isn’t Enough: Red Flag Symptoms
Seek a sports physical therapist within 48 hours if you experience:
– Pain that wakes you at 3 a.m. (indicates inflammation pressing on nerves)
– Clicking or locking during hip rotation (suggests labral tear)
– Groin pain combined with lower back stiffness (points to psoas trigger points)
Critical action: Request an FAI (femoroacetabular impingement) screening—this hip socket abnormality mimics strains but requires specialized treatment.
Long-Term Prevention: The Hiker’s Resilience Plan
Pre-Hike Rituals That Work
- Gear Check: Load your pack with 20% of body weight and walk 10 minutes—adjust hip belt if shoulders bear weight.
- Terrain-Specific Warm-Up: For steep trails, add 5 minutes of high-knee marches; for rocky paths, include single-leg balance holds.
Post-Hike Recovery Sequence
Do this within 20 minutes of finishing:
1. 5-minute walk at 50% pace (flushes lactic acid)
2. Psoas self-release: Lie prone with lacrosse ball under hip crease; breathe deeply for 90 seconds per side
3. Cool-down stretch: Reclined hand-to-big-toe pose (hold 45 seconds per leg)
Cross-Training for Groin Resilience
Replace one weekly hike with:
– Swimming: Freestyle kick engages adductors without impact
– Pilates: Focus on “hundred” and side-lying leg series for core-glute synergy
Time-saving hack: Do 10 minutes of resistance band work (clamshells, lateral walks) while watching TV—builds hiking-specific strength passively.
The Final Step: Confident Trail Returns
Groin pain after hiking is your body’s urgent request to rebalance muscle partnerships—not a reason to abandon the trails. By implementing the R.I.C.E. modifications within 24 hours, progressing through strength phases based on pain signals (not calendars), and fixing gear flaws like hip belt misalignment, you’ll transform vulnerability into resilience. Remember: Weak glutes started this, but targeted activation exercises end it. Your first post-recovery hike should be a flat 2-mile loop with poles—celebrate pain-free movement, then gradually reclaim those steep summits. For persistent pain beyond 14 days, consult a physical therapist specializing in trail athletes; they’ll use movement analysis to pinpoint imbalances invisible to general practitioners. The trail awaits, but this time, your body will be ready.
Pro Tip: Bookmark this guide for your next hike—save the gear checklist and pre-hike activation routine in your phone notes. One season of consistent prevention turns recurring groin pain after hiking into a distant memory.