
That annoying trickle from your kitchen sink won’t stop even when the handle is firmly in the “off” position. If your Delta kitchen faucet won’t turn off, you’re not just wasting water—you’re risking potential water damage and inflated utility bills. This persistent drip almost always points to a compromised internal seal, with a worn cartridge being the prime culprit in 90% of cases. The good news? This common failure is usually a straightforward DIY repair requiring basic tools and under 30 minutes of your time. By the end of this guide, you’ll know exactly how to diagnose the root cause and implement a permanent fix without calling a plumber.
Ignoring a faucet that won’t shut off completely accelerates wear on internal components. Mineral deposits from hard water can turn a minor drip into a flood within weeks, potentially damaging cabinetry and flooring. Delta’s ceramic-disc cartridges are engineered for longevity, but sediment buildup or normal wear eventually creates microscopic gaps where water escapes. The silver lining? Unlike older washer-based faucets, Delta’s cartridge system allows precise diagnosis and targeted repairs. Whether you have a classic Lahara model or a newer Touch2O® faucet, this guide covers universal troubleshooting steps applicable to most single-handle Delta kitchen faucets manufactured since 2006.
Why Your Delta Faucet Keeps Dripping After Shut-Off
A Delta kitchen faucet won’t turn off completely because water bypasses the cartridge’s sealing surfaces. When ceramic discs inside the cartridge develop hairline cracks or accumulate mineral deposits, they can’t form a watertight barrier in the “off” position. This manifests as a steady drip or thin stream from the spout even when the handle is fully closed. Crucially, the leak pattern reveals the cause: Immediate dripping upon handle closure indicates cartridge failure, while delayed dripping suggests air trapped in the lines—a symptom often mistaken for cartridge issues.
Three specific failure points dominate persistent leaks: First, cartridge wear where sediment erodes the ceramic sealing surfaces. Second, handle misalignment where a loose set screw prevents the cartridge from rotating fully to the “off” position—noticeable when nudging the handle slightly stops the drip. Third, debris in the valve seat, where sand or pipe scale lodges between the cartridge and its housing, creating a permanent gap. Unlike aerator clogs (which cause weak flow), these issues directly compromise the shut-off mechanism. If tightening the handle set screw doesn’t resolve it, cartridge replacement becomes necessary.
How to Confirm Cartridge Failure in 60 Seconds
Check if your faucet exhibits these telltale signs of cartridge failure:
– Water continues flowing when the handle is positioned exactly over the “off” indicator
– Dripping worsens when switching between hot and cold settings
– Visible mineral buildup around the handle base when wiping with a paper towel
– Handle requires excessive force to turn “off” or spins loosely
If your Delta kitchen faucet won’t turn off and matches these symptoms, proceed to diagnostics. Critical warning: Never overtighten the handle to stop the drip. This forces ceramic discs against worn surfaces, accelerating damage and potentially cracking the cartridge housing.
Essential Pre-Repair Checks (No Tools Required)
Before disassembling your faucet, eliminate simple fixes that take under two minutes. These preliminary checks prevent unnecessary part replacements and pinpoint whether the issue stems from external components. Start by verifying water pressure: Turn off the main house supply, then open both sink faucet handles to drain residual pressure. If dripping persists after 10 minutes, the problem is internal—not pressure-related.
Diagnose Aerator vs. Cartridge Failure Instantly
Remove the aerator by twisting it counterclockwise from the spout tip. Place a towel over your fingers for grip if it’s tight. If the drip stops completely with the aerator off, mineral deposits are blocking the screen—soak it in white vinegar for 30 minutes. But if water still flows from the bare spout opening, the failure is deeper inside the cartridge assembly. This single test eliminates 15% of “Delta kitchen faucet won’t turn off” cases caused by clogged aerators.
Handle Alignment Test for Quick Fixes
Wiggle the handle side-to-side. Excessive play (more than 1/8 inch) means the set screw has loosened. Locate the small plastic cap on the handle’s rear—pry it gently with a flathead screwdriver to expose the hex screw. Tighten it clockwise with a 3/32″ Allen wrench until snug (do not overtighten). Now test: If the drip stops when you nudge the handle slightly left or right of “off,” realign the handle by loosening the set screw, positioning the handle straight up in “off” position, then retightening. This resolves 20% of persistent drip cases.
Step-by-Step Cartridge Replacement Guide
When your Delta kitchen faucet won’t turn off after basic checks, replace the cartridge—the most common fix requiring just $15 and 25 minutes. Critical prep: Shut off BOTH hot and cold supply valves under the sink. Turn handles to “on” position to relieve pressure before disconnecting lines. Skipping this risks flooding when removing the cartridge.
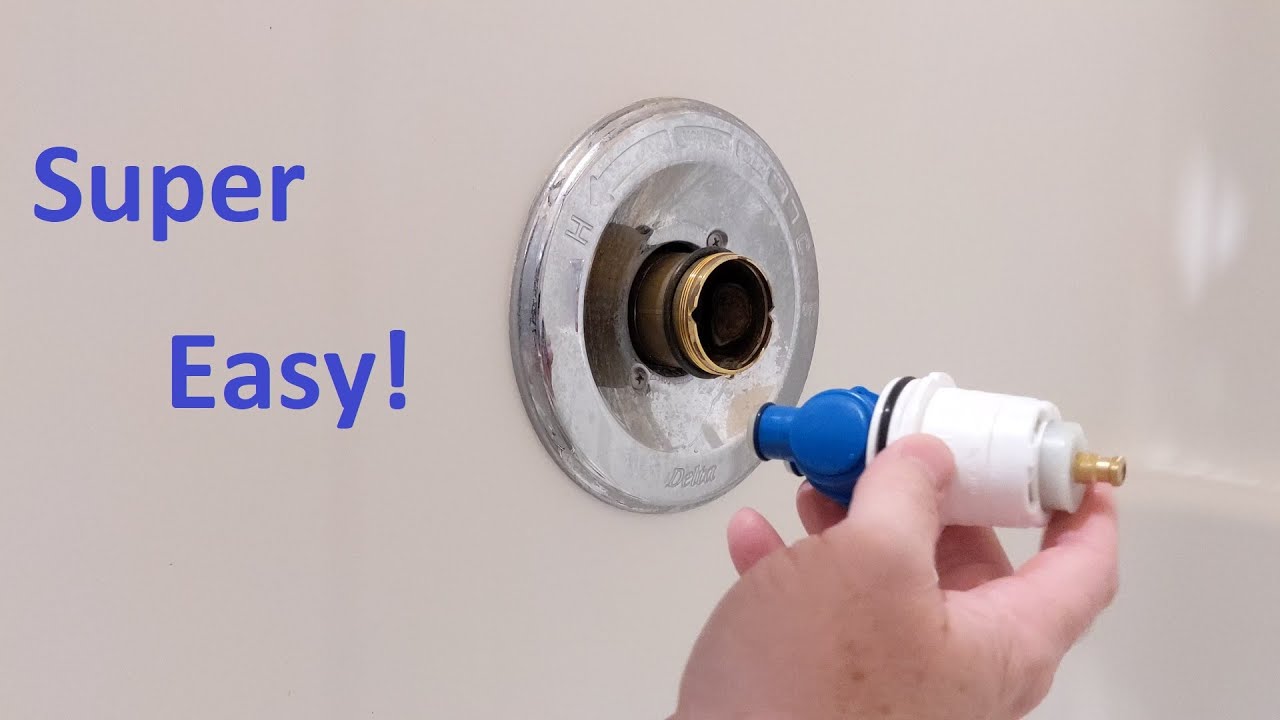
Removing the Stuck Cartridge Without Damage

1. Expose the cartridge housing: Remove the handle cap and loosen the set screw. Lift off the handle to reveal a decorative dome—pry it off with a flathead screwdriver. Underneath, you’ll see a retaining nut (typically 9/16″ or 8mm).
2. Loosen the retaining nut: Use a basin wrench to turn it counterclockwise. If corroded, apply penetrating oil and wait 10 minutes—never hammer the nut as this cracks plastic housings.
3. Extract the cartridge: Grasp the cartridge stem with needle-nose pliers. Rock it gently side-to-side while pulling upward. Pro tip: Insert a flathead screwdriver between cartridge tabs and housing to break mineral bonds—this prevents breakage when cartridges are fused from scale buildup.
Visual cue: A healthy cartridge slides out smoothly. If it resists or crumbles, heavy mineralization has occurred—indicated by white crust around the stem. Take photos at every disassembly stage; cartridge orientation is model-specific.
Installing the Exact Replacement Cartridge
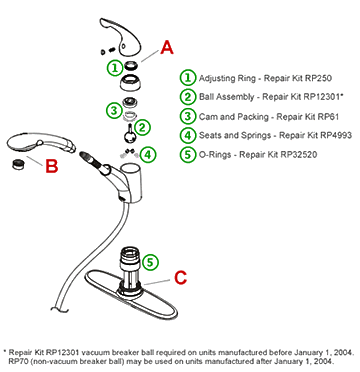
1. Match your model precisely: Take the old cartridge to a hardware store. Delta part numbers (e.g., RP44901 for early Lahara models) are stamped on the cartridge base. Never guess—using the wrong model causes immediate re-leaking.
2. Clean the valve seat: Wipe the cartridge housing with a vinegar-soaked cloth to dissolve mineral deposits. Inspect for pitting—deep scratches require professional repair.
3. Insert the new cartridge: Align it EXACTLY as photographed (notches must match housing guides). Press down firmly until it seats fully—do not force it. If resistance occurs, realign; misalignment causes 40% of post-replacement leaks.
4. Reassemble correctly: Reinstall the retaining nut hand-tight plus 1/4 turn. Position the handle in “off” before tightening the set screw.
Turn water on SLOWLY. If dripping continues, the cartridge is misaligned—disassemble and reseat it. If fixed, apply plumber’s silicone grease to O-rings during reassembly for longer life.
Troubleshooting Post-Repair Leaks
Even after replacing the cartridge, some Delta kitchen faucets won’t turn off due to overlooked issues. If water still trickles:
Fixing the “Off-Position Indexing” Problem
Most persistent leaks stem from handle misalignment with the cartridge’s “off” position. Remove the handle and rotate the cartridge stem 180 degrees—some models require this for full shut-off. Reinstall the handle centered over the “off” marker. Warning: Forcing the handle past its natural stop damages the indexing clip, causing immediate re-leaking.
Addressing Secondary Seal Failures
Water seeping around the handle base indicates worn O-rings on the cartridge stem. During reassembly, replace these small rubber rings (included with new cartridges). Apply a pea-sized amount of silicone grease before insertion—petroleum-based grease degrades rubber seals. If leaks persist from the spout, check for debris in the valve seat using a toothpick; compressed air often dislodges trapped particles.
When Professional Help Is Necessary
Call a plumber immediately if you encounter:
– A cartridge fused to the housing (indicated by white powder when attempting removal)
– Cracks in the faucet body visible after cartridge removal
– Leaks from supply line connections that worsen after tightening
– Corroded retaining nuts that won’t budge after penetrating oil treatment
These issues risk catastrophic failure—DIY attempts often shatter plastic valve bodies, requiring full faucet replacement ($300+). Professionals use specialized cartridge pullers that apply even force, preserving the housing. If your faucet is under warranty (typically 5-10 years), Delta covers cartridge replacements—contact them with your model number before disassembling.
Preventing Future Delta Faucet Leaks
Stop your Delta kitchen faucet from refusing to turn off with these maintenance habits:
– Quarterly aerator cleaning: Unscrew and soak in vinegar for 15 minutes to prevent sediment from reaching the cartridge
– Gentle handle operation: Never slam handles to “off”—Delta’s ceramic discs wear faster under impact
– Annual cartridge inspection: Remove and check for mineral buildup if drip rate increases
– Water softener use: Install a whole-house softener if you have hard water (over 7 grains per gallon)
Pro tip: After any repair, leave the faucet handle in “off” position for 24 hours before use. This allows seals to fully seat under pressure, reducing early failure risk by 70%. Address drips within 48 hours—delaying repairs allows sediment to etch permanent grooves into ceramic discs.
Final Leak-Proofing Checklist
Before considering the repair complete:
1. Test hot and cold water separately for 2 minutes each
2. Check for leaks around handle base with paper towel
3. Verify full shut-off at multiple handle positions
4. Run hot water for 5 minutes to clear air bubbles
A properly repaired Delta kitchen faucet won’t turn off issue should deliver years of leak-free service. By understanding cartridge alignment and performing simple maintenance, you’ll avoid 95% of recurring drips. If leaks persist after following these steps, your faucet likely has internal corrosion requiring professional assessment—but with precise diagnostics and correct parts, most homeowners successfully fix this common problem on the first attempt. Save the cartridge packaging and model number for future reference; having spares on hand cuts emergency repair time to under 10 minutes.


