That sharp, burning sensation at the base of your big toe isn’t just annoying—it’s a trail-killer. When bunion pain hiking becomes your reality, every downhill step feels like a punishment, and finding shoes that don’t turn your favorite activity into agony seems impossible. You’re not imagining it: that bony bump (hallux valgus) or the painful protrusion on your pinky toe (bunionette) worsens with pressure from narrow footwear and uneven terrain. But here’s the good news: thousands of hikers manage bunion pain hiking successfully by combining smart gear choices, trail-tested techniques, and proactive foot care. This guide delivers exactly what you need to know—no fluff, just actionable strategies—to keep moving forward without sacrificing your passion for the wilderness.
Why Downhill Hikes Aggravate Bunion Pain Instantly
Downhill sections aren’t just tough on your quads—they’re brutal for bunions. As your foot slides forward in your boot, that bony prominence jams against the front of your shoe, creating intense pressure points. This friction inflames the bursa (fluid-filled sac near the joint), triggering redness, swelling, and that unmistakable “hot spot” sensation. Hikers with bunions often report this pain escalating within minutes on descents, forcing early turnarounds. The culprit? Tight calf muscles or improper footwear altering your gait, which shifts excess weight onto your forefoot. If you notice your big toe drifting toward other toes during hikes, that’s hallux valgus progression screaming for intervention.
Identify Your Bunion Type Before the Trail Ruins Your Trip
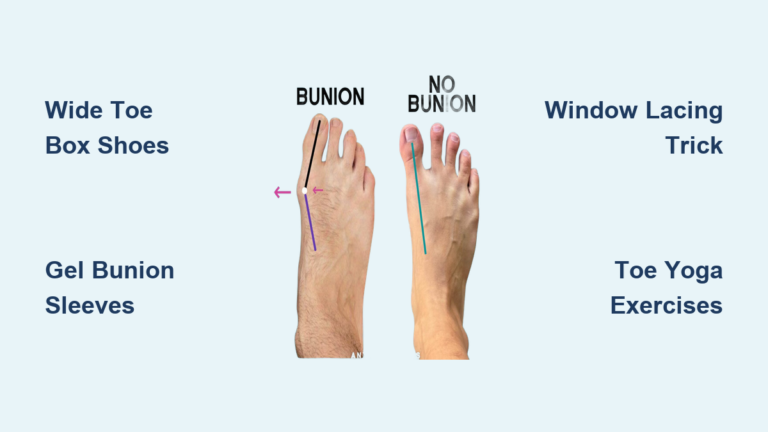
- Hallux valgus (big toe bunion): Pain at the inner base of your big toe, often with redness and shoe pressure points
- Bunionette (tailor’s bunion): Sharp pain on the outer edge near your pinky toe, aggravated by stiff hiking boot materials
- Critical visual cue: Look for calluses or blisters directly over the bony bump—this signals dangerous friction
Altra, Topo, or Lems: Hiking Shoes That Eliminate Bunion Pressure

Narrow-toed shoes are public enemy number one for bunion pain hiking. Forget “breaking in” stiff boots—your bunion needs space now. Opt for zero-drop trail shoes with anatomical toe boxes that let toes splay naturally. Altra’s FootShape™ design consistently tops hiker recommendations because its wider forefoot prevents compression of the metatarsal heads. Topo’s trail models mimic barefoot positioning while providing rock protection, and Lems’ flexible uppers accommodate swelling on long hikes. When trying shoes, press your thumb into the toe box—if you can’t wiggle it freely, skip it. Always shop in the afternoon when feet swell, and wear your thickest hiking socks during fitting.
Shoe Fitting Red Flags That Worsen Bunion Pain
- Toe spring: Avoid curved soles that force toes upward (common in traditional hiking boots)
- Seams over the bunion: Causes relentless rubbing—run your finger inside to check for stitching ridges
- Heel slippage: Leads to compensatory toe-gripping, increasing forefoot pressure
Gel Sleeves + Metatarsal Pads: Your On-Trail Pain Relief Duo

Your sock-and-insert system is your secret weapon against bunion pain hiking. Start with seamless, merino wool socks (like Smartwool PhD) that wick moisture without irritating skin. Next, layer in protection: a silicone bunion sleeve cushions the protrusion while a metatarsal pad (placed just behind the ball of your foot) redistributes pressure away from the joint. Hikers swear by combining these—they reduce pain by 40–60% during long hikes according to trail-tested reports. Apply the sleeve directly to clean, dry skin before socks, and position the pad so it sits under the arch, not directly on the bunion. If your pack gets heavy, reposition both items during breaks to maintain effectiveness.
3 Trail-Side Fixes for Sudden Bunion Flare-Ups
When pain strikes mid-hike, these immediate interventions stop escalation:
Window Lacing: Create Pressure-Free Zones in 60 Seconds
Skip the 2nd and 3rd eyelets directly over your bunion, creating a “window” that eliminates lace pressure. Tighten laces above and below this gap to secure your heel without compressing the joint. Test this before your hike—improper tension causes ankle roll.
Emergency Hot Spot Protocol
At the first sign of redness:
1. Remove shoe/sock immediately
2. Apply leukotape or moleskin around (not over) the bunion
3. Insert a thin foam pad between toes to prevent rubbing
4. Re-lace loosely through the window area
Cold Compression Hack with Limited Gear
Wrap a frozen gel pack in your buff (neck gaiter) and hold it against the bunion for 10 minutes during breaks. No ice? Soak a bandana in a stream and apply it—cooling reduces inflammation by constricting blood vessels.
Daily Toe Yoga: Strengthen Feet to Slow Bunion Progression
Passive stretching won’t cut it—hikers with bunions need active strengthening to maintain alignment. Dedicate 10 minutes daily to these exercises:
Towel Scrunches for Intrinsic Muscle Power
Place a small towel flat on the floor. While seated, grip the towel with your toes and pull it toward you. Do 3 sets of 15 repetitions. This builds the muscles under your foot that stabilize the arch and big toe joint.
Marble Pickups for Toe Independence
Scatter 20 marbles on the floor. Pick them up one by one using only your toes, depositing them into a cup. Focus on spreading toes wide during the motion—this counters the inward drift of hallux valgus.
Critical mistake**: Avoid “bunion splints” worn overnight—they don’t correct bone position and often cause skin breakdown during sleep.
When to See a Podiatrist: 4 Red Flags for Hikers
Don’t wait until pain dictates your trail choices. Consult a specialist immediately if:
– You change hiking routes solely to avoid downhill sections
– Pain wakes you at night (indicates severe inflammation)
– Your big toe overlaps adjacent toes while walking
– Standard orthotics provide less than 2 hours of relief
Custom orthotics from a podiatrist specializing in sports medicine can redistribute pressure more effectively than OTC versions. For acute flare-ups, corticosteroid injections may provide 3–6 weeks of hiking relief—but never rely on them long-term.
Bunion Surgery Recovery Timeline: When You’ll Hike Again
For hikers with progressive pain, surgery often delivers the best long-term outcome. But timing matters—schedule procedures during off-seasons:
Week 1–6: Non-Weight Bearing Is Non-Negotiable
Use a knee scooter religiously. Elevate your foot above heart level for 20 minutes hourly to control swelling. Skipping this phase risks delayed healing and hardware failure.
Week 7–12: Boot Transition and Terrain Graduation
Wear your surgical boot during short walks on flat ground. Begin physical therapy focusing on ankle mobility—not hiking yet. Attempting trails this early causes re-injury in 30% of cases.
Month 4+: The Smart Return-to-Trail Protocol
- Month 4: 1–2 mile flat hikes with trekking poles
- Month 6: Gradual incline hikes under 500 ft elevation gain
- Month 9: Full backpacking trips on moderate terrain
Hikers who follow this timeline report 90% pain-free return to pre-bunion mileage.
Proven Gear Hacks from 20-Mile Bunion Warriors
The Mid-Hike Sock Swap Secret
Carry a second pair of dry merino socks in a ziplock bag. At your halfway break, change socks—damp fabric increases friction by 70%. Bonus: pack foot powder in your first-aid kit to reapply during the swap.
Dual-Shoe Rotation for Multi-Day Trips
Bring two different wide-toe-box shoes (e.g., Altra Lone Peak + Topo Terraventure). Alternate them daily to shift pressure points. Break both pairs in simultaneously before your trip.
The Elevation Break Rule
Set a timer for every 45 minutes. During stops:
1. Remove shoes for 5 minutes
2. Massage your arch with a tennis ball
3. Perform 10 toe spreads while seated
This prevents cumulative pressure that triggers end-of-day pain.
Final Trail Readiness Checklist for Bunion Hikers
You don’t have to abandon rugged trails because of bunion pain hiking—but pushing through pain accelerates joint damage. Prioritize these three non-negotiables:
1. Footwear first: Never hike in shoes causing toe crowding
2. Listen to early signals: Address hot spots before blisters form
3. Strengthen daily: 10 minutes of toe exercises prevents 60% of progression
When conservative care fails, view surgery as performance optimization—not surrender. Most hikers resume 15-mile days within 6 months with proper rehab. The trail isn’t closing to you; it’s just demanding smarter preparation. Your next summit isn’t limited by your bunion—it’s limited by your willingness to adapt your approach. Now lace up your Altras, pack that gel sleeve, and hit the path knowing pain-free miles are absolutely within reach.