
Nothing ruins a kitchen renovation faster than crooked cabinets that wobble, gaps that collect grime, or doors that won’t align properly. The best way to install kitchen cabinets starts long before you lift the first unit—it’s about meticulous preparation that prevents costly rework. Most DIYers rush through layout, leading to frustrating errors that compound with every cabinet hung. When floors slope, walls aren’t plumb, or studs hide behind drywall, a single measurement mistake can throw off your entire installation. This guide reveals the exact sequence professional installers use to achieve flawless results every time, saving you hours of frustration and ensuring your cabinets last decades. You’ll learn why installing upper cabinets first isn’t just preferred—it’s non-negotiable for avoiding damage to finished bases.
The secret lies in respecting two immutable truths: your floor isn’t level, and your walls aren’t straight. Ignoring these realities guarantees visible gaps, misaligned doors, and structural instability. By establishing laser-precise reference lines and anchoring every cabinet into structural studs—not drywall—you create a foundation that withstands daily use. This method accommodates flooring variations, uneven walls, and hidden utilities while delivering that coveted high-end finish. Whether you’re replacing old cabinets or building new, these steps transform what feels overwhelming into a manageable, satisfying project.
Mark Your 54-Inch Reference Line: Prevent Leaning Cabinets Forever

Skipping this step causes 90% of installation failures. Floors slope, walls tilt, and cabinets installed without a true level line will visibly lean—especially long runs. The best way to install kitchen cabinets begins with identifying your kitchen’s highest floor point, which dictates all subsequent measurements.
Find the True Floor High Point with a Laser Level
Place a 4-foot level on your subfloor near where base cabinets will sit. Rotate it to locate the highest spot—this is your starting elevation. Mark a pencil line at 4½ inches above this point (standard toe-kick height). Now, project this exact height around the entire room using a self-leveling laser. Why 54 inches total? Base cabinets sit 34½ inches tall plus 4½-inch toe kicks. This laser line becomes your non-negotiable benchmark—never measure from the floor again. If tile or hardwood isn’t installed yet, add ¼-inch for tile or ½-inch for wood flooring to your reference height.
Locate Every Stud and Utility Line Before Lifting a Cabinet
Drywall anchors won’t hold cabinet weight long-term—screws must hit 16-inch or 24-inch stud centers. Use an electronic stud finder with AC detection to avoid drilling into wires. Mark stud centers clearly with vertical lines. Then, trace plumbing pipes, electrical boxes, and ductwork on the wall with colored tape. For sink cabinets, mark a 1¼-inch clearance zone around drain pipes. Missing a stud means cabinets pulling away from walls; hitting a wire risks electrocution. Pro tip: Tap walls to listen for hollow vs. solid spots—stud finders fail near metal pipes.
Prep Cabinets for Flawless Hanging: Doors Off, Holes Pre-Drilled
Remove all doors and drawers—this cuts weight by 40% and prevents glass breakage during installation. Label each component with painter’s tape (e.g., “Left of Sink #3”). Pre-drill ⅜-inch holes for plumbing penetrations in cabinet backs using the wall utility marks as guides. For European cabinets, install Blum clip systems now. Never skip edge banding on exposed plywood ends—apply iron-on tape to prevent swelling from humidity. Skipping this invites moisture damage that warps cabinets within months.
Install Upper Cabinets First: The Pro’s Secret to Avoiding Costly Damage
Attempting to hang wall units over finished base cabinets is the #1 rookie mistake. You’ll bump countertops, scratch cabinet faces, and risk dropping heavy units. The best way to install kitchen cabinets uses gravity to your advantage: hang uppers while the floor is clear. This sequence also lets you install crown molding continuously before base cabinets block access.
Build a Temporary Ledger Board for Perfect Height Alignment
Cut a 1×4 board to run the full length of your upper cabinet run. Screw it vertically into wall studs so its top edge sits exactly where the bottom of your upper cabinets will rest (typically 54 inches from the floor reference line). This board acts as a shelf that bears the cabinet’s full weight while you secure it. Without it, you’ll struggle to hold 70-pound cabinets steady while drilling—leading to misalignment or dropped units. For corner cabinets, extend the ledger 24 inches beyond the corner to support diagonal units.
Level and Connect Upper Cabinets Without Base Obstruction
Start at the corner cabinet. Lift it onto the ledger board with a helper or cabinet jack. Drive three 3-inch structural screws through the cabinet’s hanging rail into stud centers—never fewer than two screws per stud. Check for plumb with a laser level, then clamp adjacent cabinets face-frame-to-face-frame before screwing them together. This creates one rigid unit that won’t shift. Critical mistake: Don’t tighten screws fully until the entire run is leveled. A 1/16-inch gap at the wall becomes a ½-inch error at the front edge.
Shim Base Cabinets to Zero Gaps on Sloped Floors
With uppers secure, set base cabinets on your 4½-inch reference line. Place a level across the cabinet top—don’t assume the floor is level. Slide composite shims under the cabinet base until it’s perfectly level front-to-back and side-to-side. Screw cabinets together before wall attachment: clamp face frames, drill pilot holes, and use 2½-inch screws. Only then anchor to wall studs through the top hanging rail. Never force cabinets level by cranking screws—this twists frames. Shims take 2 minutes but prevent lifelong wobble.
Fix Crooked Walls in Minutes: Pro Shimming and Scribing Techniques
Even with perfect layout, walls bow and floors slope. The best way to install kitchen cabinets hides these flaws invisibly. Most homeowners try to “force” cabinets flush with walls, creating massive gaps at corners. Professionals use two techniques: strategic shimming and scribing.
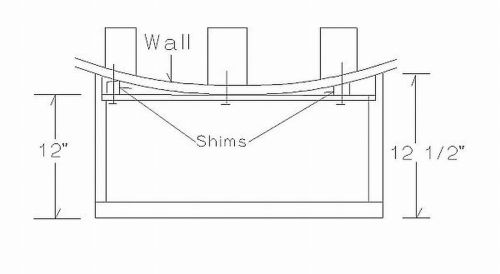
Install Shims Behind Cabinets—Not Under Them—For Seamless Walls
For walls that bow inward (common near windows), slide tapered shims between the cabinet back and wall before screwing into studs. Stack shims until the cabinet face is perfectly plumb. Then, drive screws through shims into studs. This fills wall gaps without tilting the cabinet. For outward bows, scribe a filler strip: hold a scribe tool against the wall, trace the irregularity onto a 1×2 board, then cut along the line with a jigsaw. Nail this strip to the cabinet end—it disappears behind the countertop overhang.
Avoid These 3 Costly Cabinet Installation Mistakes
Mistake #1: Installing base cabinets before uppers. Result: You’ll drop upper cabinets onto finished bases, cracking countertops or scratching cabinet faces. Always hang wall units first—period.
Mistake #2: Skipping stud verification. Drywall anchors fail under cabinet weight. Always locate stud centers with a drill bit test in an inconspicuous spot.
Mistake #3: Ignoring appliance clearances. Refrigerators need 27-inch-deep cabinets with 1-inch side gaps for airflow. Dishwashers require 34½-inch interior height—measure your unit first.
Fine-Tune Doors and Drawers for Showroom Results
Reattach doors using the 3-axis hinges common on modern cabinets. Adjust horizontally (left/right), vertically (up/down), and depth (in/out) with hex keys until all gaps are 1/8-inch consistent. For drawers, extend fully and check for binding—loosen slide screws slightly if needed. Test soft-close mechanisms with 50 pounds of weight to ensure smooth operation. Finally, install toe kicks last: they hide floor gaps and create a seamless base.
Final Note: Mastering the best way to install kitchen cabinets hinges on precision layout and the upper-then-lower sequence. By marking true level lines, anchoring into studs, and using shims strategically, you’ll avoid the crooked, wobbly results that plague rushed installations. Remember: take an extra hour to verify measurements—it prevents eight hours of demolition later. When your doors align perfectly and drawers glide silently, you’ll know you’ve installed cabinets like the pros. For next steps, check our guide on choosing cabinet hardware that withstands daily use without scratching.


