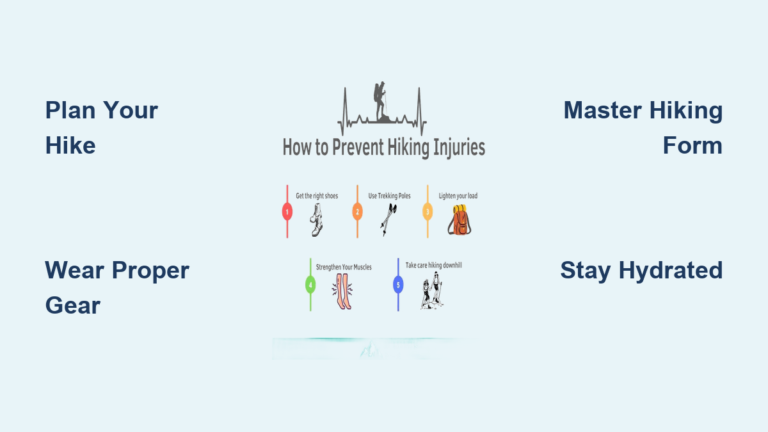
You’re halfway up a breathtaking mountain trail when a sharp pain shoots through your ankle—a misstep on loose gravel has you limping toward a potential emergency. Or maybe you’re battling crippling blisters that turn your dream hike into an endurance test. Every year, thousands of hikers face preventable injuries that cut adventures short or require rescue. The truth is, hiking injury prevention starts long before you lace up your boots. This isn’t about avoiding trails; it’s about strategic preparation that transforms risky outings into confident journeys. By the end of this guide, you’ll master actionable steps to dodge common trail hazards—from sprains and falls to dehydration—and return home safely after every adventure.
Most hiking injuries stem from three silent culprits: poor preparation, ignored body signals, and underestimating terrain. A study by the National Park Service reveals that 70% of trail rescues involve preventable issues like ankle rolls or heat exhaustion. Yet these mishaps rarely happen without warning signs. The good news? Hiking injury prevention hinges on predictable patterns you can control. Forget “toughing it out”—smart hikers prioritize safety systems over heroics. We’ll break down exactly how to build those systems, so your focus stays on summit views, not emergency exits.
Your Body, Gear, and Environment: The 3 Injury Prevention Essentials
Ignoring any one of these pillars turns minor stumbles into major crises. Your body needs conditioning for the specific trail demands—rushing a 10-mile hike with 3,000 feet of elevation gain without training invites knee strain. Gear must match conditions: lightweight sneakers on rocky terrain guarantee slips. And environment awareness means checking real-time trail reports for mudslides or ice. Most hikers fixate on distance while overlooking elevation gain, which exponentially increases injury risk. Remember: a successful hike is measured by your safe return, not summit photos. Hiking injury prevention means respecting all three elements equally.
Why Your Group’s Weakest Link Determines Safety
Never let ego override reality. A group moving at the pace of its strongest hiker leaves others exhausted and prone to missteps. Before starting, confirm everyone’s fitness level honestly—then set a pace where all can converse comfortably. This prevents the “summit fever” that causes rushed descents and falls. If one person struggles on flat sections, they’ll crumble on steep terrain. Adjust turnaround times based on the slowest member’s stamina, not the group’s ambition.
How to Plan Your Hike (and Stick to the Plan) for Safety
Trail selection mistakes cause 40% of hiking injuries according to search and rescue data. Choosing a route beyond your group’s skill level isn’t adventurous—it’s reckless. Hiking injury prevention begins with ruthless honesty about your abilities. Use apps like AllTrails to verify current conditions: a “moderate” trail after rain may be dangerously slick. Always share your exact itinerary—including parking location and emergency contacts—with someone not on the hike. Skip this step, and you risk becoming a statistic if things go wrong.
Critical Trail Research Steps You Can’t Skip
- Check real-time alerts: National park websites list closures for rockfalls or wildlife activity
- Calculate adjusted distance: Add 30% to trail length for every 1,000 feet of elevation gain
- Set ironclad turnaround times: If you haven’t reached the halfway point by noon, turn back
Ignoring weather forecasts is the #1 planning error. A sunny morning can turn to hypothermia-inducing rain at altitude—always pack for worst-case scenarios.
Must-Have Gear That Prevents Common Hiking Injuries
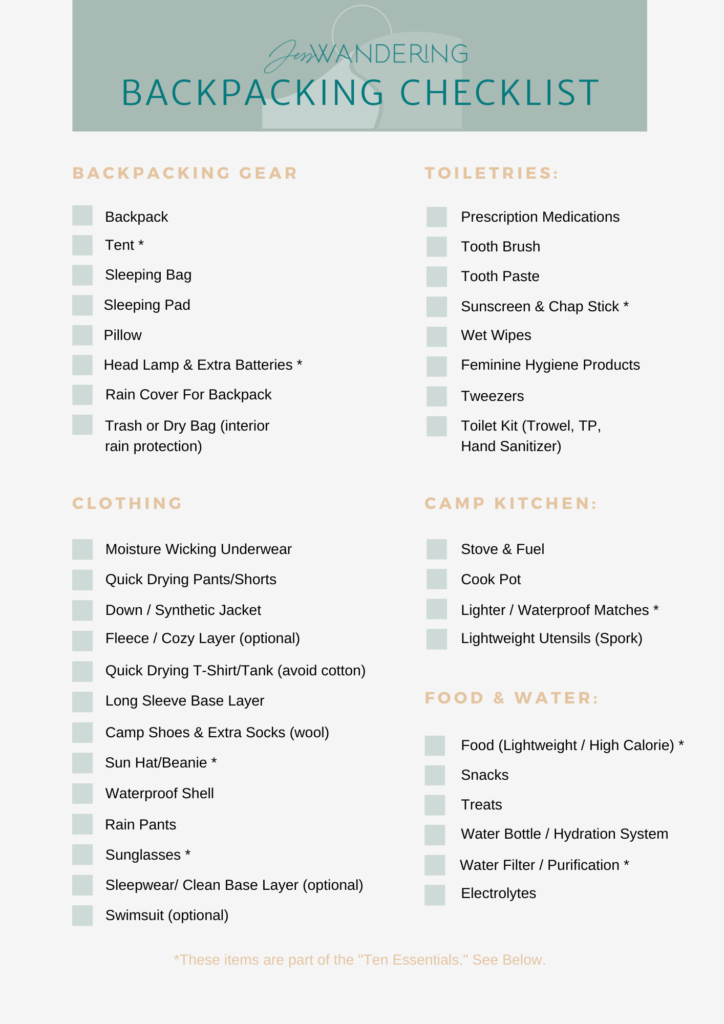
Your equipment is your first-aid kit against trail disasters. Worn-out boots cause 60% of hiking blisters, while inadequate layers lead to dangerous temperature drops. Hiking injury prevention demands gear that actively protects you, not just carries your snacks.
Footwear Failures That Wreck Hikes
Never wear new boots on a long hike—break them in with 10-mile test walks first. Prioritize ankle support on rocky trails; low-cut shoes increase sprain risk by 300%. Look for aggressive lugs (tread depth over 5mm) for muddy conditions. If your toes jam against the front on descents, you’ll develop blackened nails or blisters. Pro tip: Apply leukotape to heel and toe areas before hiking if you’re prone to hot spots.
The Non-Negotiable Ten Essentials Checklist
- Navigation: Physical map + compass (phone GPS dies)
- Hydration: Filter + 2L water minimum + electrolyte tabs
- Emergency kit: Moleskin for blisters, SAM splint, emergency blanket
- Insulation: Puffy jacket even in summer (hypothermia starts at 50°F)
Skipping any item risks turning minor issues into emergencies. That “short hike” where you forgot your rain shell could leave you shivering through a sudden storm.
Perfect Your Hiking Form to Avoid Knee and Ankle Injuries
Poor technique on descents destroys knees faster than any other trail activity. Hiking injury prevention requires deliberate movement patterns that distribute impact. Most hikers brake with quads on downhills, causing muscle fatigue that leads to falls. Instead, master these biomechanics:
Downhill Technique That Saves Your Knees
Lean slightly back from the ankles (not waist) to use gravity rather than muscle power. Take short, quiet steps—loud footfalls mean heavy impact. Plant trekking poles uphill behind your body to absorb shock. On steep sections, zigzag across slopes instead of descending straight down. If your knees ache after 20 minutes, you’re using improper form. Reset by walking sideways across the slope for 5 minutes.
Uphill Efficiency Hacks
Power through glutes, not quads: lean forward from ankles while driving through heels. On switchbacks, cut the corner slightly to reduce elevation gain per step. When fatigue hits, switch to “rest stepping”—lock your back knee briefly on each uphill step to give muscles micro-breaks.
Hydration and Fuel: Stop Dehydration Before It Causes a Fall

Dehydration impairs balance and decision-making at just 2% fluid loss—making you 3x more likely to slip. Hiking injury prevention requires proactive fueling, not reactive fixes. Wait until you’re thirsty, and you’re already 1.5% dehydrated.
Exact Hydration/Fueling Schedule to Follow
- Drink 4-6 oz every 20 minutes (set phone timer)
- Consume 100-200 calories hourly: Trail mix > energy bars (faster absorption)
- Electrolyte trigger: If sweat stings your eyes, add salt tabs immediately
Ignoring this leads to “hiker hunger”—that sudden energy crash where you can’t think straight. Pack salty snacks like jerky to maintain sodium levels during heavy sweating.
How to Avoid Slips, Trips, and Falls on Trail Hazards
Rocky sections cause 52% of hiking injuries, but most are preventable with focused movement. Hiking injury prevention on technical terrain demands hyper-awareness—not speed.
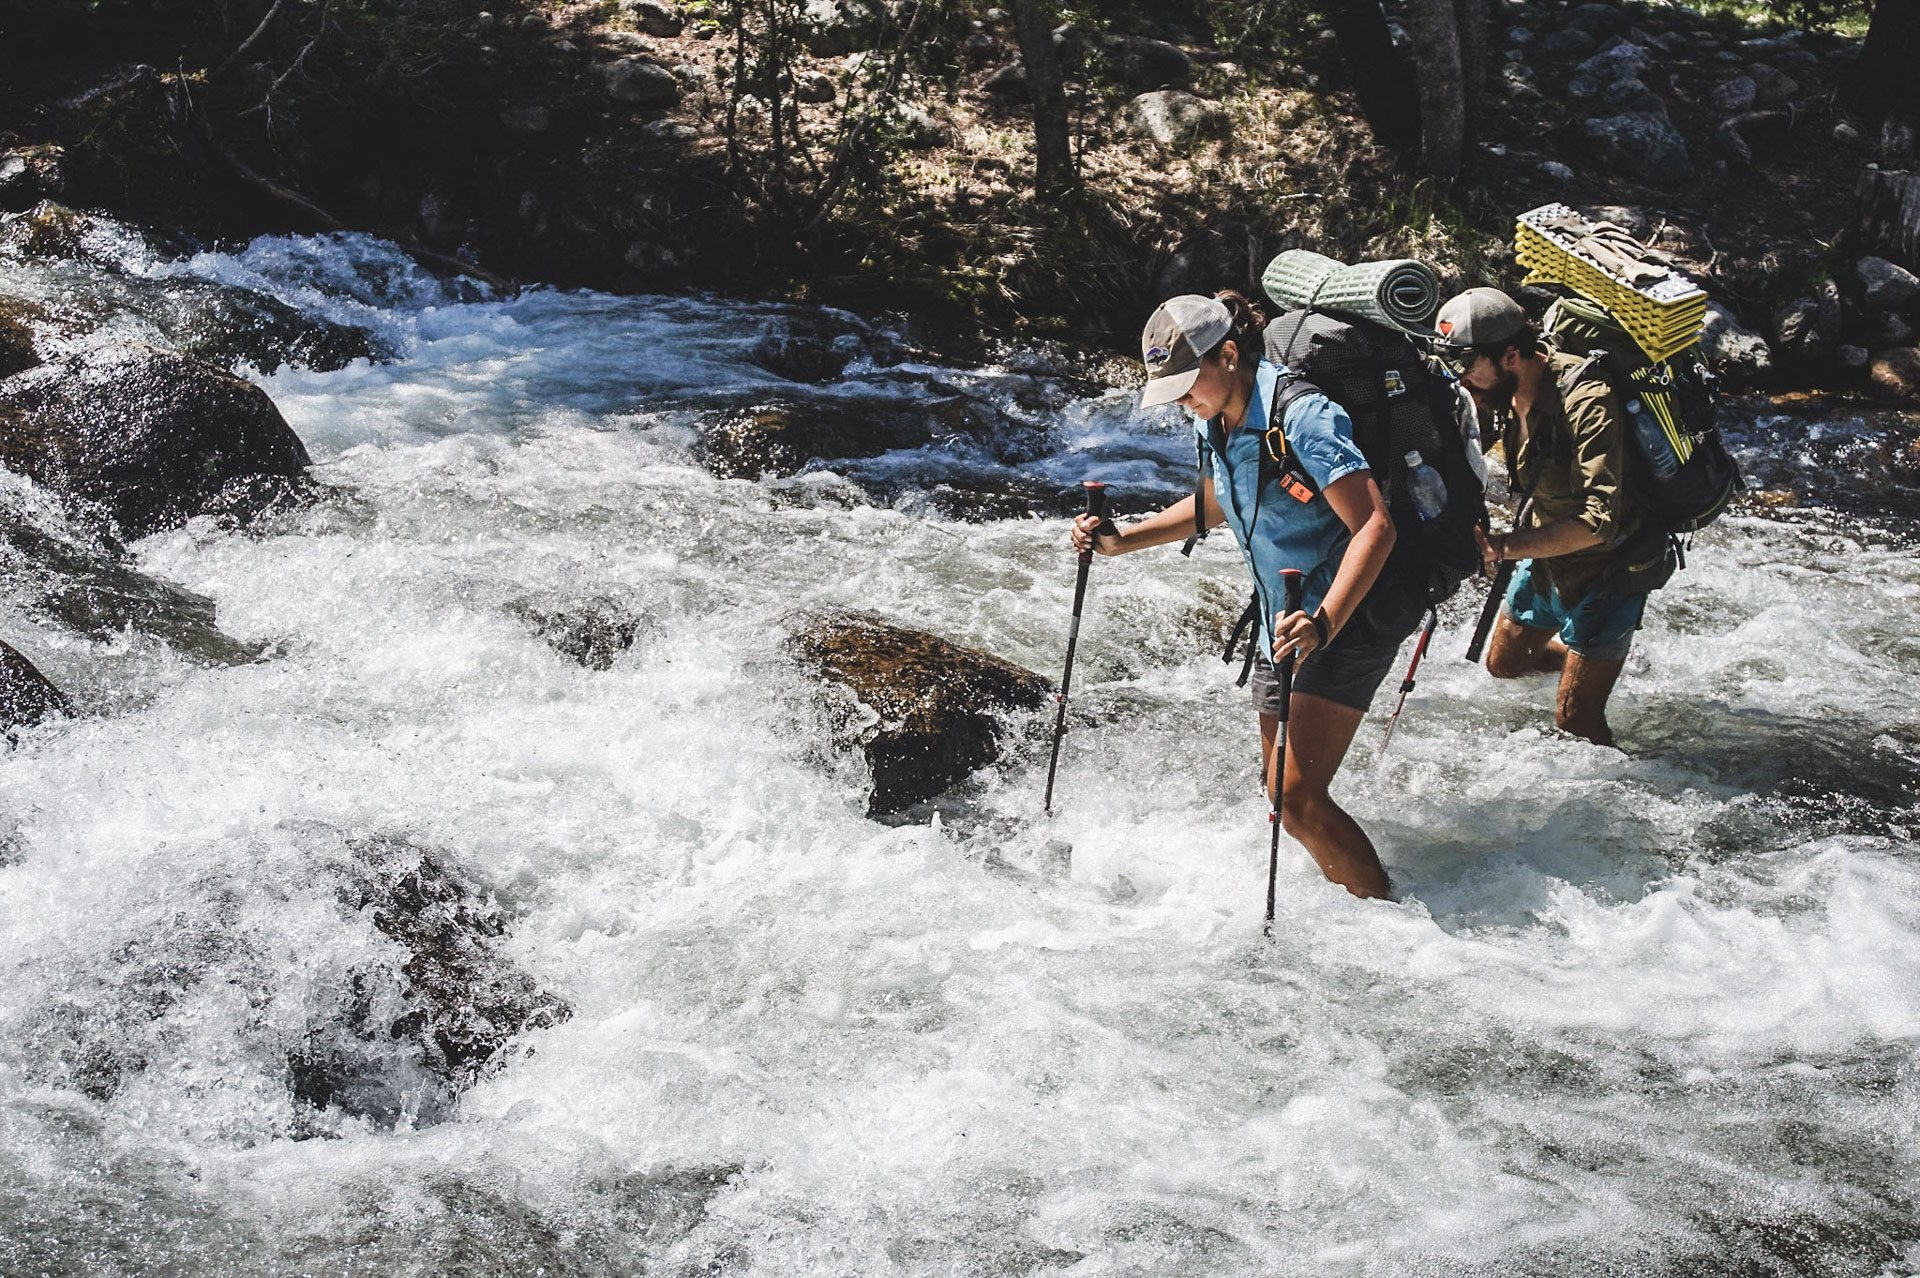
Stream Crossing Safety Protocol
- Test depth with trekking pole upstream first
- Face upstream and shuffle sideways (never turn your back to current)
- Maintain 3-point contact: Two poles + one foot, or one pole + two feet
If water reaches your knees, abort crossing—currents can knock you down instantly. On muddy trails, step on roots and rocks, not between them. They’re more stable than slippery soil.
Basic First-Aid Skills That Prevent Minor Injuries from Becoming Emergencies
A blister can sideline you if untreated, but moleskin applied before pain starts keeps you moving. Hiking injury prevention includes immediate response skills:
Blisters: The 10-Second Fix
At the first hot spot (redness/tenderness), stop and:
1. Clean area with alcohol wipe
2. Apply moleskin over vaseline (never directly on skin)
3. Cover with gauze + tape
Ignoring this turns minor friction into hiking-ending wounds within 30 minutes. For ankle rolls, use trekking poles as splints while walking out—never “walk off” serious sprains.
Post-Hike Recovery: Prevent Overuse Injuries Before They Start
Skipping cooldowns turns trail fatigue into chronic tendonitis. Hiking injury prevention continues after the parking lot.
The 15-Minute Post-Hike Routine
- Hydrate: 16 oz water + electrolyte drink within 15 minutes
- Stretch: Focus on calves (knee bent) and hip flexors (lunges)
- Inspect: Check feet for hot spots; massage quads to prevent DOMS
- Rest: Avoid stairs for 2 hours—elevate legs to reduce inflammation
Persistent joint pain (not muscle soreness) after 48 hours needs medical attention—don’t ignore it.
Conclusion: Make Every Hike a Safe Hike
Hiking injury prevention isn’t about eliminating risk—it’s about stacking the odds in your favor through preparation, technique, and respect for the trail. By implementing these specific strategies—rigorous planning, smart gear choices, biomechanically sound movement, and proactive recovery—you transform potential disasters into confident adventures. Remember the 3 non-negotiables: your body’s limits, your gear’s reliability, and the environment’s demands. When you prioritize these, every hike becomes a victory, whether you reach the summit or wisely turn back. Now lace up with knowledge, not just boots, and hit the trail safer than ever before. Your next injury-free adventure starts today.