You’re halfway through a backcountry trek when your pack strap snaps, sending your water bottle clattering down a rocky slope. Or you wake up inside a soggy tent as rain pours through a seam you didn’t notice until it was too late. For hikers, gear failure transforms adventure into anxiety—fast. Knowing how to execute quick hiking gear repair fixes keeps you moving, while recognizing when to call experts saves expensive gear from permanent damage. This guide cuts through the confusion with battle-tested solutions for trailside emergencies and long-term restoration, using only proven methods from industry repair specialists.
Ignoring minor damage often leads to catastrophic failures miles from help. A tiny tear in a rain jacket becomes a soaking disaster in a downpour, while frayed tent seams risk collapse during storms. Yet most hikers overestimate repair complexity or underestimate DIY potential. With the right knowledge and tools, 80% of common issues—from zipper malfunctions to punctured sleeping pads—can be resolved before they ruin your trip. We’ll show you exactly how to assess damage, execute reliable fixes, and know when professional intervention is non-negotiable.
Why Your Hiking Gear Fails and How to Diagnose It
Spotting Critical Damage Before It’s Too Late
Scan gear weekly for early warning signs: frayed stitching on pack straps, stiff or separating zipper teeth, and thinning fabric at high-stress points like shoulder straps. For waterproof items, rub seams with a damp cloth—if moisture seeps through, seam sealing is urgent. On tent poles, check for hairline cracks near joints; a slight “give” when flexed indicates imminent breakage. Never ignore delamination (peeling interior coatings on rainwear), as it destroys waterproofing and requires specialized repair beyond DIY fixes.
When DIY Risks Make Gear Worse
Attempting complex repairs without proper tools often compounds damage. Hand-stitching a torn Gore-Tex jacket with standard thread creates new leak points, while improper zipper slider replacement can shred zipper tape. If your gear has:
– Membrane-laminated fabrics (e.g., Patagonia H2No, The North Face Futurelight)
– Carbon fiber frames (common in ultralight packs)
– Large tears crossing seams (over 2 inches)
Stop immediately. These require industrial sewing machines and heat-sealed membranes only professionals possess. One misstep here voids warranties and sacrifices waterproof integrity.
Trailside Emergency Fixes That Actually Work
Repairing Broken Straps and Snapped Zippers in Under 5 Minutes
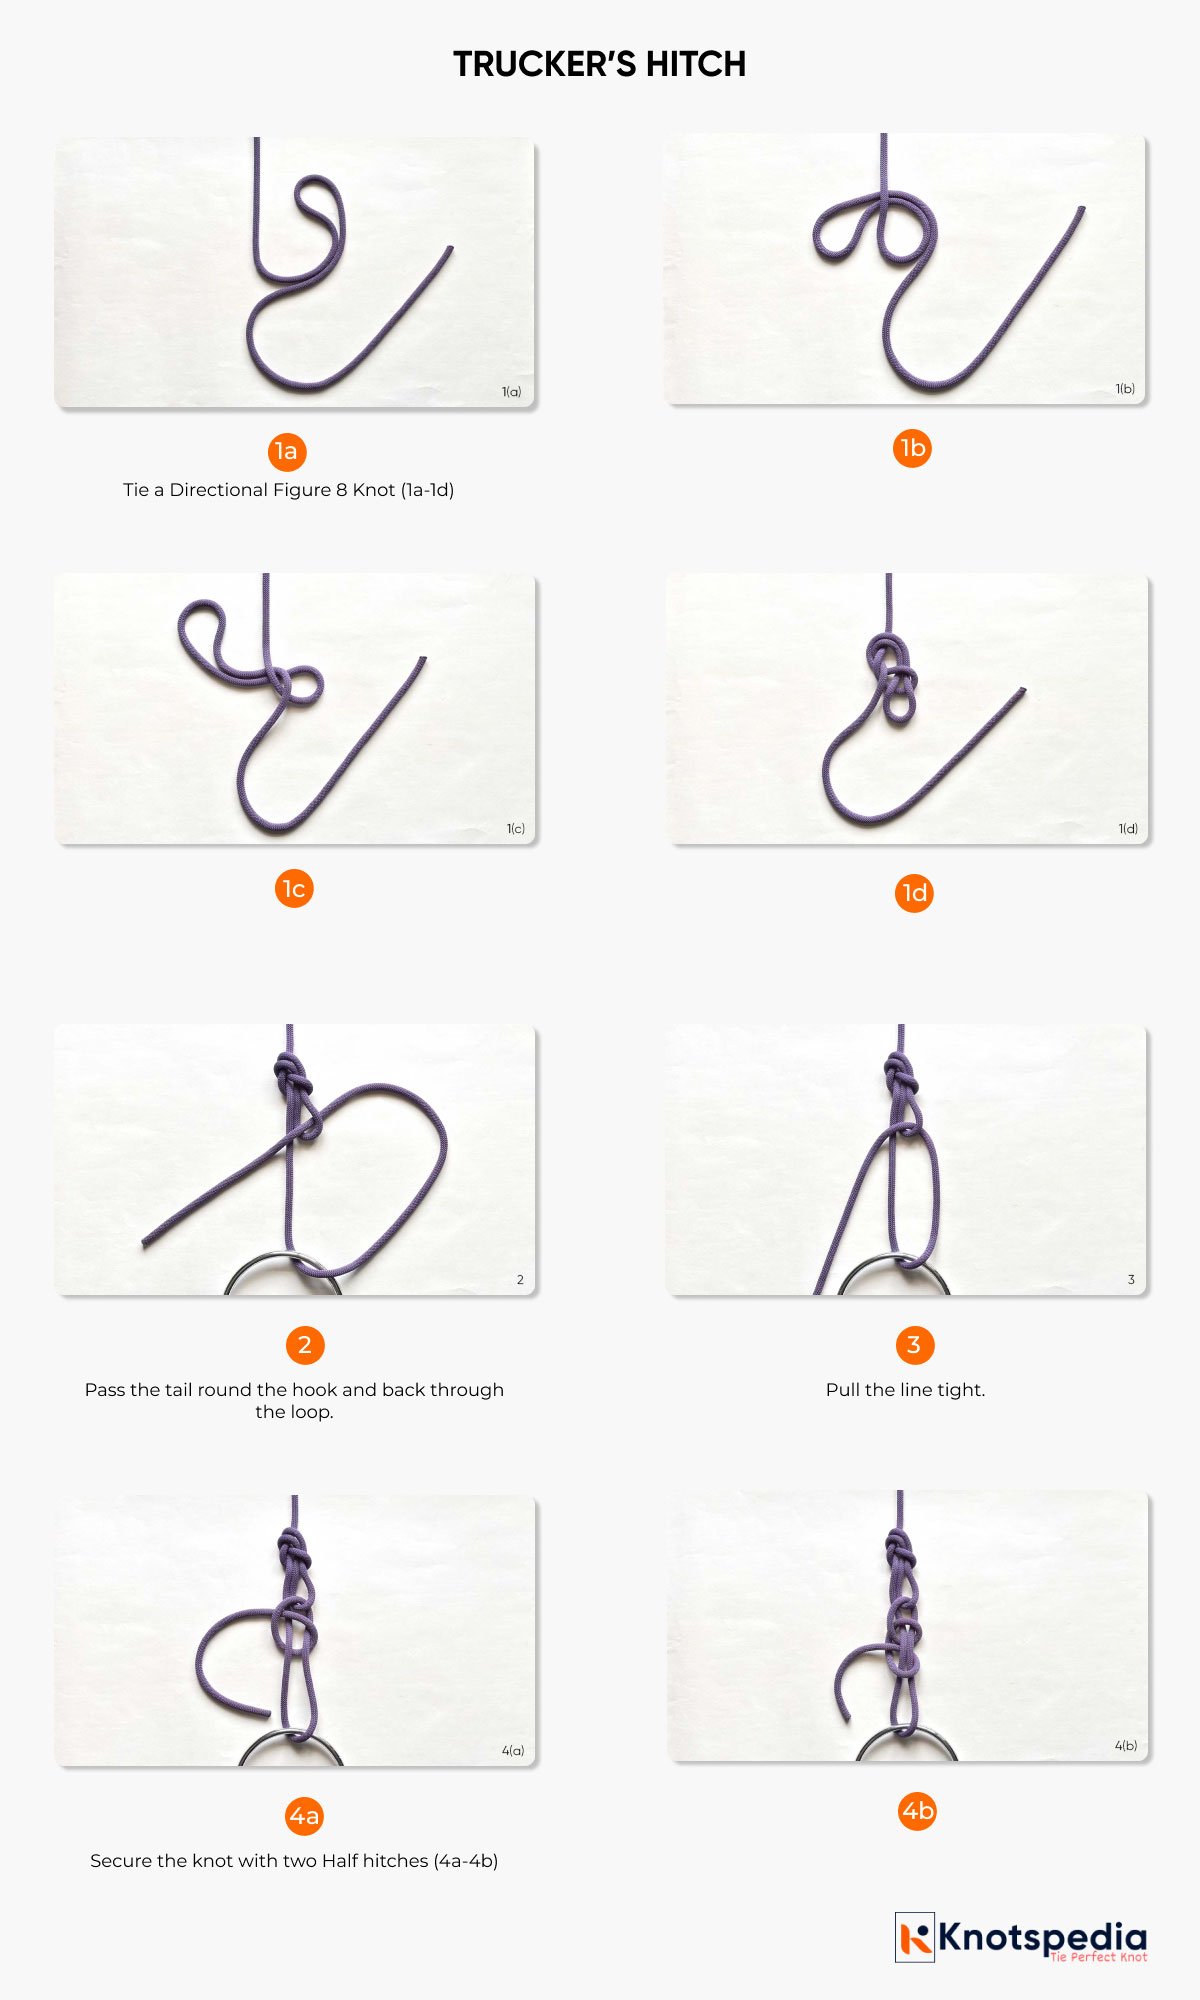
For a severed pack strap:
1. Thread trekking pole cord through the strap’s attachment point
2. Tie a trucker’s hitch knot for maximum tension
3. Seal the knot with Seam Grip adhesive to prevent slippage
If a main zipper separates, squeeze the slider’s sides together with pliers until teeth interlock smoothly. For complete slider failure, temporarily sew zipper teeth shut with dental floss, leaving just enough opening for essentials. Critical tip: Always carry a spare zipper slider matching your pack’s size (measured in #5 or #8) in your repair kit.
Patching Tents and Sleeping Pads Mid-Adventure
A pinhole leak in an air pad demands immediate action:
– Clean area with alcohol wipe from first-aid kit
– Apply dime-sized dab of Seam Grip inside and out
– Weight with a rock for 20 minutes while hiking
For tent tears under tension:
1. Cut Tenacious Tape 1.5x larger than the rip
2. Apply to both sides of the fabric, smoothing from center outward
3. Reinforce with a shock cord looped through nearby grommets
Never use duct tape on silicone-coated fabrics—it peels off instantly, taking coating with it.
Your Essential Hiking Gear Repair Kit Checklist

Must-Have Tools for $20 or Less
Forget bulky kits. Every hiker needs:
– Tenacious Tape (1.5″ x 12″ sheet): Bonds to nylon, polyester, and silnylon without heat
– Seam Grip WP (0.5 oz tube): Flexible adhesive for seams and patches (cures in 24 hours)
– Zipper repair kit: Includes #5/#8 sliders, pliers, and stopper crimps
– Tent pole sleeve: Fits most 8-10mm poles for instant splinting
– Heavy-duty needle with bonded nylon thread (store in film canister to prevent tangles)
Why Adhesive Choice Makes or Breaks Repairs
Urethane-based sealants like Seam Grip outperform silicone adhesives for hiking gear repair because they:
– Remain flexible below freezing (critical for alpine trips)
– Bond to damp surfaces when alcohol-wiped first
– Withstand repeated flexing without cracking
Pro mistake to avoid: Applying adhesive thicker than a credit card—it traps moisture and delays curing. A hairline bead is ideal.
Professional Repair Services Worth the Wait
Rainy Pass Repair: When Your Gear Needs Factory-Level Expertise
For high-end technical items—Arc’teryx jackets, Osprey packs, or down sleeping bags—Rainy Pass Repair is the gold standard. Their Tacoma facility:
– Uses industrial machines for stress-tested stitching on load-bearing straps
– Re-laminates delaminated waterproof membranes with factory-grade films
– Sources discontinued zippers and buckles from brand archives
Send gear directly (3003 S 9th St, Tacoma, WA 98405) or drop at REI. Turnaround is 3-6 weeks; costs 30-50% less than replacement. Email service@rainypass.com for DWR reapplication quotes—they restore factory water resistance to worn shells.
Tent Pole Emergencies: Custom Solutions in 48 Hours
Tentpole Technologies fabricates exact pole replacements using your broken section as a template. For bent poles:
1. Ship the damaged section (or precise measurements)
2. Receive custom aluminum splint within 48 hours
3. Slide sleeve over break and secure with included cable ties
No more trail-shortening pole failures—they even rebuild carbon fiber poles for ultralight tents.
Preventing 90% of Gear Failures Before You Hike
The Pre-Trip Inspection Protocol
Before every outing:
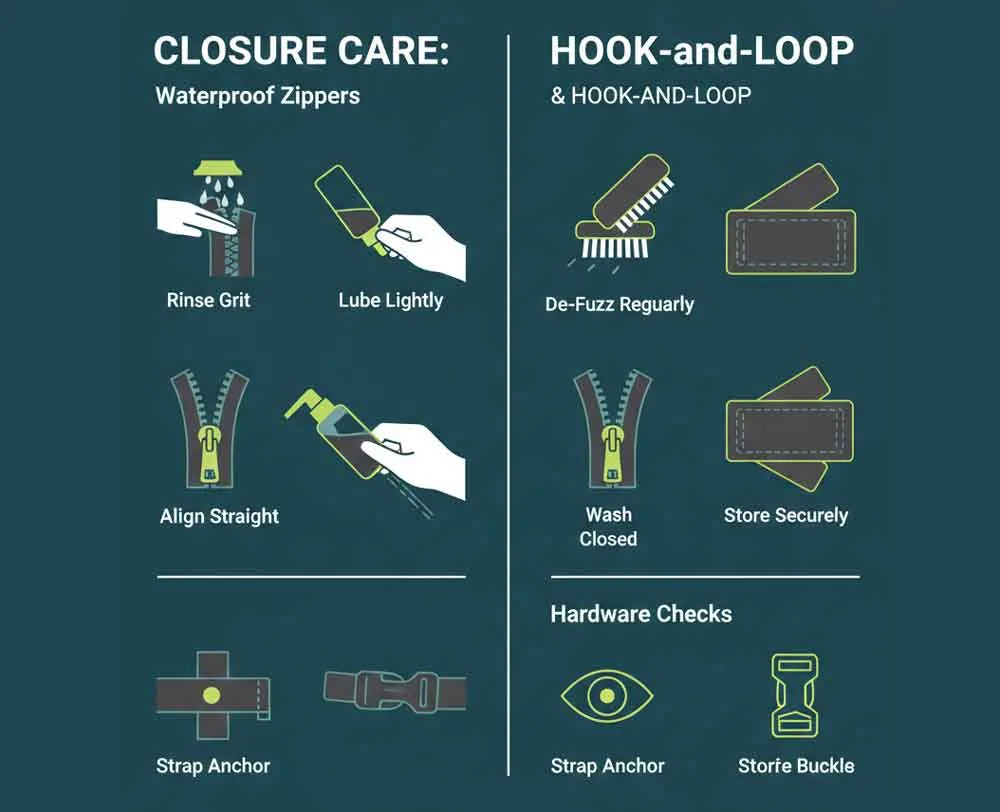
– Zippers: Run conditioner (toothpaste works) along teeth, then zip/unzip slowly 10 times
– Seams: Hold gear up to bright light—pinprick holes show as tiny dots
– Straps: Pull attachment points with body weight to test stitching integrity
– Poles: Flex gently; discard if you hear cracking
Storage Habits That Extend Gear Life
Compressing wet gear destroys waterproof coatings. Always:
1. Air-dry tents and sleeping bags for 48 hours post-trip
2. Store packs in mesh closets (not stuff sacks) with silica gel packs
3. Apply Nikwax Tech Wash annually before DWR reapplication
Critical mistake: Hanging packs by straps stretches load-bearing points. Use a wide, padded hanger instead.
Final Note: Mastering basic hiking gear repair transforms trail mishaps from trip-enders into minor detours. For immediate fixes, Tenacious Tape and Seam Grip solve 80% of field emergencies. But when Gore-Tex delaminates or carbon fiber fractures, professional services like Rainy Pass Repair deliver factory-level restoration. Implement the pre-trip inspections and storage protocols outlined here, and your gear will outlast multiple hiking seasons—proving that the most essential piece of equipment isn’t what you carry, but what you know.