Your 1950s cabinets still have solid bones. That 1970s linoleum hides original hardwood floors. How to decorate an old kitchen isn’t about erasing history—it’s about strategic updates that cost less than $2,000 while honoring its character. Forget demolition days; most vintage kitchens need cosmetic tweaks, not structural overhauls. I’ve seen homeowners transform dated spaces in weekends by focusing on high-impact changes like cabinet paint and layered lighting. You’ll keep what works (like functional layouts and sturdy cabinetry) while replacing what doesn’t (think builder-grade hardware and gloomy lighting). By the end of this guide, you’ll know exactly which three updates make the biggest difference and how to phase your project without breaking your budget or your back.
Audit Your Kitchen’s Bones Before Spending a Dime
Before buying paint or hardware, pinpoint what makes your kitchen feel outdated versus what gives it soul. Many “old” kitchens actually have hidden strengths: original hardwood floors under vinyl, solid-wood cabinets beneath oak varnish, or functional layouts that predate open-concept trends. Start by listing pain points: Is the work triangle cramped? Do cabinets feel cluttered? Does poor lighting make cooking a chore? Then identify keepers: a vintage enamel sink, charming beadboard walls, or built-in pantries. This audit prevents wasted money—you might skip full cabinet replacement if boxes are structurally sound. Pro tip: Take photos from each corner to spot layout flaws. If your fridge-to-sink-to-stove path forces you through traffic lanes, prioritize repositioning outlets over cosmetic changes.
Why Your Layout Might Not Need Changing
If your workflow feels inefficient, measure your work triangle first. Kitchens under 200 sq. ft. often function perfectly with minor tweaks—like moving a trash can under the sink instead of across the room. Only consider structural changes if counters force you to twist awkwardly or if appliances block doorways. Most vintage layouts work; they just lack modern storage hacks.
Spot Hidden Gems Worth Preserving
Run your hand along cabinet interiors—solid wood feels heavy and grainy, while particleboard is smooth and lightweight. Check flooring edges near doorways for glimpses of original hardwood. If you find either, budget for refinishing instead of replacement. These features add resale value and authenticity no new build can replicate.
Paint Cabinets Like a Pro: Avoiding Peeling and Chipping
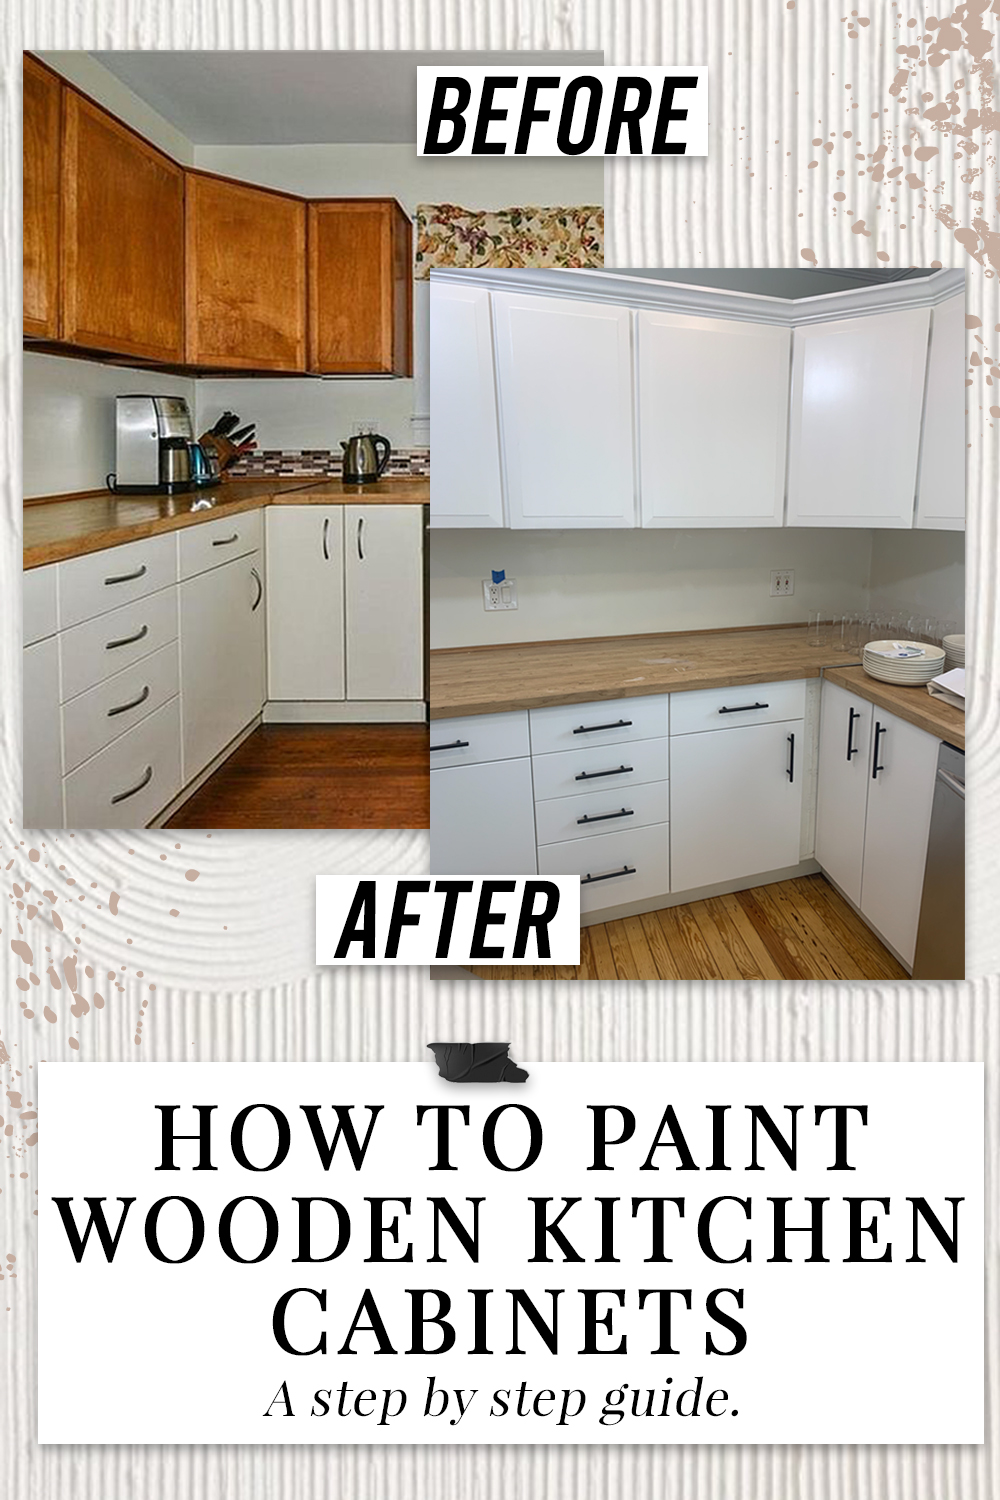
Painting cabinets delivers the highest visual ROI for under $300. But skip the prep steps, and you’ll face peeling within months. Start by removing doors and hardware, then clean every surface with TSP degreaser—especially near stovetops where grease hides. Lightly sand with 220-grit paper until smooth (no glossy spots!), then wipe away dust. Apply a high-adhesion primer like Zinsser Bulls Eye 1-2-3; this seals wood pores and prevents bleed-through. For paint, use 100% acrylic enamel (like Benjamin Moore Advance) in satin finish—it dries hard as armor. Apply thin coats with a microfiber roller, waiting 24 hours between coats. Rush this, and you’ll get brush marks or drips. Allow 72 hours to cure before rehanging.
Choosing Colors That Modernize Without Erasing Character
White or warm greige makes small kitchens feel larger, but don’t default to safe neutrals. Try sage green on lowers with creamy uppers for vintage charm, or navy on islands for drama. Test swatches at different times of day—kitchens get harsh overhead light that washes out colors. Avoid dark hues on all cabinets in windowless spaces; they’ll feel cave-like.
When to Skip Painting Entirely
If your cabinets have intricate details (like raised panels), painting can muddy the design. Instead, refinish with gel stain to enhance wood grain. Or paint only lower cabinets while keeping uppers natural—this grounds the space visually.
Reface Cabinets Instead of Replacing for Maximum Impact
Replacing cabinets costs $15,000+; refacing (new doors, drawer fronts, and hardware) costs 1/3 as much. For kitchens with structurally sound boxes but dated fronts, this is your sweet spot. Measure every opening precisely—mismeasure by 1/8 inch, and gaps ruin the look. Order slab-style doors for clean lines or shaker for subtle texture. Pair with unlacquered brass knobs (they develop a warm patina over time) or matte black pulls for contrast. Install new crown molding to hide ceiling gaps—a $50 upgrade that screams custom. Warning: Avoid mismatched hardware finishes; use one metal tone throughout (e.g., all brass or all black).
Hardware Swaps That Transform in 20 Minutes
Replace every knob with the same style—no mixing! For 1980s oak cabinets, try bin-pull handles in oil-rubbed bronze. On white shakers, go for cup pulls in unlacquered brass. Budget tip: Spray-paint existing hardware with Rust-Oleum Specialty Metallic for $15. Sand first, apply outdoors, and let cure 48 hours.
Modernize Countertops Without Quartz Replacement Costs
Full countertop replacement averages $3,000. Instead, refresh laminate counters with peel-and-stick vinyl designed for kitchens (like Nuvinom). It mimics marble or concrete and withstands heat up to 212°F. Clean counters thoroughly, measure twice, and apply with a squeegee to avoid bubbles. For butcher-block lovers, sand and oil existing counters with mineral oil—this revives dried wood in an afternoon. If replacing, choose butcher block over laminate; it’s cheaper than quartz and adds warmth.
Backsplashes That Define Your Style in a Weekend
Subway tile is timeless, but add personality with placement. Lay 3×6 tiles vertically for height in small kitchens, or use herringbone patterns with smaller tiles for movement. For vintage flair, try encaustic cement tiles in geometric shapes—they’re pricier but install like ceramic. Always extend the backsplash behind the stove; a 4-inch gap looks unfinished. Pro move: Use the same tile on the counter-to-cabinet gap (called a “grout line”) for cohesion.
Swap Outdated Fixtures for Farmhouse Sinks and Faucets

Your sink is the kitchen’s focal point. Replace a double-basin sink with a deep single-bowl apron-front model (like Kohler’s Whiteshore) for $400—it adds instant charm and fits large pots. Match it with a high-arc faucet in matte black or unlacquered brass. Check clearance first: Farmhouse sinks protrude 2-3 inches, so ensure base cabinets can support the weight. For rentals or tight budgets, swap just the faucet; a bridge-style model in brushed nickel modernizes instantly. Never pair a farmhouse sink with a drop-in countertop—it requires custom cabinetry.
Choose DIY-Friendly Flooring That Hides Imperfections
Luxury vinyl plank (LVP) is the hero for old kitchens. It’s waterproof, mimics hardwood perfectly, and clicks together over uneven subfloors—no demolition needed. Avoid sheet vinyl; it yellows and tears. For authenticity, choose planks with wire-brushed texture and varying plank lengths. Install parallel to the longest wall; diagonal layouts waste 15% more material. Budget tip: Buy remnants for under $2/sq. ft. at flooring stores—they’re perfect for small kitchens.
When to Restore Original Floors Instead
If you uncover hardwood under linoleum, rent a floor sander ($50/day). Sand with 80-grit first (for deep scratches), then 120-grit, and finish with 220-grit. Apply 2 coats of Bona Traffic HD finish—it dries fast and resists water rings. Don’t attempt this if boards are >20% damaged; LVP is cheaper than repairs.
Layer Three Types of Lighting for a Brighter Workspace

Old kitchens have one sad ceiling fixture. Add three lighting layers:
1. Task lighting: Under-cabinet LED strips (like Philips Hue) eliminate shadows on counters. Install adhesive strips along the cabinet’s front edge—never the back, or light won’t reach your workspace.
2. Ambient lighting: A single pendant over the sink (e.g., Schoolhouse Electric’s Farmhouse) replaces dated flush mounts. Hang it 30-36 inches above the counter.
3. Accent lighting: Battery-powered puck lights inside glass cabinets highlight dishes without wiring.
Skip track lighting—it ages a space instantly. Instead, use one statement fixture to draw the eye upward.
Style Open Shelves Without Creating Visual Chaos
Replacing two upper cabinet doors with open shelves makes small kitchens feel larger. But cluttered shelves scream “messy,” not “curated.” Install sturdy brackets (not flimsy rods) 18 inches apart. Style with the “rule of three”: group a tall vase, medium bowl, and small plant. Leave 30% of shelf space empty—crowding overwhelms. For vintage charm, mix white dishes with one colorful stack (like vintage Pyrex). Never store everyday items you use hourly (like mugs); shelves are for display pieces.
Where to Avoid Open Shelving
Skip open shelves above stovetops (grease buildup) or near dishwashers (steam warps wood). In galley kitchens, open shelves make the space feel narrower—stick to closed cabinets there.
Phase Your Project in Four Realistic Steps
Tackle updates in this order to avoid living in chaos:
1. Declutter and plan (1 weekend): Remove everything, purge unused items, and map your phased budget.
2. Big structural work (1-2 weeks): Flooring, sink/faucet swaps, and cabinet removal. Do this when you can eat out.
3. Cosmetic updates (1 week): Paint walls first (dust settles), then cabinets, then backsplash.
4. Final touches (1 day): Hardware, lighting, rugs, and styled shelves.
Never do cabinets and flooring simultaneously—you’ll scuff new floors during cabinet work. Always paint before installing new countertops; drips ruin stone edges.
Decorating an old kitchen is about respecting its history while making it work for modern life. Focus on three high-impact changes: painted cabinets, layered lighting, and strategic open shelving. These updates cost under $1,500 but deliver 80% of the visual transformation. Maintain your refreshed space by wiping painted cabinets monthly with mild soap (no abrasive cleaners!) and reapplying mineral oil to butcher-block counters every 3 months. Ready for your next step? Measure your cabinet faces tonight—knowing exact dimensions unlocks custom-looking results without custom prices. Your vintage kitchen’s next chapter starts now.