
Your kitchen sink battles daily stains from coffee rings, hard water deposits, and food residue while harboring bacteria from raw produce and meat. When scrubbing with regular cleaners fails to restore shine or eliminate lingering odors, bleaching a kitchen sink becomes the ultimate solution for deep disinfection and stain removal. But improper use can damage surfaces or create hazardous fumes – especially if you mix bleach with other cleaners. This guide delivers the precise method for safely restoring your sink’s gleam while killing 99.9% of germs, whether you’re tackling rust rings in a porcelain basin or disinfecting a stainless steel workhorse. You’ll learn material-specific protocols, avoid dangerous mistakes, and achieve professional results in under 15 minutes.
Ignoring regular deep cleaning allows grime to etch into surfaces, making stains permanent. Yet many homeowners either skip bleaching entirely due to safety fears or accidentally ruin sinks by using full-strength bleach. The truth? When diluted correctly and applied with targeted timing, bleach is the most effective kitchen disinfectant for eliminating norovirus, E. coli, and stubborn organic stains. By following this exact process, you’ll transform a dingy sink into a sanitized focal point without risking damage to your fixtures or health.
Avoid These Critical Safety Hazards Before Touching Bleach
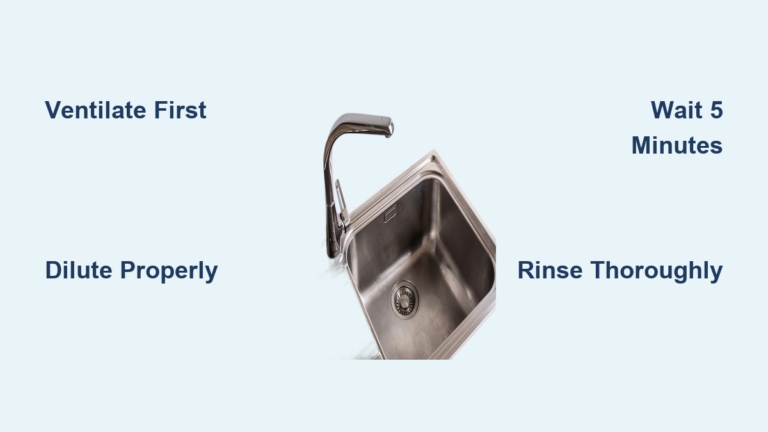
Skipping safety steps turns a routine clean into a health emergency. Bleach fumes can trigger asthma attacks, and mixing it with common cleaners creates chlorine gas that causes breathing difficulties. Start by opening all kitchen windows and turning on exhaust fans – never rely on a single window. While working, wear thick rubber gloves that cover your wrists and ANSI-approved safety goggles; household bleach permanently damages eyes within seconds. Dress in old clothing since bleach spatters cause irreversible fabric discoloration. Most crucially, remove every other cleaner from your sink area – including dish soap, vinegar, and drain openers – because combining bleach with ammonia (in glass cleaners) or acids (in toilet bowl cleaners) produces lethal mustard gas.
Why Ventilation Isn’t Optional for Sink Bleaching
Poor airflow concentrates bleach vapors to dangerous levels. If you smell strong fumes after applying the solution, leave the room immediately and increase ventilation. Never bleach your sink in a windowless kitchen – relocate potted plants or electronics first to open windows. For homes without exhaust fans, position a box fan facing outward in a nearby window during the entire process. This precaution is non-negotiable for households with children, pets, or respiratory conditions.
Pre-Clean Your Sink to Maximize Bleach Effectiveness
Applying bleach to a dirty sink wastes solution and reduces germ-killing power. Begin by removing all dishes, sponges, and drain strainers. Rinse the basin thoroughly with warm water to wash away loose food particles – skip this step, and grease will neutralize the bleach on contact. Next, scrub the entire sink with a mild dish soap and non-scratch sponge to break down oils. Pay special attention to the drain flange and faucet base where grime accumulates. Finally, pour boiling water down the drain to clear hair and soap scum; a clogged drain causes bleach solution to pool, risking prolonged contact that etches porcelain or corrodes pipes.
Spot-Test for Hidden Material Risks
Before full application, test your diluted bleach solution on a hidden area like the sink’s underside near the cabinet. Apply a cotton ball soaked in the mix, wait 2 minutes, then rinse. If discoloration occurs (common in older porcelain or stone), abort the process – your sink material can’t tolerate bleach. This 60-second check prevents irreversible damage to $2,000+ fixtures.
Execute This Exact Bleaching Process for Germ-Free Results

Follow these steps precisely for disinfection that meets CDC standards while protecting your sink’s finish. The key is using the correct dilution and contact time – too weak won’t kill pathogens, too strong ruins surfaces.
Mix the Perfect 1:9 Bleach-to-Water Ratio
Combine ½ cup of standard household bleach (5.25-8.25% sodium hypochlorite) with 4½ cups cool water in a plastic bucket – never mix directly in the sink to avoid concentration errors. Warm water degrades bleach’s effectiveness, so skip hot tap water. This ratio creates a 0.5% solution proven to destroy kitchen pathogens like salmonella within 5 minutes. For smaller sinks, scale down proportionally (e.g., 2 tablespoons bleach per 18 oz water).
Apply, Wait, and Rinse Using CDC-Validated Timing
Soak a microfiber cloth in your solution and wipe all sink surfaces, including faucet handles and the drain opening. For tough stains like tea rings, press the cloth directly onto the spot for 30 seconds before moving. Let the solution dwell for exactly 5 minutes – set a timer since overexposure causes pitting. Scrub stained areas gently with a baking soda-coated sponge (the mild abrasive lifts discoloration without scratching). Immediately rinse every surface with cold running water until the bleach smell vanishes – residual traces can contaminate dishes. Dry completely with a lint-free towel to prevent water spots.
Match Your Method to Your Sink Material
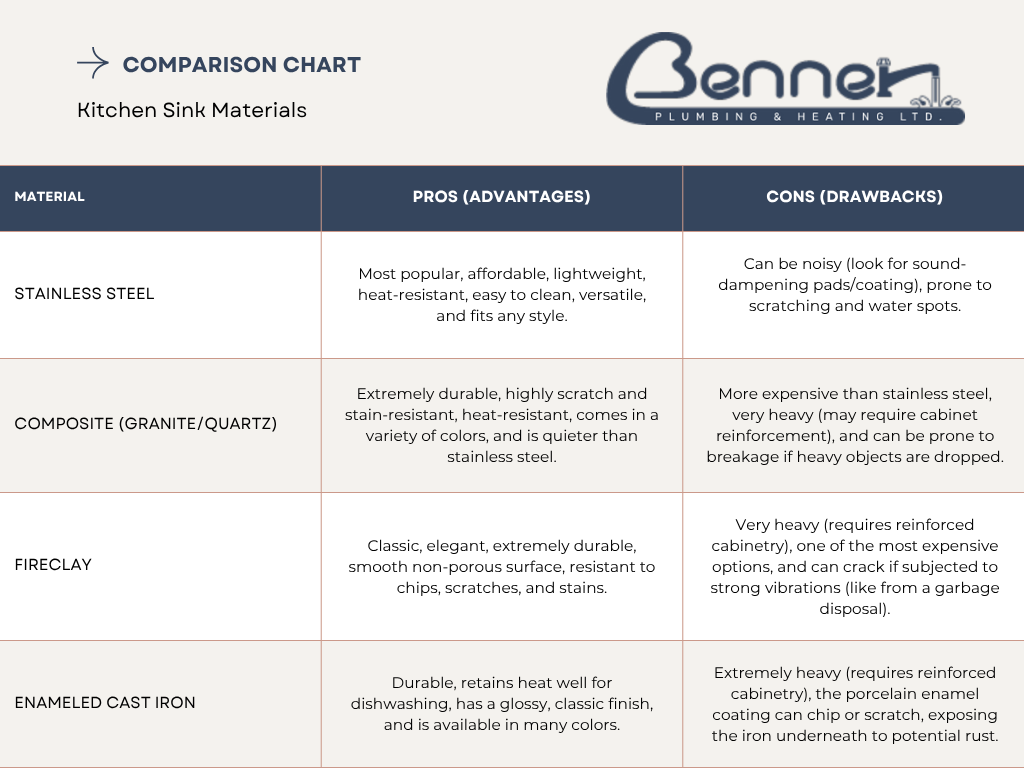
Bleach compatibility varies drastically by material. Stainless steel and glazed porcelain tolerate this process, but natural stone requires alternatives.
Stainless Steel: Prevent Water Spots and Scratches
Use a soft cloth instead of sponges to avoid fine scratches that harbor bacteria. After rinsing, wipe dry immediately with a microfiber towel following the metal’s grain direction. For ongoing protection, apply a pea-sized drop of mineral oil to a dry sink weekly – it repels water and maintains luster. Never leave bleach standing in stainless sinks; even diluted solution causes pitting within 10 minutes.
Porcelain and Fireclay: Guard Against Staining
These glazed surfaces resist bleach but discolor if scratched. Avoid abrasive pads – use only nylon brushes. If your porcelain has chips exposing the underlying metal, skip bleach entirely as it will rust the exposed area. After bleaching, rinse with vinegar-water solution (1:1) to neutralize any alkaline residue that attracts hard water stains.
Materials That Can’t Tolerate Bleach
Never bleach granite, marble, quartzite, or copper sinks. Bleach permanently etches stone and causes copper to turn green-black. For these materials, switch to hydrogen peroxide-based cleaners or lemon-salt scrubs. Composite sinks (like granite-epoxy mixes) vary by brand – consult your manufacturer before proceeding.
Prevent Damage with These Post-Bleach Care Steps
Rinsing alone isn’t enough for long-term sink health. Immediately after drying, apply a protective barrier. For stainless steel, rub food-grade mineral oil onto a soft cloth and buff the entire basin – this creates a water-repelling film that reduces future staining. Stone sinks need a pH-neutral sealant reapplied monthly. Crucially, run cold water through the faucet for 30 seconds to flush bleach from aerator screens, preventing discolored water later.
Weekly Maintenance to Extend Bleach Results
Prevent rapid re-staining by wiping your sink dry after each use with a microfiber cloth. For hard water areas, spray undiluted white vinegar weekly and let sit 2 minutes before rinsing – it dissolves mineral deposits before they set. Never leave citrus peels or coffee grounds sitting in the sink overnight; acidic residues react with residual bleach traces.
Critical Mistakes That Ruin Sinks and Endanger Health
Over 40% of ER visits for chemical burns involve improper bleach use. The top error? Mixing bleach with vinegar to “boost cleaning power” – this creates chlorine gas that causes lung damage. Never use hot water in your solution; it vaporizes bleach fumes faster while reducing disinfecting power. Leaving bleach pools in the sink basin seems convenient but concentrates the chemical, etching surfaces within minutes. Finally, skipping the 5-minute dwell time renders disinfection useless – set a visible timer.
Why “Natural” Bleach Alternatives Backfire
Adding baking soda directly to bleach creates salt crystals that scratch finishes. Spraying vinegar after bleach (even hours later) releases toxic gases as residues react. These “hacks” compromise safety without improving results – stick to the validated 1:9 dilution.
Effective Bleach-Free Options for Sensitive Materials
:max_bytes(150000):strip_icc()/homemade-and-natural-cleaning-products-1900456_final_3-cd0d455d6bee4370ae9aaefd902493ca.png)
When bleach isn’t an option, these methods tackle stains safely. For stone or copper sinks, make a paste of lemon juice and kosher salt – the citric acid lifts stains while salt provides gentle abrasion. Apply with a soft cloth, scrub in circular motions, then rinse thoroughly. Hydrogen peroxide (3%) works for light disinfection; spray on surfaces, wait 10 minutes, then rinse. Baking soda paste (baking soda + water) removes surface stains but won’t kill viruses – ideal for daily maintenance on vulnerable materials.
Final Verification Before Resuming Kitchen Use
After bleaching, confirm all traces are gone by placing a damp paper towel in the sink for 2 minutes. If it develops yellow stains or a chemical smell, repeat rinsing until neutral. Test faucet water by filling a glass – any bleach odor means aerator screens need flushing. Only use the sink for food prep once it’s completely dry and odor-free. For ongoing protection, bleach your sink monthly using this exact method to prevent biofilm buildup that standard cleaners miss.
Final Note: Bleaching your kitchen sink properly transforms it from a germ hotspot to a hygienic workspace in minutes. By respecting material limitations, adhering to CDC dwell times, and avoiding deadly chemical combinations, you’ll maintain a spotless sink that withstands daily kitchen battles. Remember: ventilation, precise dilution, and thorough rinsing aren’t optional steps – they’re the difference between a sparkling result and a costly disaster. Implement the weekly maintenance tips to stretch time between deep cleans, and always keep bleach locked away from household cleaners to prevent accidents. Your safest, shiniest sink awaits with these exact protocols.


