
That sticky, yellowed layer coating your kitchen cabinets didn’t appear overnight—it’s the result of countless cooking sessions where airborne oils settled and polymerized into a stubborn film. Whether you’re dealing with light grease around cabinet handles or thick, hardened buildup above your stove, this guide shows you exactly how to remove thick grease from kitchen cabinets safely and effectively. Most homeowners waste hours scrubbing with the wrong solutions, only to leave residue behind or damage their cabinet finishes. The right approach combines chemical science with practical techniques tailored to your specific cabinet material, saving you time and protecting your investment.
Why Your Kitchen Cabinets Develop Thick, Sticky Grease Buildup
Cooking fumes carry microscopic oil particles that settle on nearby surfaces, gradually building up a sticky film that attracts dust and food particles. This isn’t just unsightly—it creates a breeding ground for bacteria and makes future cleaning exponentially harder. The yellow or amber color of aged grease reveals what you’ve been cooking: butter leaves yellow stains, frying creates golden buildup, and roasted meats contribute amber tones. Heat from your stove accelerates this process, causing grease to polymerize into a varnish-like coating that bonds strongly to cabinet surfaces. Ignoring this buildup allows it to harden further, transforming from a simple wipe-down problem into a major cleaning challenge that requires specialized techniques.
Your Essential Kitchen Degreasing Toolkit

Before tackling thick grease, gather these specific supplies that target grease molecules without harming cabinet finishes:
Must-Have Cleaning Solutions:
– Grease-cutting dish soap (Dawn works best for breaking oil bonds)
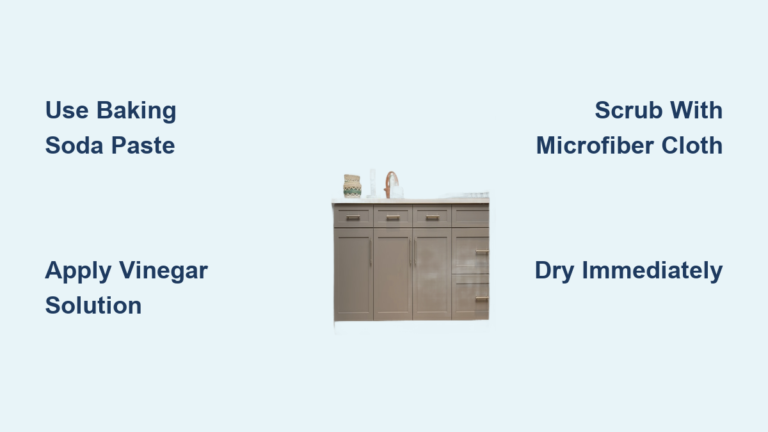
– Baking soda (creates gentle abrasive paste for heavy buildup)
– White vinegar (breaks down polymerized grease when combined with heat)
– Isopropyl alcohol (70% concentration dissolves tough grease without water damage)
– Commercial degreaser (Simple Green for eco-friendly heavy-duty jobs)
Specialized Tools:
– Microfiber cloths (lint-free for streak-free results)
– Plastic scraper (for thick layers without scratching)
– Soft-bristled detailing brushes (including old toothbrush for crevices)
– Spray bottle with adjustable nozzle
– Non-abrasive sponges (blue Scotch-Brite works for most finishes)
Critical Safety Note: Always wear rubber gloves and work in a well-ventilated kitchen. Never mix ammonia with vinegar or bleach—these combinations create dangerous fumes.
The 5-Step Process to Remove Thick Grease From Kitchen Cabinets
Identify Your Grease Type Before Cleaning
Thick grease appears in three distinct forms, each requiring different treatment:
– Fresh, sticky grease: Wipe easily with dish soap solution
– Yellowed, polymerized grease: Requires baking soda paste or vinegar treatment
– Hardened, varnish-like buildup: Needs commercial degreaser or steam cleaning
Test your chosen solution on a hidden cabinet area first—especially important for stained wood or painted finishes. For severe buildup, check if the grease peels when gently scraped; if it does, you’re dealing with years of polymerized grease that needs specialized treatment.
Dry Removal: The Critical First Step Most People Skip
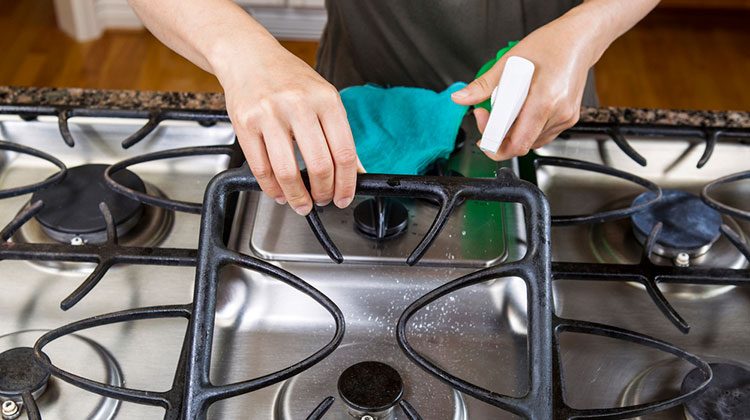
Begin with a dry microfiber cloth to remove loose dust particles before applying liquids. This prevents creating muddy streaks that are harder to clean. For thick buildup, gently scrape with a plastic tool at a 30-degree angle to lift the grease layer without scratching. Focus on horizontal surfaces above your stove first—these collect the most grease due to rising cooking vapors. Skipping this dry removal step forces you to work harder later, as you’ll be moving grease around rather than removing it.
Apply the Right Degreasing Solution for Your Situation
For moderate yellowed grease:
1. Mix 3 tablespoons baking soda with 2 tablespoons water to form a thick paste
2. Apply generously to greasy areas with a cloth
3. Let sit for 15-20 minutes (longer for severe buildup)
4. The paste draws out grease while providing gentle abrasion
For stubborn, hardened grease:
– Combine equal parts white vinegar and water with 1 tablespoon dish soap
– Spray liberally and cover with a damp paper towel to prevent drying
– Let sit for 30 minutes to break down polymerized oils
– The vinegar’s acidity dissolves grease bonds while dish soap emulsifies the oil
Proper Scrubbing Technique to Avoid Damage
Always scrub in the direction of the wood grain for wooden cabinets, using light pressure with a soft brush. For laminate or thermofoil cabinets, circular motions work best. Focus on one 2×2 foot section at a time—larger areas let cleaning solutions dry prematurely, reducing effectiveness. When tackling carved details, use an old toothbrush dipped in your cleaning solution to work into crevices without damaging raised panels. For particularly stubborn spots, reapply your solution rather than increasing scrubbing pressure, which can damage cabinet finishes.
Final Rinse and Protective Conditioning
Wipe away residue with a clean, damp microfiber cloth, changing water frequently to avoid redepositing grease. For painted cabinets, a second pass with plain water ensures no soap residue remains. Immediately dry all surfaces with a clean, soft towel to prevent water damage—especially important for wood cabinets. Finish by applying a light coat of furniture polish or wood conditioner to restore protective oils and create a barrier against future grease buildup. This final conditioning step is crucial for maintaining cabinet appearance long-term.
Targeting Your Kitchen’s Grease Hotspots
Cabinet Handles and Hardware: The #1 Grease Magnet
Grease accumulates most heavily around handles due to constant hand contact transferring oils. Remove hardware if possible and soak in hot, soapy water for 15 minutes. For non-removable handles, wrap a cloth soaked in vinegar solution around them and let sit for 10 minutes before scrubbing with an old toothbrush. Pay special attention to the underside of handles where grease pools and hardens.
The Stovetop Wall Area: Extreme Grease Zone
This area requires military-grade cleaning tactics. Apply your baking soda paste thickly and cover with plastic wrap to keep it moist for 30 minutes. For baked-on grease, use a handheld steam cleaner held 2 inches from the surface—steam breaks grease bonds without chemical residue. Always work from bottom to top to prevent dirty runoff on cleaned areas.
Cabinet Material-Specific Cleaning Protocols
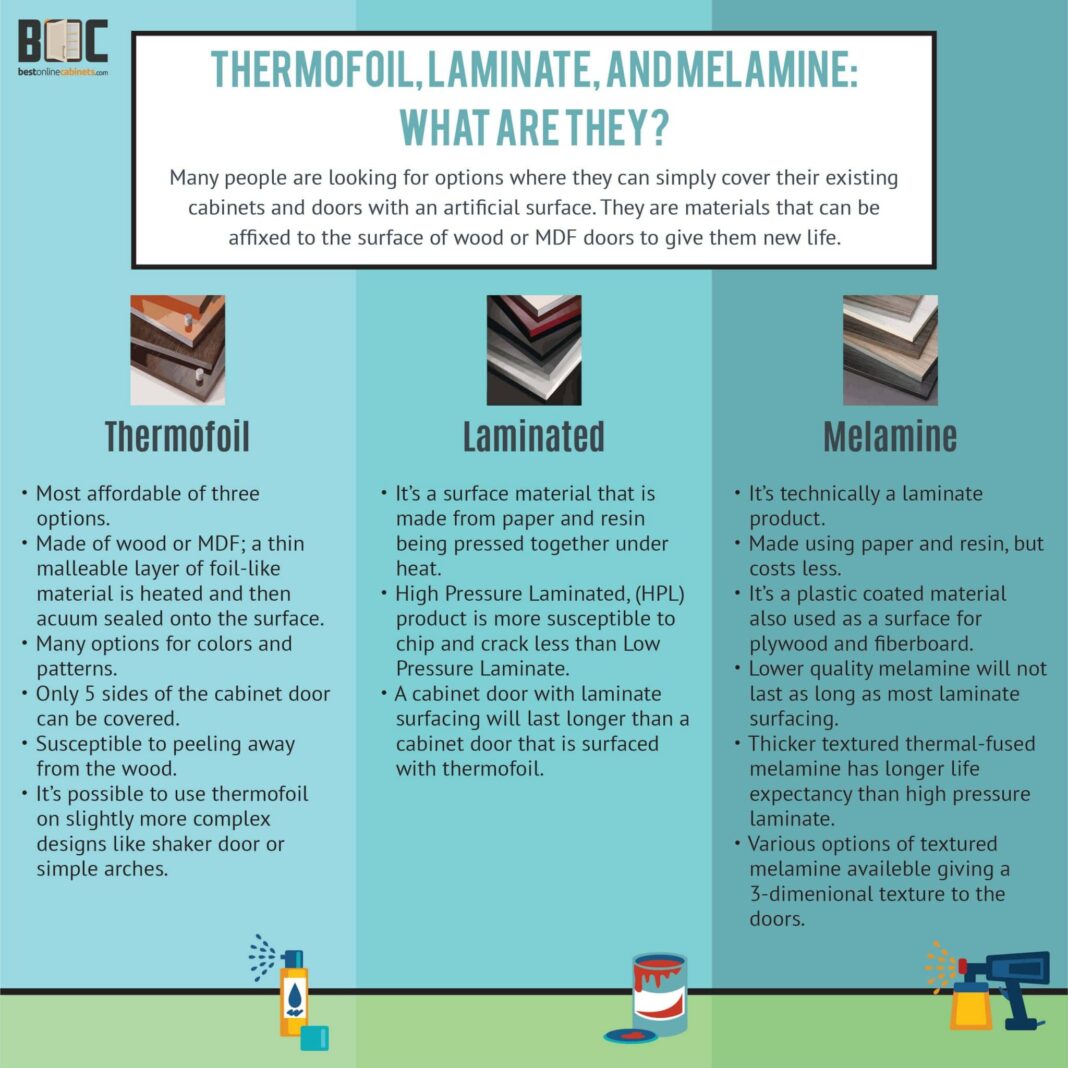
Painted Cabinets: Use only pH-neutral cleaners and avoid vinegar solutions which can dull finishes over time. A simple mix of dish soap and warm water works best for regular maintenance.
Stained Wood Cabinets: Test all solutions on hidden areas first. After cleaning, apply a thin coat of mineral oil to replenish lost moisture and protect the wood.
Laminate/Thermofoil Cabinets: Avoid excessive moisture which can seep into seams. Use a barely damp cloth with minimal pressure—these surfaces scratch easily but clean up beautifully with proper technique.
When to Call Professionals for Grease Removal
If you’ve tried multiple methods and still face thick, hardened grease that won’t budge, professional cleaning services have industrial-strength solutions that safely remove years of buildup. They use commercial steam cleaners and specialty degreasers that penetrate deep into grease layers without damaging finishes. This becomes cost-effective when dealing with full kitchen cabinet systems showing severe buildup—what might take you 8+ hours of frustrating work, professionals complete in 2-3 hours with better results.
Prevent Future Grease Buildup With These Daily Habits
Weekly maintenance takes just 5 minutes: wipe cabinets with a microfiber cloth dampened with 1:4 vinegar-water solution. Install a range hood vented to the outside—this reduces airborne grease by 70% compared to recirculating models. Apply a thin coat of paste wax to cleaned cabinets; it creates a barrier that makes future cleaning effortless. Most importantly, wipe splatters immediately after cooking—preventing buildup is always easier than removing it later.
The key to maintaining grease-free cabinets isn’t occasional deep cleaning but consistent, simple habits that prevent buildup from becoming a major problem. By understanding grease chemistry and using the right techniques for your specific cabinet material, you can keep your kitchen looking fresh with minimal effort. Remember: the best time to clean grease is before it has a chance to harden—so make that quick weekly wipe-down part of your kitchen routine.


