
That morning coffee spill reveals it again—ugly scratches marring your kitchen sink. Daily use, stray pot handles, or even abrasive cleaners can leave these unsightly marks that make your sink look perpetually dirty. But here’s the critical truth: how to remove scratches from kitchen sink surfaces depends entirely on your sink’s material. Applying stainless steel methods to porcelain could destroy your finish, while composite repair kits won’t work on ceramic. This guide cuts through the confusion with exact, material-specific techniques to fix scratches safely. You’ll learn to identify your sink type, assess scratch depth with a simple fingernail test, and execute repairs that actually work—no more guessing or risky DIY experiments.
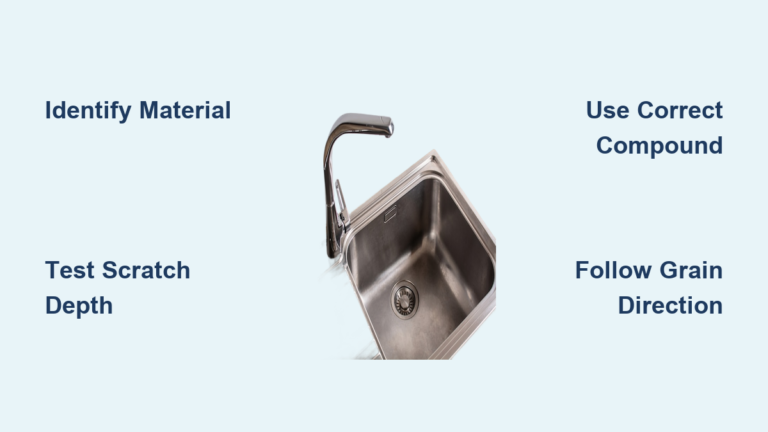
Identify Your Kitchen Sink Material Before Repairing
Grab a flashlight and inspect your sink closely—this step makes or breaks your scratch repair. Run your finger over the surface while examining its texture and color pattern under bright light. Composite/granite sinks feel cool and stone-like with subtle flecks of quartz or granite visible in the surface. Porcelain, ceramic, and fireclay sinks have a glossy, glass-smooth finish that’s often pure white or colored throughout. Stainless steel reveals a distinct linear grain pattern when viewed from an angle and feels metallic cold to the touch. If your sink has a dull gray cast with visible metal grain, it’s stainless steel. Mistaking these materials leads to disastrous results—like using steel wool on porcelain (which guarantees deeper scratches). When in doubt, check manufacturer documentation or look for model stamps under the sink rim.
How to Perform the Fingernail Scratch Depth Test
This 10-second assessment determines your repair approach. Clean the scratch area with dish soap and water, then dry completely. Gently drag your fingernail across the scratch (not along it). If your nail catches or snags, it’s a deep scratch requiring filler kits or sanding. If your nail glides smoothly over the mark, it’s a surface scratch treatable with polishing compounds. For stainless steel sinks, skip this test—any visible scratch needs grain-direction polishing. Never assume scratch depth visually; many surface marks feel deeper than they are. This test prevents wasted effort on minor scratches that respond to simple baking soda paste.
Fixing Deep Scratches in Composite Sinks with Epoxy Kits

Deep scratches that catch your fingernail compromise the protective seal on granite composite sinks. These require precise epoxy filling to prevent staining. Blanco, Franke, and IKEA composite sinks all respond well to this method. Start by thoroughly cleaning the scratch with isopropyl alcohol on a microfiber cloth—any grease or soap residue prevents epoxy adhesion. Let the area dry 15 minutes. Mix the two-part epoxy filler from your repair kit (like Blanco Repair Kit or Festa Granite Repair) exactly as instructed—deviating from ratios causes improper curing. Use a toothpick to apply the paste slightly above the sink surface, filling the scratch completely. Immediately smooth excess with a credit card held perpendicular to the sink. Work fast; epoxy sets in 5-7 minutes. Let cure undisturbed for 24 hours before light use, 48 hours for full hardness. Rushing this step creates cracks when water contacts uncured epoxy.
Why Surface Scratches on Composite Sinks Need Special Cleaners
Light scratches that don’t catch your fingernail are often just in the surface sealant—not the composite material itself. Bar Keepers Friend Soft Cleanser or Cillit Bang Power Cleaner work here because their mild abrasives (calcium carbonate) polish without scratching. Apply cream to a non-scratch blue Scotch-Brite pad, not a cloth, and rub in small circles for 60 seconds. The pad’s texture lifts surface marks while the cleaner restores shine. Rinse immediately—leaving it on more than 2 minutes dulls the finish. For Blanco sinks, their Clean & Care Kit includes pH-balanced polish that won’t strip the protective layer. Avoid vinegar-based cleaners; their acidity degrades composite sealants over time. Test any product in the sink’s rear corner first—some colored composites react poorly to oxalic acid formulas.
Repair Porcelain Sink Scratches with Ceramic Polishing Compounds
Porcelain and fireclay sinks have a fragile glazed surface—aggressive methods cause permanent damage. For hairline scratches (fingernail test passes smoothly), use MA-AX Ceramic Polish or a non-gel toothpaste. Apply to a damp microfiber cloth and buff in 2-inch circles with light pressure for 3 minutes. The silica in toothpaste gently abrades the glaze to even out shallow marks. Rinse with cool water—hot water can crack compromised glaze. For deeper scratches exposing beige clay underneath, you’ll need porcelain repair epoxy. Clean the area with acetone, then mix J-B Weld Porcelain Repair with a tiny drop of acrylic paint matching your sink color (use a toothpick tip). Fill the scratch slightly high, and let cure 12 hours before wet-sanding with 1000-grit paper. Never use steel wool—its particles embed in porcelain, causing rust stains.
Critical Mistake to Avoid on Glazed Ceramic Sinks
Most DIYers ruin ceramic sinks by sanding incorrectly. Never use dry sandpaper—it creates dust that scratches surrounding areas. Always wet-sand with 600-grit paper lubricated by water, moving only with the sink’s natural contour lines. For a basin-shaped sink, sand in concentric circles; for flat-bottomed sinks, use straight back-and-forth motions. Progress to 1500-grit paper after initial sanding to remove swirl marks. Finish by applying ceramic glaze restorer like Shamrock Sink Refinishing Kit with a foam brush—this seals micro-scratches and restores water beading. If your sink shows “crazing” (spiderweb cracks in the glaze), stop immediately; polishing will worsen it. Professional refinishing is the only solution for crazed surfaces.
Remove Stainless Steel Sink Scratches by Following the Grain
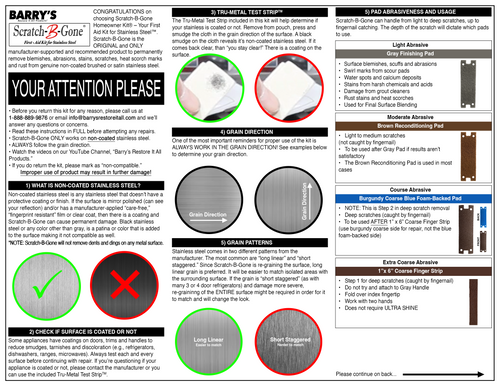
Stainless steel scratches are deceptive—what looks like random damage actually follows the metal’s directional grain pattern. Ignoring this grain guarantees worse scratches. First, identify the grain: look at your sink under angled light. You’ll see fine parallel lines running front-to-back (most common) or side-to-side. All repair motions must follow these lines. For light hairline scratches, make a paste of baking soda and water (3:1 ratio). Dip a soft cotton cloth (not microfiber—it can snag) into the paste and rub in straight lines with the grain for 2 minutes. Rinse with vinegar-water solution (1:1) to neutralize baking soda residue, then dry. This removes 80% of surface marks in under 10 minutes.
Fixing Deep Scratches on Brushed Stainless Steel Sinks
Deep scratches that catch your fingernail require staged wet-sanding. Never attempt this on satin-finish sinks—it permanently alters texture. Start with 600-grit wet/dry sandpaper soaked in water for 5 minutes. Fold paper into quarters for better control. Sand only along the grain using light pressure—pressing hard creates uneven patches. Work in 6-inch sections, overlapping strokes by 50%. After 2 minutes, switch to 800-grit paper to remove 600-grit marks. Repeat with 1200-grit, then 2000-grit for final smoothing. Each grit stage takes 90 seconds max. Finish by applying Weiman Stainless Steel Cleaner with a grain-following motion using a microfiber cloth. Buff dry immediately—water spots highlight your repair work. This process takes 20 minutes but makes deep scratches vanish into the brushed pattern.
Prevent Future Kitchen Sink Scratches with Proven Tactics
Stop scratches before they start with these manufacturer-approved strategies. Install rubber-coated sink grids sized precisely for your basin—they absorb impact from pots and pans. For composite sinks, choose silicone mats with suction cups (like SimpleHuman) that won’t slide. Never cut food directly in the sink; even plastic knives scratch porcelain. Always rinse abrasive residues like sand (from root vegetables) or coffee grounds immediately—drying particles act like sandpaper. Use non-scratch Dobie pads for daily cleaning, not green scrubbers. For stainless steel, rinse with vinegar weekly to prevent mineral deposits that accelerate scratching. Blanco recommends their Protect spray for composite sinks—a monthly application fills micro-scratches before they worsen.
When to Call a Professional for Sink Scratch Repair
Some damage exceeds DIY capabilities. Seek professional help if:
– You see exposed metal in stainless steel sinks (indicates corrosion)
– Porcelain chips expose the underlying iron or steel body
– Composite sink scratches leak colored liquid (sign of deep resin failure)
– Fireclay sinks have hairline cracks spreading from scratches
Attempting repairs on these issues often costs more than professional service. A certified technician can refinish porcelain sinks for $150-$300, versus $500+ for replacement. For high-end sinks like Kohler cast iron or Rohl fireclay, always consult the manufacturer first—unauthorized repairs void warranties.
Final Note: You now have exact methods to remove scratches from kitchen sink surfaces based on your specific material. Remember: composite needs epoxy for deep scratches but cream cleaners for surface marks; porcelain requires ceramic polishers never steel wool; stainless steel demands grain-direction sanding. Prevention matters most—those rubber sink grids take 10 seconds to install but save years of frustration. Grab your baking soda or polishing compound today and reclaim that smooth, spotless sink. For stubborn porcelain chips or composite cracks, professional refinishing delivers flawless results without replacement costs.


