
That stubborn blob of dried glue on your kitchen counter isn’t just unsightly—it’s a constant reminder of a messy mistake. Whether it’s from a craft project gone wrong, a broken appliance handle, or accidental adhesive drips, removing glue from kitchen counters requires precision to avoid permanent damage. Most DIY attempts fail because people grab the nearest solvent without checking their countertop material or glue type. In this guide, you’ll learn exactly which methods work for your specific surface and adhesive, saving you from costly refinishing projects. We’ll cover foolproof techniques using household items and targeted solvents that dissolve glue without harming your countertop.
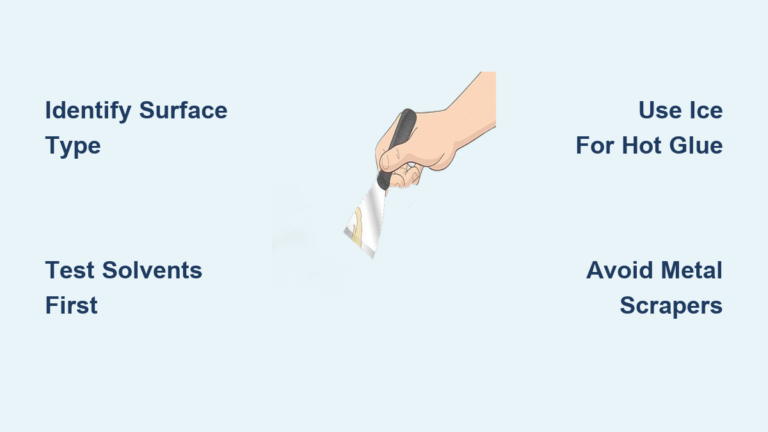
Identify Your Countertop Material Before You Start

Your countertop’s material determines which removal methods are safe. Using acetone on laminate or vinegar on marble could cause irreversible etching or discoloration. Skip this step, and you risk turning a small glue spot into a $500 repair job. Always check manufacturer documentation first, but here’s how to identify common surfaces:
- Laminate/Formica: Smooth, non-porous surface with visible seams. Test by scratching an inconspicuous area—you’ll see layered particleboard beneath the thin plastic coating.
- Quartz/Engineered Stone: Uniform color throughout with tiny flecks. No visible seams (sold in slabs). Resists stains but hates harsh acids.
- Granite/Marble: Natural stone with unique veining. Porous—spill water to see if it darkens the surface (indicates absorption).
- Butcher Block: Warm, wood-grain texture. Shows knife marks and requires oiling. Avoid water saturation.
Critical mistake alert: Never assume your surface type. That “granite-looking” countertop might actually be laminate, which acetone will melt within seconds. When in doubt, treat it as delicate and start with the gentlest method.
How to Spot Test Solvents Safely
Skip this test, and you might ruin your entire countertop. Here’s the non-negotiable procedure:
1. Choose a hidden spot (under the sink cabinet or behind the faucet)
2. Apply a pea-sized amount of your chosen solvent
3. Cover with plastic wrap to prevent evaporation
4. Wait 10 minutes, then wipe clean
5. Check for cloudiness, discoloration, or texture changes
If damage occurs, move to a gentler solvent. For porous stone like marble, skip solvent testing entirely and use only oil-based methods.
Match the Removal Method to Your Glue Type
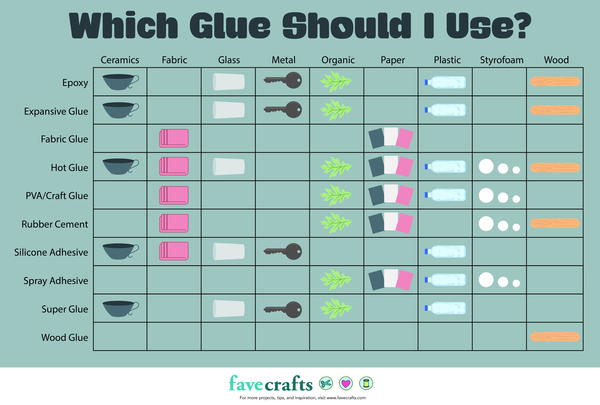
Grabbing the wrong remover wastes time and risks damage. Identify your glue first by its texture and origin:
- White/Craft Glue (PVA): Chalky white when dry, peels like paper. Common in school projects.
- Super Glue (Cyanoacrylate): Hard, glassy residue. Bonds skin instantly.
- Construction Adhesive (Liquid Nails): Thick, rubbery, and flexible even when dry.
- Hot Glue: Opaque yellow/white, forms distinct drips. Feels waxy.
Pro tip: Press a fingernail into the glue. If it dents, it’s fresh and easier to remove. If rock-hard, you’ll need stronger solvents.
Water-Based Glue Removal for Laminate and Quartz
Dried school glue on Formica? This 15-minute method preserves your surface:
1. Soak a microfiber cloth in hot, soapy water (add 1 tbsp Dawn dish soap per cup)
2. Lay cloth directly over glue for 10 minutes—steam softens the bond
3. Gently scrape with a plastic putty knife (angled at 30 degrees)
4. For residue, apply mayonnaise as a paste and wait 5 minutes before wiping
Why it works: The oil in mayo breaks down PVA polymers while soap lifts residue. Never use vinegar—it can delaminate edges over time.
Super Glue Spill Fix for Granite and Marble
Acetone melts super glue but destroys natural stone. Here’s the safe alternative:
1. Dampen a cotton ball with 90%+ isopropyl alcohol
2. Hold firmly against the glue spot for 60 seconds (no rubbing!)
3. Wipe with a clean cloth using circular motions—you’ll see the glue lift
4. For stubborn spots, repeat with lemon essential oil (contains natural limonene)
Visual cue: Success looks like the glue turning translucent before dissolving. If you see white haze, stop immediately—you’re etching the stone.
Removing Construction Adhesive and Epoxy Safely

Heavy-duty adhesives require strategic softening. Never scrape dried Liquid Nails—it will gouge surfaces.
Heat Method for Quartz and Solid Surfaces
- Set hair dryer to medium heat (no higher than 150°F)
- Hold 6 inches from glue for 30 seconds until it turns tacky
- Immediately wipe with damp microfiber cloth using light pressure
- For residue, apply Goo Gone Original and wait 2 minutes before wiping
Time estimate: 20 minutes for a quarter-sized spot. Stop if the adhesive smokes—that means you’re overheating.
Chemical Method for Non-Porous Countertops
Only for laminate, quartz, or sealed granite:
1. Apply pure acetone (not nail polish remover) to a cotton swab
2. Dab edges of the glue blob first to prevent spreading
3. Wait 90 seconds—adhesive will turn gummy
4. Lift with credit card edge using upward flicks
Warning: Acetone fumes are flammable. Work near an open window with a fan blowing outward. Never leave rags soaked in acetone—they can spontaneously combust.
Quick Fix for Hot Glue and Tape Residue
Hot glue removal is the easiest—if you know this ice trick:
1. Place frozen peas in a ziplock bag directly on the glue
2. Wait 3 minutes until it becomes brittle
3. Flick the edge with a fingernail—the glue should pop off whole
4. For residue, rub with cooking oil on a paper towel
Tape residue? WD-40 works in 30 seconds but requires thorough cleanup:
– Spray on rag first (never directly on counter)
– Wipe residue until clear
– Immediately follow with dish soap and water to remove oily film
Countertop-Specific Glue Removal Tips
Butcher Block and Wood Counters
Use only oil-based methods:
– Apply mineral oil thickly and wait 20 minutes
– Scrape with dull butter knife
– Finish with baking soda paste (1:1 with water) scrubbed gently
– Never use alcohol—it dries out wood and causes cracking
Tile and Grout Lines
Glue trapped in grout needs special handling:
1. Soften with warm vinegar soak (50/50 water/vinegar in spray bottle)
2. Scrub grout lines with old toothbrush
3. For white grout stains, make paste of hydrogen peroxide and baking soda
4. Let sit 10 minutes before rinsing
Pro tip: Seal grout annually with penetrating sealer to prevent future glue absorption.
3 Critical Mistakes That Damage Countertops
Mistake #1: Using Razor Blades on Delicate Surfaces
Metal scrapers scratch laminate and quartz. Always use plastic tools—even “gentle” scraping with steel wool leaves micro-scratches that trap dirt. For glass-top counters, a single-edge razor held at 45 degrees is safe, but never on stone or laminate.
Mistake #2: Mixing Chemical Cleaners
Combining vinegar and bleach creates toxic chlorine gas. Even “safe” mixes like baking soda and vinegar reduce effectiveness. Stick to one solvent per session, and wait 24 hours before trying another method.
Mistake #3: Skipping the Final Clean
Residue from solvents attracts grease. Always finish with:
1. Spray area with 50/50 water and white vinegar
2. Wipe with microfiber cloth
3. Buff dry with lint-free towel
This neutralizes pH and restores shine.
When to Call a Professional for Glue Removal
DIY fails when:
– Glue covers more than 6×6 inches (risk of uneven treatment)
– You have antique or high-end stone (like Calacatta marble)
– Previous attempts caused hazing or discoloration
Professionals use industrial-grade tools like:
– Infrared heat guns (precise temperature control)
– pH-neutral adhesive removers
– Color-matched fillers for damaged spots
For under $100, they can often fix what DIY ruined. Don’t gamble with heirloom countertops.
Removing glue from kitchen counters successfully hinges on matching your method to both the adhesive and surface. Always start gentle: hot soapy water for water-based glues, ice for hot glue, and oils for residue. Test every solvent first, avoid metal scrapers, and never mix chemicals. For natural stone or large spills, professional help is worth the cost. Once clean, prevent future mishaps by placing a silicone mat under craft projects and storing glue tubes upright in a dedicated container. Your countertop will stay pristine—and you’ll never dread that sticky surprise again.


