

Your kitchen has become a daily frustration. Doors hang crooked, shelves wobble under light loads, and the layout no longer fits your cooking habits. Replacing kitchen cupboards transforms both functionality and home value—but skipping proper planning turns this dream project into a nightmare. One professional installer bluntly shares: “I’ve returned to more DIY kitchen disasters than I can count—everything ends up misaligned or unsafe.” If your cupboards are structurally unsound or the layout no longer works, replacement is necessary. This guide cuts through the confusion, giving you actionable steps to replace kitchen cupboards safely while avoiding the top errors that force homeowners to call in expensive rescuers. You’ll learn exactly when to DIY, how to budget realistically, and why your first installed cabinet determines the entire project’s success.
Why Your First Cabinet Must Be Perfectly Level

Installing new kitchen cupboards starts with a single critical step most DIYers rush: leveling the corner cabinet. This isn’t just about aesthetics—unlevel base cupboards cause doors to rub, drawers to jam, and countertops to slope dangerously. Walls are rarely plumb, and floors often sag near sinks where plumbing adds weight. Skipping precise leveling here guarantees every subsequent cabinet will compound the error.
How to Establish Your Foundation Line
- Mark stud locations using a stud finder—upper cupboards rely entirely on these anchor points.
- Create a level baseline with a 4-foot torpedo level and chalk line:
– Measure 36 inches up from the floor at both ends of a wall.
– Snap a chalk line between these points.
– Verify levelness every 12 inches; adjust marks if the floor slopes. - Install a temporary ledger board (1×4 pine) along this line to support upper cupboards during installation.
Critical Mistakes That Ruin Alignment
- Ignoring floor irregularities: Shim base cupboards before securing them to the wall. Place shims under low spots until a level shows true horizontal.
- Relying on existing cabinets: Old cupboards were likely installed imperfectly—never use them as a reference.
- Skipping the corner start: Always begin with the corner base cabinet. If this unit isn’t square and level, adjacent cabinets won’t align. One installer warns: “A 1/8-inch error here becomes a 2-inch disaster at the far end.”
Choosing Between Full Replacement, Refacing, or Door Swaps
Replacing kitchen cupboards doesn’t always mean ripping out every box. Your cabinet carcasses (the structural boxes) dictate your best path. If they’re solid with no water damage or warping, you could save 50-70% by avoiding full replacement.
When Full Cupboard Replacement Is Non-Negotiable
- You’re changing the kitchen layout (e.g., moving a sink wall).
- Carcasses show damage like swollen particleboard near sinks.
- Existing cupboards are poorly constructed (thin plywood, weak joints).
Budget-Friendly Alternatives That Deliver Results
| Option | Cost (10-ft Kitchen) | DIY Difficulty | Time Required |
|---|---|---|---|
| Full replacement | $2,000-$5,000+ | Advanced | 7-10 days |
| Refacing (new doors/drawer fronts) | $800-$1,500 | Moderate | 3-5 days |
| Door-only replacement | $300-$700 | Beginner | 1-2 days |
Pro tip: Test carcass strength by pressing firmly on cabinet corners. If they flex or feel spongy, full replacement is essential. For sound boxes, refacing with thermofoil doors and new hardware creates a high-end look at half the cost.
Demolition Done Right: Avoid Hidden Utility Disasters
Tearing out old cupboards seems straightforward—until you hit a water line or electrical conduit. This phase requires meticulous utility mapping to prevent costly, dangerous surprises.
Step-by-Step Safe Removal Protocol
- Shut off main water and electricity at the breaker panel—don’t just flip individual switches.
- Label every connection: Use painter’s tape to tag pipes, wires, and vents before disconnecting.
- Remove upper cupboards first: Start with the farthest unit from the sink. Drill out wall screws while a helper supports the weight.
- Cut countertops free: Saw through caulk bonds with a utility knife before unscrewing from base cupboards.
- Check for hidden anchors: Older kitchens often have nails through cabinet backs into studs—scan with a stud finder before pulling.
Critical warning: Never assume plumbing locations. One DIYer’s story illustrates the risk: “I didn’t check behind the sink cabinet and sliced through a hot water line—flooded the kitchen and ruined the subfloor.” Always shut off water and test faucets before demolition begins.
Installing Base Cupboards: The Shim Technique Pros Use
Base cupboards bear countertop weight and daily impacts, making precise installation non-negotiable. The key is compensating for uneven floors without compromising stability.
How to Shim Like a Professional
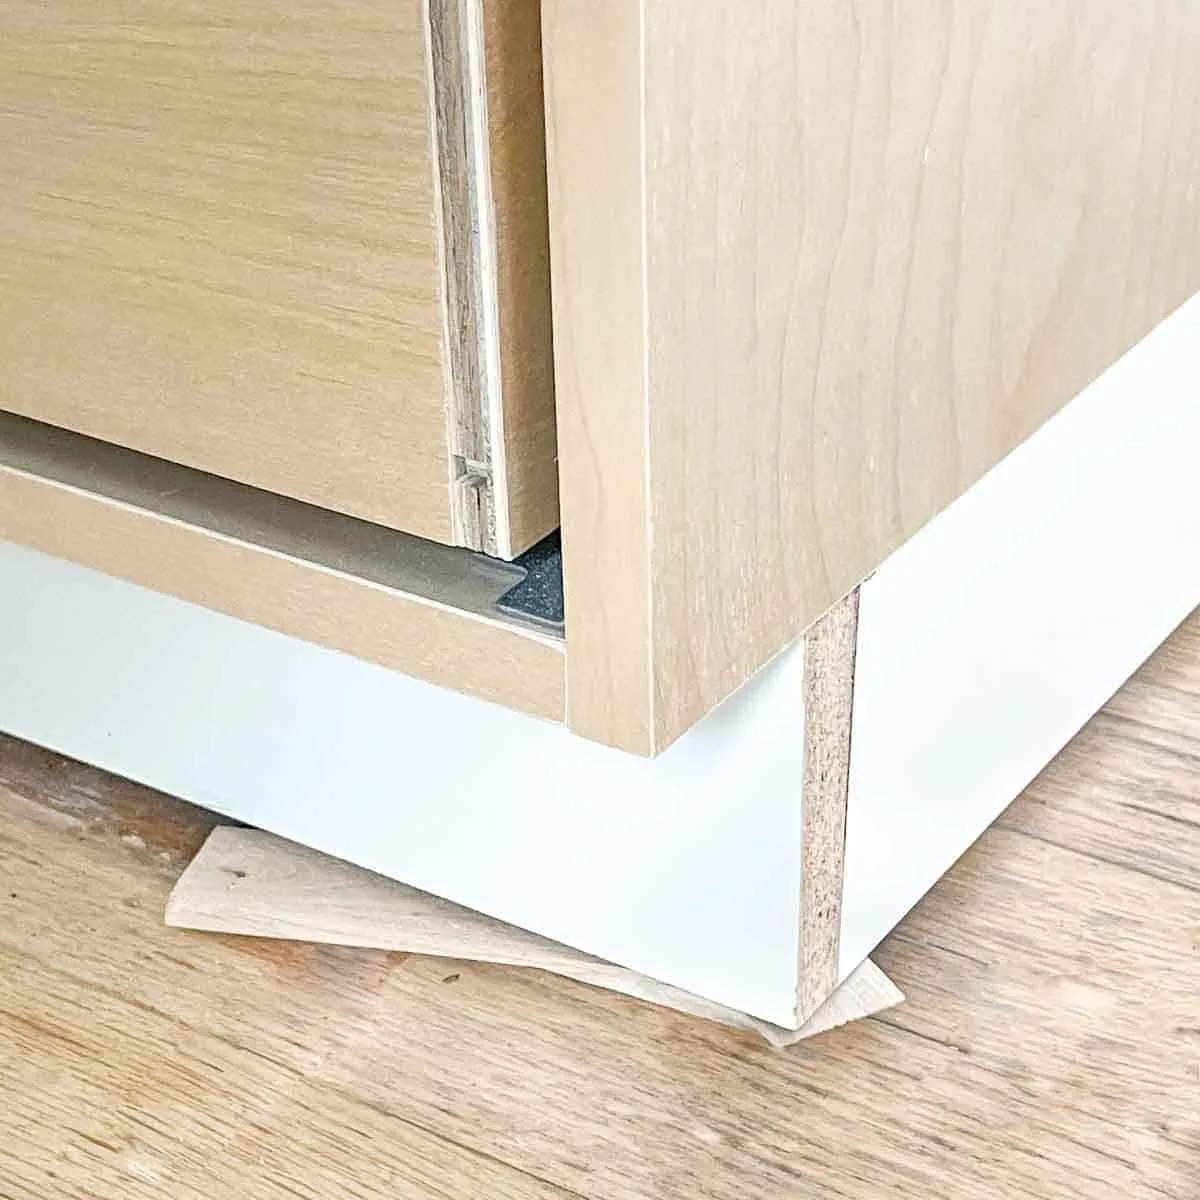
- Position the corner cabinet against the wall, leaving 1/2 inch for scribe gaps.
- Place a level across the top front edge.
- Insert shims under low corners until the cabinet is perfectly level:
– Slide shims incrementally (don’t force them fully under at once).
– Check for plumb on both sides with a torpedo level. - Secure to wall studs with 3-inch cabinet screws—never rely on floor fasteners alone.
- Scribe adjacent cabinets to walls using a compass tool: Trace the wall contour onto the cabinet back, then sand or saw to match.
Time-saver: Pre-drill shim holes through the cabinet base. This avoids splitting wood when inserting shims during alignment.
Why Upper Cupboard Installation Requires Two People (and Strong Studs)
Hanging upper cupboards is where DIY projects most commonly fail. A single 36-inch cabinet weighs 40-60 pounds when loaded with dishes—a disaster if improperly secured. Walls often lack sufficient studs in prime locations, forcing creative anchoring.
The 3-Step Wall Mounting System
- Locate and mark studs every 4 inches—don’t trust stud finder results alone. Knock to confirm density.
- Position cabinets on the ledger board: Lift with a partner, resting the bottom edge on your pre-installed board.
- Secure through the back panel into studs using 3-inch screws:
– Drive one screw at top and bottom of each stud location.
– Never use only particleboard screws—they pull out under weight.
Urgent safety note: If studs don’t align with cabinet positions, install a 1×3 plywood backer between studs. Screw cupboards into this backer—never rely on drywall anchors for upper units.
Budget Breakdown: Realistic Costs for a $5,000 Kitchen Cupboard Refresh
Many homeowners underestimate total costs, focusing only on cupboard prices. A realistic DIY budget includes hidden expenses like disposal fees and tool rentals. One renovator’s accurate $5,000 allocation:
- New cupboards (IKEA/Bunnings flat-pack): $1,000
- Countertop (prefab laminate): $1,000
- Sink, faucet, plumbing parts: $1,000
- Backsplash tile and adhesive: $1,000
- Appliance updates (e.g., new dishwasher): $1,000
Where DIYers overspend:
– Rental tools: Stud finders ($15/day), demolition hammers ($40/day)
– Disposal fees: $150+ for old cupboards at the landfill
– Mistake corrections: Extra caulk, filler, replacement doors
Smart savings: Buy discontinued “new but unused” cupboards from renovation sites. One user scored solid oak units for 30% off by networking with local contractors.
When to Call a Professional: The 3 Non-Negotiable Scenarios
Replacing kitchen cupboards seems DIY-friendly until you face these situations where professional expertise prevents dangerous errors:
- Moving plumbing or electrical lines: Relocating a sink requires certified plumbing work in most regions. One DIYer’s flooded kitchen cost $2,000 in water damage repairs.
- Installing stone countertops: Quartz or granite slabs need precise cabinet leveling—within 1/16 inch tolerance. A single unlevel cabinet cracks expensive stone.
- Full layout changes: Moving walls or adding islands demands structural assessments. As a contractor states: “I’ve seen DIYers remove load-bearing walls disguised as pantry cabinets.”
Hybrid solution: Do demolition and prep yourself (saving $500-$800), then hire a pro for cupboard installation. This balances cost savings with critical expertise where mistakes are most costly.
Replacing kitchen cupboards transforms your home’s heart—but only if done correctly. The difference between a flawless renovation and a costly disaster lies in honest skill assessment and meticulous execution of foundational steps. Never skip leveling that first cabinet, always verify utility locations before swinging a hammer, and recognize when professional help prevents catastrophic errors. For most homeowners, a partial DIY approach delivers the best results: handle demolition and prep yourself, then invest in expert installation for the cupboards themselves. This strategy saves money while ensuring your new kitchen functions safely for decades. Remember the installer’s final warning: “If your hands shake installing a bookshelf, this isn’t the project to start with.” Prioritize precision over speed, and your kitchen cupboards will serve you flawlessly long after the renovation dust settles.


