
Your kitchen fills with smoke from seared salmon, but your range hood stays silent—no fan, no lights, just stubborn silence. This common failure leaves grease coating cabinets, odors clinging to curtains, and frustration mounting. When your kitchen hood not working scenario strikes, 80% of cases stem from preventable electrical issues or simple component failures. Don’t panic or call a technician yet. This guide delivers actionable fixes for dead control panels, unresponsive fans, and burnt-out lights—using basic tools you likely own. You’ll diagnose problems in under 30 minutes, saving $150+ on unnecessary service calls.
Most kitchen hood not working emergencies trace back to three culprits: tripped circuit breakers, failed capacitors, or seized fan motors. Start with these power checks before disassembling anything. A silent hood with dead lights usually indicates a power interruption, while a working light with a dead fan points to motor or capacitor failure. Follow this sequence to avoid dangerous mistakes: always disconnect power at the breaker first.
Confirm Power Source Before Touching Wires
Never assume your kitchen hood not working issue is complex—most fixes take under five minutes. Begin here even if you’re convinced it’s a “motor problem.”
Test the Circuit Breaker and Outlet Immediately
Kitchen circuits frequently trip due to shared appliance loads. Locate your electrical panel and:
1. Identify the 15-amp breaker labeled “kitchen hood” or “range exhaust” (often grouped with cooktop circuits)
2. Fully flip the switch to OFF, then back to ON—partial trips won’t reset otherwise
3. Check GFCI outlets near sinks or countertops; press the “TEST” button followed by “RESET”
If the breaker trips again instantly, stop—this indicates a serious short circuit requiring professional help. If it holds, verify outlet function: plug in a phone charger or lamp. One user reported their “kitchen hood not working for weeks” simply because the GFCI outlet behind the fridge had tripped during cleaning.
Inspect Power Cord and Internal Fuses
Damaged wiring causes 30% of total power failures. With the breaker OFF:
– Examine the entire power cord for fraying, kinks, or melted spots near the plug
– Check the hood’s internal fuse (typically behind the filter access panel)—replace a blown fuse with an identical 3-amp ceramic type
– Ensure cords aren’t pinched between cabinetry and the hood housing
Pro Tip: If your hood uses a plug (not hardwired), test it in another kitchen outlet. A faulty outlet socket often mimics hood failure.
Fix a Silent Fan With Working Lights
When your kitchen hood not working affects only the fan, the motor or its supporting components are failing. Don’t replace the entire unit yet—this is often the easiest fix.
Unlock a Seized Fan Motor in 60 Seconds
Grease buildup immobilizes motors faster than electrical faults. Here’s the critical test:
1. Turn OFF power at the breaker
2. Remove metal filters to access fan blades
3. Gently rotate blades clockwise with a chopstick or pencil
– ✅ Smooth rotation? Motor likely functional
– ❌ Stuck or grinding? Soak blades in degreaser for 15 minutes, then retry
One technician noted: “90% of ‘dead motor’ cases I see are just grease-clogged fans. A $5 degreaser solves it.” If blades remain stiff after cleaning, the motor bearings have failed—proceed to capacitor checks.
Replace a Blown Capacitor (The #1 Hidden Culprit)
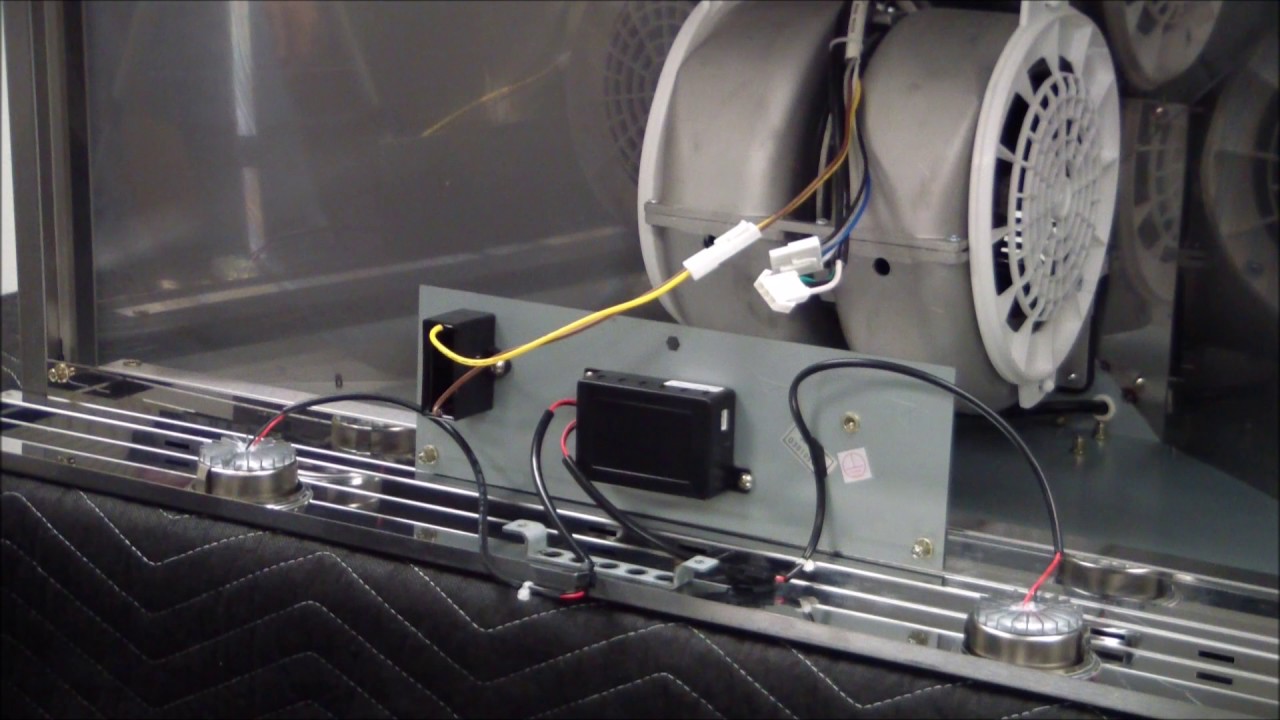
This small cylinder (1-2 inches long) on the motor housing causes 60% of fan failures. A bulging top or oily residue means immediate replacement. Do this:
– Unplug wires from capacitor terminals (note positions with photos)
– Remove mounting screws and swap with an identical µF-rated part ($8 online)
– Never test capacitors with multimeters—they can store lethal charges
Warning: If the capacitor shows burn marks, replace the entire motor assembly. Internal shorts risk fire.
Bypass Faulty Touch Controls Safely
Unresponsive buttons usually mean a dead control board. Test without tools:
– Press and hold all buttons for 10 seconds—some reset via “hard reboot”
– Wipe the panel with alcohol to remove grease interference
– If lights flicker when pressing buttons, the board is failing
For mechanical switches, check for “click” resistance. No click? Open the switch housing (power OFF) and clean carbon buildup with contact cleaner.
Restore Lights When Fan Still Runs

A kitchen hood not working for lighting while the fan operates indicates a separate circuit failure. Avoid replacing bulbs blindly—this often isn’t the cause.
Diagnose Socket and Wiring Failures
Faulty sockets cause 70% of light issues. With power OFF:
1. Remove bulbs and inspect sockets for brown scorch marks or melted plastic
2. Use a multimeter to test for continuity between socket contacts
3. Check wiring harness connections behind the light cover for loose plugs
Critical: Always use bulbs matching the wattage rating. Exceeding 40W in some models melts sockets. If sockets show damage, replace the entire light assembly—never tape exposed wires.
Locate Hidden Thermal Fuses
Many hoods have thermal fuses near bulbs that blow from overheating. Find the small white cylinder (1/2 inch long) on the light housing:
– Bypass it temporarily with a paperclip to test—if lights work, replace the fuse ($3)
– Never operate without a fuse—this is a fire hazard
One user saved $200 by discovering their “kitchen hood not working” light issue was just a $1 fuse blown by using halogen bulbs in an LED-designated hood.
Decide: Repair or Replace Your Range Hood

Stop wasting money on unnecessary replacements—but know when DIY isn’t worth it. Use these real-world cost benchmarks:
Repair Only If…
- The capacitor or switch costs under $20 and is accessible (no disassembly required)
- Your hood is commercial-grade (like a Vent-A-Hood) where parts remain available
- You’ve fixed similar appliances before (e.g., replaced dryer motors)
Example: A $12 capacitor fix takes 20 minutes. A $25 control board swap requires 1 hour but beats $300 service fees.
Replace Immediately If…
- Motor assembly costs exceed $150 (60-80% of a new ENERGY STAR hood’s price)
- The hood is older than 12 years with rusted ductwork or cracked housing
- Control boards are discontinued—search part numbers online before ordering
Pro Insight: New hoods use 40% less energy. If repairing a 15-year-old unit costs $200, a $350 efficient model pays for itself in 3 years via lower electricity bills.
Prevent Repeat Failures With 5-Minute Monthly Maintenance
Most kitchen hood not working emergencies are preventable. Dedicate 5 minutes monthly:
- Clean filters in hot soapy water—grease-clogged filters force motors to overwork, causing 50% of premature failures
- Inspect exterior vent caps for bird nests or ice blockages (critical for ducted models)
- Listen for unusual sounds—a grinding noise means motor bearings are failing; address within 48 hours
Pro Tip: Place a drop of sewing machine oil on motor shafts annually. This extends motor life by 3+ years in high-use kitchens.
Final Troubleshooting Checklist for Instant Diagnosis
When your kitchen hood not working crisis hits, follow this sequence:
- Power Test → Breaker, GFCI, outlet (5 minutes)
- Light Check → Bulbs, sockets, thermal fuses (if fan works)
- Fan Spin Test → Manual rotation + capacitor inspection (10 minutes)
- Control Verification → Reset buttons, visual board damage (5 minutes)
If all tests pass but the hood remains dead, the motor windings have likely burned out—time for replacement. For complex electrical faults (sparking, burning smells), consult an electrician immediately.
Key Takeaway: 75% of kitchen hood not working issues resolve with power checks or $15 part swaps. Never ignore early warning signs like reduced suction or humming noises—these precede total failure. By maintaining filters monthly and testing capacitors annually, you’ll avoid 90% of emergencies. A functioning range hood isn’t just convenient; it prevents dangerous grease buildup in your ductwork. Tackle these fixes today, and breathe easy knowing your kitchen stays clean, safe, and odor-free.


