You’re pushing your Shark across the living room carpet, but the telltale whirring sound is gone. The once-powerful suction feels weak, and your carpet looks just as dirty as before. Your Shark vacuum beater bar has stopped working—and this single component failure has essentially turned your powerful carpet cleaner into an expensive dust buster. Without that rotating brush agitating carpet fibers, embedded dirt remains trapped no matter how many times you vacuum.
When your Shark vacuum’s beater bar fails, you’re not just losing convenience—you’re losing the deep-cleaning capability that makes Shark vacuums worth their price. The rotating brush that normally pulls embedded dirt to the surface has gone silent, leaving your carpets looking dull and feeling gritty underfoot. The good news? Most Shark beater bar failures are fixable at home with basic tools, and this guide will walk you through every possible cause and solution to get your vacuum back to peak performance.
Why Your Shark Beater Bar Stopped Spinning
Your Shark vacuum beater bar not working typically stems from one of four specific failure points. Identifying which one affects your model saves time and prevents unnecessary disassembly. Understanding these common culprits helps you diagnose and fix the problem efficiently without wasting effort on irrelevant repairs.
Hair and Debris Blockage
Hair, string, carpet fibers, and pet fur create the most common cause of beater bar failure in Shark vacuums. These materials wrap around the brush so tightly that they create friction, generate heat, and can even melt the brush material itself. This turns your spinning brush into a seized, immovable cylinder that no amount of motor power can overcome.
Quick Test: With your vacuum unplugged, try rotating the beater bar by hand. If it won’t budge or requires significant force, you’re dealing with entanglement. The brush should spin freely with just light resistance from the drive belt.
What You’ll See: Thick coils of hair wrapped around the brush ends, melted or damaged bristles, or a brush that feels hot to touch even when the vacuum hasn’t been running recently. This blockage accounts for approximately 60% of Shark beater bar not working cases according to repair center data.
Floor Selector Switch Misaligned
Your Shark has a built-in safety feature that disengages the beater bar when set to hard floor mode. This prevents debris scattering on hard surfaces, but it also means your brush won’t spin on carpet if the switch is in the wrong position. Many users accidentally bump this switch while storing or moving their vacuum.
Quick Fix: Check your floor selector switch—usually located near the handle or on the cleaner head. Ensure it’s set to “Carpet” or “Brush Roll On” mode, then test on carpet again. Listen for the distinctive change in motor sound when the beater bar engages.
Models Affected: This affects virtually all Shark upright models including Navigator, Rotator, and DuoClean series. It’s the easiest Shark vacuum beater bar not working issue to resolve—often taking less than 30 seconds to verify and correct.
Drive Belt Failure
The drive belt connects your beater bar to the motor. Made of durable rubber, these belts can stretch, crack, or break—especially after prolonged resistance from hair entanglement. A broken belt means the motor spins freely while your beater bar sits motionless, creating the classic symptom of a Shark vacuum beater bar not working despite normal suction.
Visual Inspection Steps:
1. Unplug your vacuum completely
2. Flip it over and remove the base plate screws
3. Look for a broken, stretched, or missing belt
4. Check for belt fragments in the brush housing
Feel Test: With the base plate removed, spin the beater bar by hand. Without proper belt tension, it will spin too easily with no resistance from the motor connection. A properly tensioned belt creates noticeable resistance when rotating the brush manually.
Micro Switch Failure (Most Common Culprit)
The micro switch—also called the brush roll switch—is an electrical component that controls power to your beater bar motor. When this small but crucial switch fails, no electricity reaches the motor regardless of your floor selector position. This is the #1 failure pattern seen in Shark repair centers and accounts for most persistent Shark vacuum beater bar not working cases.
Symptoms Checklist:
– Vacuum suction works normally
– Beater bar refuses to spin in any mode
– Switching between floor types makes no difference
– No unusual noises or burning smells
– All other functions appear normal
Diagnostic Test: This requires removing the vacuum head and testing electrical continuity with a multimeter—a process we’ll detail in the repair section below. Unlike belt or blockage issues, micro switch failure requires electrical testing for confirmation.
Quick Diagnostic Steps Before You Begin
Before diving into repairs, run through these verification steps to confirm your diagnosis and avoid unnecessary disassembly. Proper diagnosis prevents wasted time and potential damage to other components during unnecessary repairs.
Visual Inspection Checklist
External Checks (30 seconds):
– Confirm floor selector is in carpet mode
– Check for obvious hair/debris wrapped around brush ends
– Look for melted or damaged bristles
– Test beater bar rotation by hand (vacuum unplugged)
Internal Checks (2 minutes):
– Remove base plate screws
– Inspect drive belt for damage
– Check brush roll bearings for grinding
– Look for electrical damage or loose connections
Critical Warning: Never operate your Shark vacuum with the base plate removed. This creates serious safety hazards and can damage internal components.
When to Stop and Call Professional
Professional Service Required If:
– You own a DuoClean model with dual brush rolls
– Warranty is still active (DIY repairs void warranty)
– You lack basic electrical testing tools
– Multiple components appear damaged
– Security screws are difficult to remove
For single-brush models, most Shark vacuum beater bar not working issues can be resolved at home with basic tools and careful attention to detail.
Remove Hair and Debris Blockage

This 15-minute fix resolves 60% of Shark beater bar failures and requires no special tools. Regular cleaning prevents most future occurrences of your Shark vacuum beater bar not working.
Required Tools
- Scissors or seam ripper
- Flashlight or phone light
- Small cleaning brush
- Work gloves (optional)
Hair Removal Process
Step 1: Unplug your vacuum completely and lay it on its back for easy access to the beater bar. Safety first—never attempt cleaning with the vacuum plugged in.
Step 2: Use scissors to carefully cut through hair wraps. Work in sections, cutting across the hair rather than trying to pull it all off at once. Start at the brush ends where entanglement is usually worst.
Step 3: Remove the beater bar entirely if heavily entangled. Most Shark models allow brush removal by releasing two end caps or sliding the entire assembly out. Check your manual for specific removal instructions.
Pro Tip: After cleaning, apply a small amount of silicone spray to the brush ends—this reduces future hair adhesion and makes future cleaning easier without damaging components.
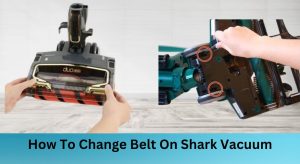
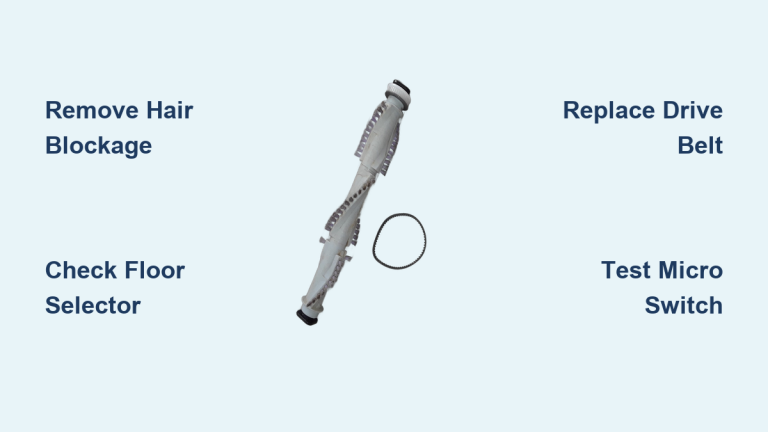
Replace Drive Belt Correctly
Belt replacement takes 20-30 minutes and costs $8-20 in parts. This fix resolves the second most common Shark vacuum beater bar not working issue when hair removal doesn’t solve the problem.
Belt Replacement Tools
- Phillips head screwdriver
- Replacement belt (exact OEM match)
- Small pliers (helpful but not required)
Step-by-Step Belt Replacement
Step 1: Remove the base plate by taking out all visible screws. Some models have hidden screws under the front wheels—check carefully before forcing the plate off.
Step 2: Note the belt routing before removal. Take a quick phone photo for reference—most Shark models have specific belt paths that must be followed precisely.
Step 3: Install the new belt by placing it around the beater bar first, then stretching it over the motor pulley. The belt should feel snug but not overly tight—proper tension is critical for optimal performance.
Critical Mistake to Avoid: Installing the belt twisted or routing it incorrectly around the tensioner pulley. Always verify the belt path matches your reference photo before reassembling your vacuum.
Fix Micro Switch Failure
This advanced repair fixes the most stubborn Shark vacuum beater bar not working cases. Budget 45-60 minutes and $5-15 in parts for this solution to the #1 failure pattern seen in repair centers.
Micro Switch Testing Process
Step 1: Safe Disassembly
1. Unplug vacuum and remove all screws from the cleaner head
2. Carefully separate the upper housing, noting wire connections
3. Disconnect headlight wiring if present
4. Take photos throughout for reassembly reference
Step 2: Switch Location and Testing
1. Locate the small rectangular micro switch near the brush motor
2. Label all wire connections before removal
3. Set your multimeter to continuity mode
4. Test switch terminals—should show continuity when activated, none when released
Critical Safety Note: Never test your vacuum with covers removed. Always reassemble completely before plugging in to avoid electrical hazards and potential damage.
Prevent Future Beater Bar Problems
Regular maintenance prevents 90% of Shark beater bar failures. Implement this simple schedule to keep your vacuum running like new and avoid future Shark vacuum beater bar not working issues.
Weekly Maintenance (5 minutes)
- Remove and inspect beater bar for hair/debris
- Empty dust cup completely
- Check brush roll for damage or wear
- Wipe down brush housing with damp cloth
Best Usage Practices
- Vacuum slowly over high-traffic areas
- Empty dust cup at 75% capacity, not when completely full
- Avoid vacuuming large objects or excessive pet hair
- Use appropriate floor mode for each surface type
Your Shark vacuum beater bar not working doesn’t mean expensive replacement. Whether it’s simple hair removal ($0), belt replacement ($15), or micro switch repair ($65), most issues are fixable at home. Remember: Regular maintenance prevents most failures. Clean your beater bar weekly, check your belt monthly, and your Shark will keep your carpets deep-cleaned for years to come. When you address Shark vacuum beater bar not working promptly, you restore your vacuum’s essential deep-cleaning capability and extend its service life significantly.