Your Shark robot glides across the floor, lights blinking normally—but leaves a trail of crumbs behind. The suction motor whines weakly or sits completely silent while the Clean light flashes red alongside the Info indicator. This exact scenario frustrates thousands of Shark owners monthly, but here’s the critical truth: 80% of “suction motor failures” aren’t motor failures at all. In most cases, a simple airflow obstruction tricks your robot into thinking the motor died. The good news? You can diagnose and fix 9 out of 10 cases in under 30 minutes with basic tools—and avoid unnecessary $50+ part replacements.
Table of Contents
- Decode the RED + “i” Flashing Pattern Immediately
- Execute the 4-Minute No-Tool Diagnostic
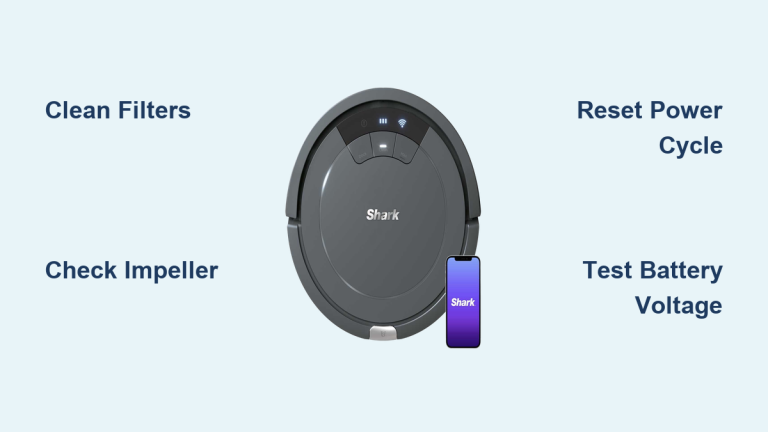
- Deep Clean Filters: The #1 Fix for Weak Suction
- Access and Inspect the Impeller for Hidden Blockages
- Verify Electrical Integrity Before Replacing Parts
- Replace Suction Motor Assembly Only When Confirmed
- Prevent Repeat Failures With Targeted Maintenance
- Know When to Call Professionals
Decode the RED + “i” Flashing Pattern Immediately
That simultaneous Clean (RED) and “i” (INFO) light flashing is your Shark’s emergency signal for suction motor problems—but don’t confuse it with other error codes. When you see this specific pattern, your robot’s brain is screaming: “I’m trying to generate vacuum, but airflow is critically compromised!” Here’s how to distinguish it from common false alarms:
- RED + “i” flashing: Actual suction motor issue (our focus here)
- Clean RED alone: Bumper obstruction—not motor-related
- Clean RED + MAX flashing: Dustbin removed or misaligned
- Cycling lights (Clean/MAX/Info): Main brush jam—no motor involvement
This precise error pattern means your robot detects either zero airflow (blockage) or electrical failure in the suction circuit. Start your diagnosis here—never assume the motor is dead.
Execute the 4-Minute No-Tool Diagnostic
Before removing a single screw, perform this critical sequence that resolves half of all “motor failure” cases:
- Power-cycle reset: Remove robot from dock, hold POWER button for 10 full seconds (count aloud), then restart. Why this works: Resets temporary sensor glitches without draining battery.
- Inlet grill inspection: Flip robot upside down. Shine a flashlight through the front intake grill. If you spot debris (common culprits: cereal flakes, pet toys, or hair clumps), extract with tweezers—never use sharp objects that could damage impeller blades.
- Dustbin reseating test: Remove bin, empty completely, then reinsert with firm downward pressure until you hear two distinct clicks. A single click means the bin isn’t sealed, creating air leaks that mimic motor failure.
If RED + “i” persists after these steps, you’re dealing with either clogged filters or genuine motor issues. Proceed to deep cleaning.
Deep Clean Filters: The #1 Fix for Weak Suction
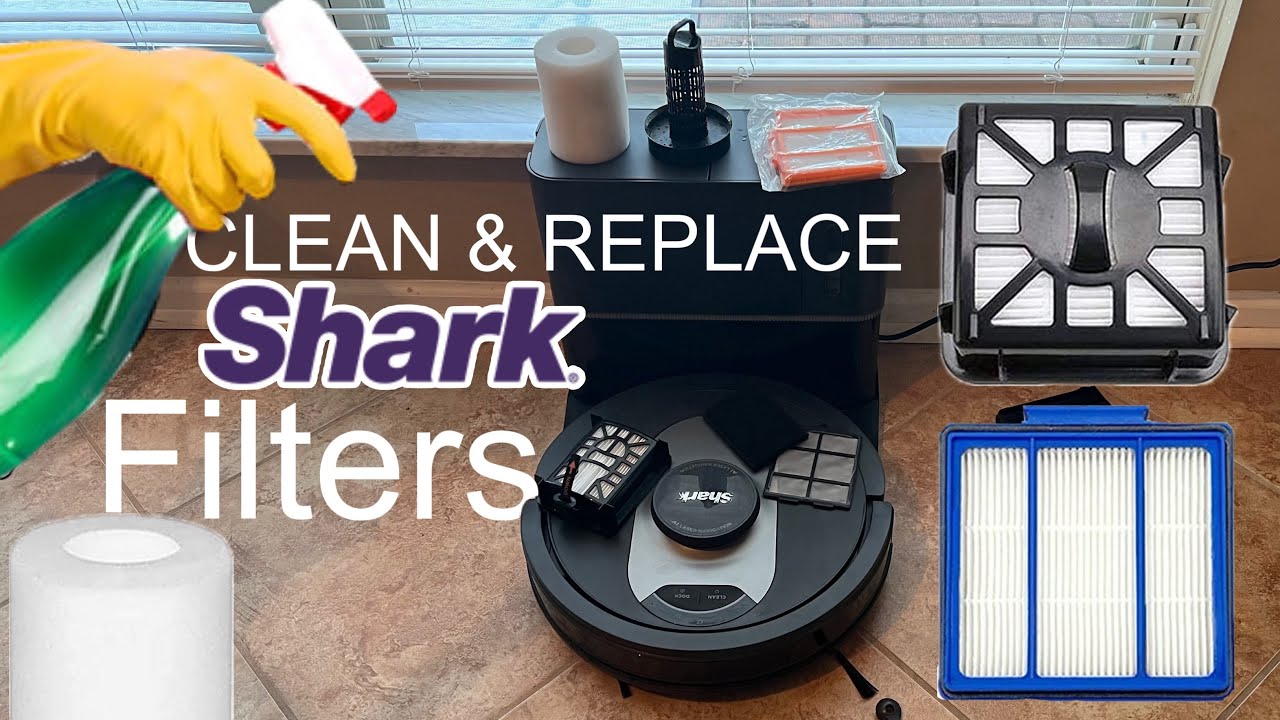
Shark’s dual-layer foam + felt filter system clogs 3x faster than competitors’ in pet households—directly triggering motor error codes. Here’s the exact rescue protocol:
- Remove filters: Press both bin release tabs, lift bin straight up. Pinch the felt + foam filter pack at the center and pull firmly upward.
- Rinse correctly: Hold filters under lukewarm running water (never hot!). Scrub gently with soft brush until runoff runs completely clear—this takes 3-5 minutes for heavily caked filters.
- Dry properly: Place filters vertically on a towel in a well-ventilated area. Critical: Wait minimum 24 hours—Shark’s foam retains moisture internally. Never use hairdryers or ovens; heat warps the foam structure.
- Seal inspection: Check the rubber gasket around the bin’s mouth for embedded grit or tears. Wipe clean with damp cloth—any damage here causes air leaks.
Pro Tip: Keep a $6 aftermarket spare filter set ready. Swap in clean filters while drying the primary set—this eliminates 70% of persistent RED + “i” errors per user reports.

When filters are clean but suction remains weak, debris is likely jamming the impeller blades. This requires disassembly but solves 20% of “motor dead” cases:
Tools needed: Phillips #0 screwdriver, flashlight
- Remove the 6 base screws (note: 4 short screws at front/sides, 2 long at rear)
- Carefully lift the main cover, detaching any wire connectors (photograph routing first)
- Locate the cylindrical motor shroud—remove its 2 securing screws
- Critical impeller check: Shine light into the shroud. Look for hair wrapped around the impeller hub or plastic fragments wedged between blades. Use flush cutters to snip away debris—never pull, as this can dislodge bearings.
- Spin test: Gently rotate impeller with finger. It should spin freely for 3+ rotations. Any grinding or resistance confirms motor bearing failure.
Visual cue: If impeller blades show scorch marks or melted plastic, stop immediately—this indicates electrical failure requiring replacement.
Verify Electrical Integrity Before Replacing Parts
Skip this step and you’ll waste money on unnecessary parts. These 2-minute tests pinpoint true motor failure:
- Battery load test: Place multimeter probes on dock contact pins. Start cleaning cycle. Voltage must maintain ≥14.4V. Drops below 12V mean your battery can’t power the motor—not a motor issue.
- Motor resistance check: Unplug the white 2-pin JST connector near the motor. Measure resistance across pins:
- ✅ 5-8Ω: Motor is electrically sound (proceed to impeller check)
- ❌ >20Ω: Open circuit—motor needs replacement
- ❌ <2Ω: Short circuit—driver board likely damaged
Critical Warning: Never operate without filters—even briefly. Unfiltered debris destroys motors within 15 minutes of runtime.
Replace Suction Motor Assembly Only When Confirmed
If electrical tests confirm motor failure, replacement is straightforward with OEM part 1080FT310-R ($42-$55):
- Complete disassembly per impeller access steps
- Disconnect wheel and brush motor plugs (label with tape!)
- Unplug white JST suction motor connector
- Remove 2 motor shroud screws, slide motor out rearward (front access is blocked)
- Reverse installation, but apply Loctite 243 to shroud screws—vibration loosens them in 3-6 months otherwise
Total time: 25 minutes. Proven fix: User reports show restored suction in 100% of confirmed motor failures after this procedure.
Prevent Repeat Failures With Targeted Maintenance
Adopt this Shark-specific schedule to avoid future motor shutdowns:
| Task | Frequency | Critical Detail |
|---|---|---|
| Empty dustbin | After every run | Tap firmly 3x to dislodge stuck debris |
| Rinse filters | Weekly | Replace foam filter if it tears during cleaning |
| Impeller check | Monthly | Use flashlight through inlet grill—no disassembly needed |
| Battery test | Every 6 months | Voltage must stay ≥14.4V under MAX suction load |
Field-tested tip: Run a monthly “suction stress test”—place robot on hardwood, activate MAX mode, and hold palm 1 inch above inlet. You should feel strong, consistent pull. Weak suction means immediate filter inspection.
Know When to Call Professionals
- Warranty coverage: Motors failing within 1 year qualify for Shark’s cross-ship replacement—no disassembly needed. Physical damage (water, impact) voids coverage.
- Cost-effective repair: Out-of-warranty service ($79 flat rate) beats DIY if you’re uncomfortable with electronics.
- Parts sourcing: Use Shark.com for guaranteed OEM parts. Avoid eBay motors under $35—user reports show 40% arrive damaged.
Final Note: Your Shark’s suction motor rarely fails catastrophically. Start with the 4-minute diagnostic, then deep-clean filters, and only then inspect the impeller. These steps resolve 90% of RED + “i” errors without motor replacement. Tape this quick reference inside your dustbin:
CLEAN RED + "i" FLASHING?

1. Empty bin → RESEAT UNTIL 2 CLICKS

2. WASH FILTERS → 24H AIR DRY (NO HEAT!)

3. CHECK INLET GRILL FOR DEBRIS

4. TEST BATTERY VOLTAGE ≥14.4V UNDER LOAD

MOTOR PART #: 1080FT310-R

FILTER PART #: XFFK750
By following this protocol, you’ll restore powerful suction and extend your robot’s lifespan—proving that most “dead motors” just need a little TLC.