Is your Shark Navigator vacuum suddenly slacking on the job? If it’s not picking up dirt like it used to, or you’re hearing strange noises (or worse, catching a whiff of something burning), it might be time to give your vacuum a little TLC. Specifically, the brush belt could be the culprit. A worn-out brush belt can drag down your vacuum’s performance and even cause damage if ignored. But don’t worry—replacing it is easier than you might think. With a few tools and a bit of patience, you can have your Shark Navigator running like new again. Let’s dive in!
Is It Really the Brush Belt? Let’s Check First

Before you start disassembling your vacuum, it’s worth confirming whether the brush belt is actually the issue. Here’s how to troubleshoot:
Signs of a Worn-Out Brush Belt
- Reduced Suction: If your vacuum isn’t picking up debris as well as it used to, the belt might be slipping or broken.
- Unusual Noises: Grinding or squealing sounds can indicate a belt that’s on its last leg.
- Burning Smell: This is a red flag that the belt is overheating due to friction.
How to Inspect the Belt
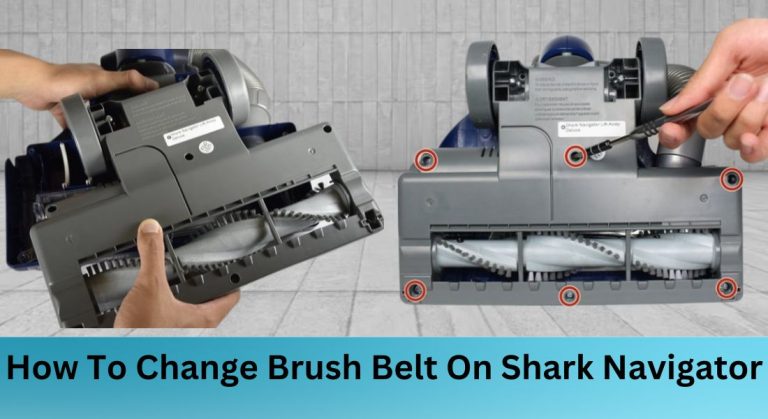
To get a good look at the belt, you’ll need to remove the bottom plate of your vacuum. Here’s how:
1. Lay the vacuum on its side and locate the roller brush underneath.
2. Use a metal spudger (or a flathead screwdriver in a pinch) to pop out the wheels on both sides.
3. Remove the screws holding the bottom plate in place.
4. Once the plate is off, inspect the belt for cracks, frays, or missing teeth. If it looks damaged, it’s time for a replacement.
What You’ll Need to Get Started

Before you start the replacement process, gather these tools and parts:
– Metal spudger or flathead screwdriver
– Phillips #1 screwdriver
– iFixit opening tool (or another plastic prying tool)
– Compatible replacement belt (check your Shark Navigator model to ensure the right fit)
Pro tip: If you’re not sure which belt to buy, consult your user manual or reach out to Shark’s customer support. Using the wrong belt can lead to poor performance or even damage.
Step-by-Step: Replacing the Brush Belt
Now that you’ve confirmed the belt is the issue and have your tools ready, let’s get to work. Here’s how to replace the brush belt on your Shark Navigator:
Removing the Old Belt
- Locate the Roller Brush: Lay the vacuum down and identify the roller brush underneath.
- Pop Out the Wheels: Use the metal spudger to remove the wheels on both sides of the vacuum.
- Remove the Screws: Take out the screws holding the bottom plate in place. The number of screws may vary depending on your model.
- Separate the Vacuum Body: Loosen the blue fulcrum to separate the bottom and main body of the vacuum.
- Access the Roller Brush: Use the plastic opening tool to carefully separate the blue and dark grey plastic frames enclosing the roller brush.
- Remove the Grey Frame: Take off the grey frame from the bottom of the vacuum and place it on a flat surface.
- Take Off the Old Belt: Lift the roller brush and remove one side of the black roller brush belt. Slide the belt off the motor.
Installing the New Belt
- Position the New Belt: Place the replacement belt over the motor and roller brush pulleys, making sure it’s not twisted.
- Align the Belt: Ensure the belt is properly seated and aligned to prevent slipping or damage during operation.
Putting It All Back Together
Once the new belt is in place, it’s time to reassemble your vacuum. Here’s how:
Reassembling the Vacuum
- Reattach the Grey Frame: Place the grey frame back onto the bottom of the vacuum.
- Secure the Wheels: Pop the wheels back into place and tighten any screws you removed earlier.
- Reconnect the Vacuum Body: Reattach the bottom and main body of the vacuum, ensuring all components are securely in place.
Testing Your Handiwork
- Plug It In and Test: Turn on the vacuum to ensure the new belt is functioning correctly.
- Listen for Issues: Make sure there are no unusual noises and that the brush roll is spinning smoothly.
- Double-Check Everything: Give all screws and components a final once-over to ensure everything is securely fastened.
Keep Your Shark Navigator Running Smoothly
Replacing the brush belt on your Shark Navigator is a quick and easy way to restore its suction power and keep it running efficiently. Regular maintenance, like checking and replacing worn-out parts, can significantly extend the life of your vacuum. Plus, you’ll save money by avoiding costly repairs or replacements down the line.
Remember, always consult your user manual for model-specific instructions and follow safety precautions when working with your vacuum. With a little effort, you’ll have your Shark Navigator back to its dirt-busting best in no time!