
Is your Shark RV1001AE robot vacuum not holding a charge like it used to? A degraded battery can significantly impact its cleaning performance and runtime. Fortunately, replacing the battery is a straightforward process you can do yourself, saving you the cost of professional repair. This guide provides a detailed, step-by-step approach to safely and effectively change the battery on your Shark RV1001AE, extending the life of your robotic cleaning companion.
This article will cover everything you need to know, from gathering the necessary tools to performing the replacement and troubleshooting common issues. By following these instructions, you’ll be able to restore your Shark RV1001AE to its peak cleaning performance in no time. Let’s get started!
What You’ll Need
Before you begin, gather the following tools and materials:
- New Shark RV1001AE replacement battery: Ensure you purchase a compatible battery specifically designed for the RV1001AE model.
- Phillips head screwdriver: A standard Phillips head screwdriver will be needed to remove screws.
- Small flathead screwdriver or plastic opening tool (optional): This may be helpful for gently prying open the battery compartment if needed.
- Clean workspace: A well-lit area with enough room to work comfortably.
Step-by-Step Battery Replacement Guide
Follow these steps to safely and effectively replace the battery in your Shark RV1001AE:
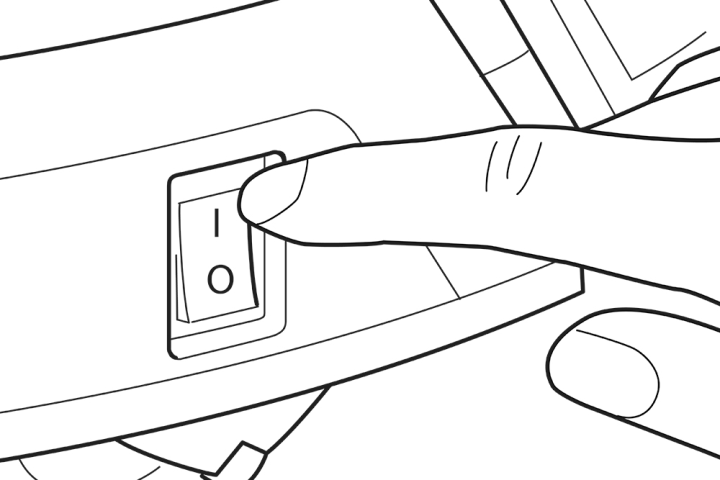
- Power Off the Robot Vacuum: Before you begin any maintenance, ensure the robot vacuum is completely powered off. There should be a power switch on the side of the unit.
- Locate the Battery Compartment: Turn the Shark RV1001AE over so the bottom is facing up. The battery compartment is typically located on the underside and secured with screws.
- Remove the Screws: Use the Phillips head screwdriver to remove all the screws securing the battery compartment cover. Keep the screws in a safe place to prevent losing them.
- Open the Battery Compartment: Once the screws are removed, carefully detach the battery compartment cover. If the cover is stuck, use a small flathead screwdriver or plastic opening tool to gently pry it open.
- Disconnect the Old Battery: Inside the compartment, you’ll see the old battery connected to the robot vacuum via a connector. Gently disconnect the connector, being careful not to pull on the wires. Take note of the battery’s orientation before disconnecting it.
- Remove the Old Battery: Carefully remove the old battery from the compartment.
- Install the New Battery: Place the new battery into the compartment, ensuring it’s oriented correctly, matching the way the old battery was positioned.
- Connect the New Battery: Connect the new battery to the robot vacuum by attaching the connector securely.
- Replace the Battery Compartment Cover: Place the battery compartment cover back on and align it with the screw holes.
- Secure the Cover with Screws: Use the Phillips head screwdriver to re-install all the screws you removed earlier, tightening them until the cover is secure.
- Power On and Test: Turn the robot vacuum back over, power it on, and allow it to charge. Monitor the charging process to ensure the new battery is charging correctly. Let the robot fully charge, and then start a cleaning cycle to ensure that the new battery runs as expected.
Troubleshooting Common Issues
- Robot Vacuum Not Charging:
- Solution: Double-check the battery connection to ensure it is secure. Make sure the charging base is properly connected to a power outlet and the robot is correctly docked. Try cleaning the charging contacts on both the robot and the base.
- Robot Vacuum Still Has Short Run Time:
- Solution: Ensure the new battery is fully charged before use. Check that the vacuum’s filters and brushes are clean, as these can affect performance. If problems persist, the battery might be faulty.
- Battery Compartment Cover Difficult to Open:
- Solution: Use a small flathead screwdriver or plastic opening tool to gently pry around the edges of the cover. Be careful not to apply too much force, which can damage the cover or the robot vacuum.
- Robot Vacuum Not Turning On After Battery Replacement:
- Solution: Double-check that the battery connector is securely attached. Also, ensure that the power switch is in the “On” position and the battery has had sufficient time to charge.
Tips, Warnings, and Best Practices
- Use only compatible batteries: Using non-compatible batteries can damage your Shark RV1001AE and void the warranty.
- Dispose of old batteries properly: Recycle old batteries according to local regulations. Do not dispose of them in regular trash.
- Fully charge the new battery: Before using the robot vacuum for the first time with the new battery, allow it to charge completely.
- Keep the charging contacts clean: Regularly clean the charging contacts on the robot and the charging base to ensure efficient charging.
- Store in a cool, dry place: When not in use for extended periods, store the robot vacuum in a cool, dry place to prolong battery life.
FAQ Section
How often should I replace the battery on my Shark RV1001AE?
The lifespan of a robot vacuum battery typically ranges from 12 to 18 months, depending on usage frequency and charging habits. If you notice a significant decrease in runtime or cleaning performance, it’s likely time for a replacement.
Can I use a higher capacity battery in my Shark RV1001AE for longer runtimes?
While it might seem tempting to use a higher capacity battery, it’s crucial to use a battery specifically designed for the RV1001AE model. Using an incompatible battery can damage the robot vacuum’s charging system and void the warranty.
What do I do if the robot vacuum still doesn’t work after replacing the battery?
First, ensure that the battery is fully charged and correctly connected. If the issue persists, there may be other underlying problems with the robot vacuum. In such cases, consult the Shark customer support or consider professional repair services.
Where can I purchase a replacement battery for my Shark RV1001AE?
You can purchase replacement batteries from various online retailers such as Amazon, eBay, or directly from the Shark official website. Make sure to buy from a reputable source to ensure you’re getting a genuine and compatible battery.
Is it difficult to change the battery on the Shark RV1001AE?
No, changing the battery is generally a straightforward process that can be done with basic tools like a Phillips head screwdriver. Following the steps outlined in this guide should make the process easy and manageable for most users.
How long does it take to fully charge the new battery after replacement?
The charging time for a new battery can vary, but it typically takes between 3 to 5 hours to fully charge. Refer to the battery’s specifications or the robot vacuum’s manual for specific charging time recommendations.
Conclusion
Replacing the battery on your Shark RV1001AE robot vacuum is a simple way to revitalize its cleaning performance and extend its lifespan. By following the detailed steps outlined in this guide, you can confidently replace the battery yourself, saving time and money. Remember to use a compatible battery, take necessary safety precautions, and follow best practices for optimal results. With a new battery, your Shark RV1001AE will be back to efficiently keeping your floors clean. Don’t wait, give your Shark RV1001AE a new lease on life today by replacing its battery and enjoying a cleaner home!


